Hair Care
How to Paint a Farmhouse Staircase With Chalk Paint DIY
Jun
A farmhouse staircase has one very important job: getting everyone safely from one floor to another while quietly judging the rest of the entryway. If your stairs are scuffed, dated, orangey-oak, carpet-shadowed, or simply giving “1998 builder special,” chalk paint can help turn them into a charming focal point without requiring a full renovation or a second mortgage.
This guide walks you through how to paint a farmhouse staircase with chalk paint DIY style, including prep, product choices, color ideas, sealing, safety, and the real-life “oops, the dog stepped on step seven” lessons nobody puts on the paint can. Chalk paint is loved for its matte, velvety finish and vintage character, but stairs are a high-traffic surface, so this project needs more planning than painting a cute side table you found on Facebook Marketplace.
The goal is simple: a staircase that looks warm, rustic, clean, and intentionally farmhousenot like you panic-painted it during a long weekend and hoped gravity would handle the details.
Why Chalk Paint Works for a Farmhouse Staircase
Chalk paint has become a DIY favorite because it creates a soft matte finish that looks aged, relaxed, and handmade. That makes it a natural fit for farmhouse interiors, where the best design elements feel collected over time rather than purchased in one terrifying receipt.
On a staircase, chalk paint can be especially useful for risers, balusters, newel posts, trim, and decorative details. It adheres well to many clean surfaces, covers old finishes beautifully, and can be lightly distressed for that “old farmhouse, but with Wi-Fi” look. The finish also pairs nicely with wood tones, black metal, vintage runners, woven baskets, shiplap walls, and neutral paint palettes.
However, stair treadsthe part your feet actually step onneed special attention. Chalk paint alone is not tough enough for daily foot traffic. If you use chalk paint on treads, it must be sealed with a durable, floor-rated protective topcoat. In busy homes with kids, pets, shoes, muddy boots, or relatives who refuse to remove their sneakers, you may want to use chalk paint on the risers and a porch-and-floor enamel or stain on the treads.
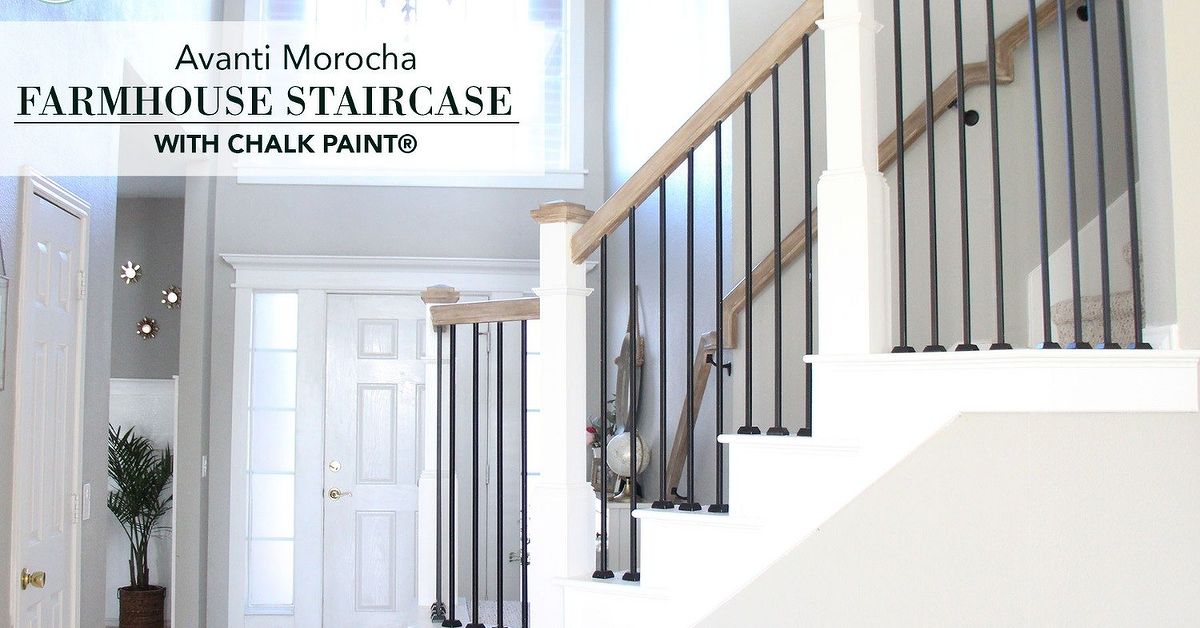
Best Farmhouse Staircase Paint Ideas
Before opening the paint can, choose a color plan. A farmhouse staircase usually looks best when it feels simple, warm, and slightly imperfect in a tasteful way. Think “restored country home,” not “haunted barn, but make it beige.”
Classic White Risers and Wood Treads
This is the most timeless farmhouse staircase combination. Paint the risers in a warm white chalk paint and leave the treads stained or sealed wood. It brightens the stairwell while keeping the natural texture of wood visible.
Black Treads and White Risers
For a modern farmhouse look, pair soft white risers with matte black or charcoal treads. This creates contrast and looks crisp with black railings, lantern-style lighting, and neutral walls.
Soft Gray or Greige Staircase
Gray, greige, mushroom, and warm taupe chalk paint shades work beautifully when you want subtle character. These colors hide dust better than bright white and still feel calm and rustic.
Distressed Farmhouse Finish
A lightly distressed finish works best on risers, spindles, and railings. Sand the edges gently after painting to reveal a bit of the original wood or base color underneath. The trick is restraint. Distressing should look like decades of gentle use, not like the stairs got into a fight with a cheese grater.
Tools and Materials You’ll Need
Gather everything before you start. Stairs are not the place to discover your roller tray is missing and your only brush has become a fossil.
- Chalk paint suitable for interior wood surfaces
- Floor-rated clear topcoat, water-based polyurethane, or chalk paint lacquer
- Degreasing cleaner or mild detergent
- Painter’s tape
- Drop cloths or rosin paper
- Fine-grit sanding sponge, usually 180 to 220 grit
- Wood filler for nail holes, cracks, or dents
- Putty knife
- Quality angled brush
- Small foam roller or microfiber roller
- Tack cloth or damp microfiber cloth
- Primer or stain-blocking primer if needed
- Optional stencil for risers
- Optional anti-slip additive for the final topcoat
- Knee pads, because stairs have no mercy
Step 1: Inspect the Staircase
Start by checking the condition of your stairs. Look for loose treads, squeaks, cracked risers, splintering edges, peeling paint, waxy buildup, carpet staple holes, and mystery stains from a past life. Paint can make stairs beautiful, but it cannot repair structural problems. If a tread moves underfoot, fix that first.
Also decide what parts you are painting. Many DIYers paint only the risers and side trim with chalk paint, then stain or seal the treads. Others paint the entire staircase. If your stairs are the main route in your home, plan the project in sections so you are not trapped upstairs like a Victorian ghost.
Step 2: Clean Like You Mean It
Chalk paint has a reputation for needing very little prep, but staircases are different. Stairs collect dust, oils, floor cleaner residue, pet hair, shoe grime, and tiny crumbs that somehow survive every vacuuming session. If you paint over grime, the finish may peel, chip, or cure unevenly.
Clean every surface with a mild degreasing cleaner or warm water with a small amount of dish soap. Wipe again with clean water to remove residue, then let the staircase dry completely. Pay extra attention to corners, edges, and the area where the riser meets the tread. That little seam is basically a dust retirement community.
Step 3: Sand Glossy Surfaces
Even if your chalk paint says “no sanding required,” glossy stairs should be scuff-sanded. You do not need to remove the old finish completely. The goal is to dull the shine so the paint has something to grip. Use a fine-grit sanding sponge and sand lightly in the direction of the wood grain.
After sanding, vacuum thoroughly and wipe with a tack cloth or damp microfiber cloth. Dust left behind will create bumps in the finish, and once sealed, those bumps become permanent little monuments to impatience.
Step 4: Fill Holes and Repair Damage
Use wood filler on nail holes, staple marks, dents, and cracks. Let it dry according to the product instructions, then sand smooth. If you removed carpet, you may find rows of staple holes along the edges. Fill them carefully, because paint will highlight those tiny craters like stage lighting on bad decisions.
If there are gaps between the wall and stair trim, use paintable caulk. Do not caulk gaps between tread boards that need natural movement unless appropriate for your staircase construction. When in doubt, keep repairs flexible and avoid trapping moisture.
Step 5: Tape and Protect the Area
Use painter’s tape along walls, baseboards, trim, and any areas you do not want painted. Press the tape edges firmly to prevent bleeding. Cover floors at the top and bottom of the staircase with drop cloths or rosin paper.
If you are painting risers but not treads, tape the tread edges carefully. For crisp farmhouse-style risers, patience with tape is worth it. Sloppy lines can make a staircase look rushed even if the color is perfect.
Step 6: Prime When Necessary
Many chalk paints adhere well without primer, but primer is still useful in certain situations. Use a stain-blocking primer if your stairs are made from tannin-rich wood, if you see water stains, if the previous finish is dark red or orange, or if old knots keep bleeding through. Primer is also smart when painting over glossy polyurethane, unknown old paint, or patched areas.
For farmhouse white risers, primer can save you from applying five coats of chalk paint while questioning your life choices. A good primer creates a more even base and improves durability.
Step 7: Apply the First Coat of Chalk Paint
Stir the chalk paint thoroughly before applying. Chalk paint is thicker than standard wall paint, and the ingredients can settle. Use an angled brush for corners and edges, then a small roller for flat areas. Apply thin coats rather than one thick coat. Thick paint can show brush marks, take longer to dry, and chip more easily.
For risers, brush around the edges first, then roll the center. For spindles and railings, work in small sections and watch for drips. Chalk paint dries quickly, so avoid overworking it once it begins to set. If brush marks appear, do not panic. Some texture can actually enhance the farmhouse look, as long as it feels intentional.
Step 8: Add a Second Coat
Most staircases need two coats of chalk paint for solid coverage. Dark colors over light surfaces may cover faster, while whites and creams over dark wood may need an extra coat. Let each coat dry fully before adding the next.
Lightly sand between coats if you want a smoother finish. Use a fine sanding sponge and barely kiss the surface. You are not trying to start over; you are just removing raised grain or tiny imperfections.
Step 9: Create a Farmhouse Distressed Look
Distressing is optional, but it can give your staircase character. Once the final paint coat is dry, lightly sand edges, corners, and raised details where natural wear would happen over time. Focus on the sides of risers, the edges of newel posts, and decorative trim.
Avoid heavy distressing on stair treads. Foot traffic will create natural wear soon enough, and it does not need your enthusiastic help. For a more layered look, paint a darker base coat first, then a lighter top coat, and sand gently to reveal the darker shade underneath.
Step 10: Seal the Chalk Paint Properly
This is the step that determines whether your staircase stays beautiful or becomes a cautionary tale. Chalk paint must be sealed, especially on stairs. Wax can be lovely on furniture, but it is usually not the best choice for stair treads because it can become slippery and may not stand up to heavy foot traffic. For stairs, choose a durable clear topcoat designed for floors or high-traffic surfaces.
Apply the topcoat in thin, even layers with a high-quality brush or applicator. Follow the manufacturer’s drying and recoat times. For treads, use multiple coats and allow proper curing before normal use. Dry to the touch does not mean fully cured. Paint can feel dry but still be soft underneath, just like a cookie that looked ready but collapsed emotionally in the middle.
If safety is a concern, add a clear anti-slip additive to the final coat or use a stair runner. Painted stairs can be slick, especially in socks. A beautiful staircase should not double as an indoor slide.
Step 11: Let the Finish Cure
After the final topcoat, allow the stairs to cure as long as the product recommends. During the first few days, avoid shoes, dragging laundry baskets, pet claws, and anything with sharp edges. If your staircase is the only route between floors, paint alternating steps first so you can still use the stairs carefully. Once those steps cure, paint the remaining ones.
For homes with children or pets, consider blocking access temporarily. A curious dog can add paw-print texture faster than any specialty brush, and while that may be “custom,” it is not always the custom you wanted.
Farmhouse Staircase Design Details That Make a Big Difference
The paint is the star, but the supporting details help the whole staircase feel finished. A painted farmhouse staircase pairs beautifully with matte black hooks, a vintage-style pendant light, woven baskets, framed botanical prints, or a simple jute runner. If your entryway has shiplap, board-and-batten, or beadboard, keep the stair colors calm so the textures do not compete.
For a cozy look, use warm whites instead of bright blue-white paint. For a bold modern farmhouse style, pair black treads with creamy risers and a natural wood handrail. For a cottage farmhouse look, try muted sage, dusty blue, or soft gray on the risers.
Common Mistakes to Avoid
Skipping the Cleaning Step
Paint does not bond well to dust, grease, or old cleaning products. Cleaning is boring, yes, but peeling stairs are more boring and much more annoying.
Using Chalk Paint on Treads Without a Durable Topcoat
Chalk paint needs protection. On stair treads, always use a tough, compatible sealer. Check the paint label because some decorative chalk paints are not recommended for floors.
Painting Too Thickly
Several thin coats are better than one heavy coat. Thick coats can chip, streak, or dry unevenly.
Ignoring Slip Resistance
Matte does not automatically mean grippy. Consider anti-slip additives, runners, or textured finishes for safety.
Rushing the Cure Time
A finish can be dry enough to touch but not hard enough for normal traffic. Give the topcoat time to cure before letting the staircase return to full family chaos.
How to Maintain a Chalk-Painted Farmhouse Staircase
Once your staircase is painted and sealed, maintenance is simple. Sweep or vacuum regularly to remove grit that can scratch the finish. Clean with a damp cloth and a mild cleaner when needed. Avoid harsh chemicals unless your topcoat specifically allows them.
Keep a small amount of leftover paint and topcoat for touch-ups. Painted stairs are hardworking surfaces, and a little wear is normal. In fact, a few soft signs of use can add farmhouse charm. The trick is knowing the difference between charming patina and “someone dropped a toolbox down the stairs.”
Real DIY Experience: What Painting a Farmhouse Staircase Actually Teaches You
Painting a farmhouse staircase with chalk paint is one of those DIY projects that looks simple online and then immediately develops side quests. You begin with a sweet vision of white risers, rustic charm, and maybe a cup of coffee nearby. Twenty minutes later, you are crouched on step four wondering how one staircase collected enough dust to qualify as an archaeological site.
The first big lesson is that prep is not optional. Chalk paint is forgiving, but stairs are not. Every bump, staple hole, glossy patch, and crumb has a way of announcing itself once paint goes on. The best results come from slowing down before the fun part. Clean twice. Sand lightly. Fill holes. Tape carefully. It feels like overkill until the first coat goes on smoothly and you suddenly feel like a home improvement genius.
The second lesson is to test your color in the actual stairwell. Farmhouse white can look creamy and soft in the paint store, then turn icy under cool LED lighting. Black can look elegant in photos but show every golden retriever hair in real life. Greige can be perfect in the morning and oddly muddy by evening. Paint a sample on a riser or scrap board and check it at different times of day. Your staircase lighting has opinions, and it will share them.
The third lesson is that traffic planning matters. If you paint every step at once, you may trap yourself on one floor like a character in a very low-budget renovation drama. Painting alternating steps is a practical solution. Mark the usable steps with painter’s tape or sticky notes so nobody forgets. This is especially important in homes where children, pets, or sleepy adults use the stairs before coffee.
Another practical experience: choose your brush wisely. Cheap brushes leave bristles behind, and nothing ruins a farmhouse finish like discovering a tiny brush hair sealed forever under polyurethane. A quality angled brush gives cleaner edges on risers and trim. A small roller helps avoid heavy brush marks on flat surfaces. Keep a damp cloth nearby for quick cleanup because paint has a mysterious ability to appear on walls, socks, elbows, and occasionally the family cat.
Sealing is where many DIYers learn patience. The staircase may look finished after the paint dries, but without a strong topcoat, it is vulnerable. A good sealer adds durability and makes cleaning easier. Apply thin coats, let them dry properly, and respect the cure time. This part is not glamorous, but it is the difference between a staircase that lasts and a staircase that starts chipping before you have finished bragging about it.
Finally, embrace small imperfections. A farmhouse staircase does not need to look factory-made. Slight brush texture, gentle distressing, and tiny variations can make the project feel warm and authentic. The goal is not sterile perfection. The goal is a staircase that welcomes people into the home, handles real life, and looks better every time you walk past it.
Painting a staircase with chalk paint is absolutely manageable for a careful DIYer. It takes time, patience, and a willingness to kneel in awkward positions, but the transformation can be dramatic. When done right, the stairs become more than a passageway. They become a design feature with personality, charm, and just enough rustic attitude to make the whole entryway feel intentional.
Conclusion
Learning how to paint a farmhouse staircase with chalk paint DIY style is about balancing beauty with durability. Chalk paint gives you that soft, vintage, lived-in finish farmhouse lovers adore, but stairs need thoughtful prep and serious protection. Clean thoroughly, scuff glossy surfaces, repair damage, use thin coats, and seal everything with a durable topcoat suitable for high-traffic areas.
Whether you choose white risers and natural wood treads, dramatic black steps, soft gray tones, or a lightly distressed cottage finish, the right paint plan can completely refresh your staircase without replacing it. Take your time, respect the curing process, and remember: if a project involves stairs, paint, and gravity, patience is not just a virtueit is a safety feature.
SEO Tags
Note: This article is written in original American English for web publishing and synthesizes practical guidance from reputable paint manufacturers, home-improvement retailers, and professional DIY resources without inserting source links or citation placeholders.
