
Beauty Tools & Accessories
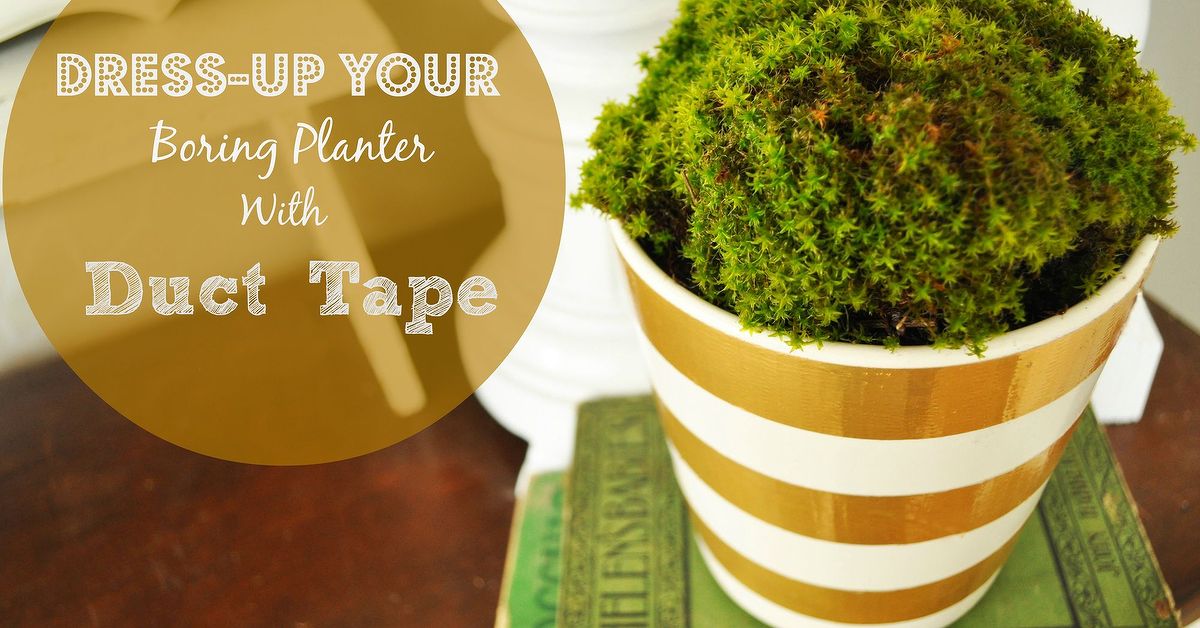
Decorate Your Boring Planter With Duct Tape!
Jul
Some planters quietly support your plants. Others look as though they were designed by a committee whose favorite color is “warehouse beige.” Fortunately, you do not need expensive pottery, professional painting skills, or a dramatic home-makeover montage to fix the situation. With colorful duct tape, a pair of scissors, and a little imagination, you can turn an ordinary flowerpot into a cheerful piece of DIY home decor.
A duct tape planter makeover is fast, affordable, beginner-friendly, and surprisingly versatile. You can create crisp stripes, modern geometric patterns, playful color blocks, seasonal designs, or a wonderfully chaotic collage. Better yet, the project can often be completed in less time than it takes to decide where the planter should live.
Why Decorate a Planter With Duct Tape?
Duct tape is not merely the silver roll hiding beside the toolbox. Craft versions are available in solid colors, metallic finishes, bold prints, animal patterns, florals, plaids, and other designs. That variety makes tape an easy decorative material for renters, students, families, teachers, and anyone who wants a low-mess craft.
Unlike paint, duct tape does not require brushes, drop cloths, drying time, or a brave conversation with the carpet after an accident. It also provides immediate coverage, which is helpful when the original pot is scratched, faded, stained, or simply lacking personality.
This project works especially well for inexpensive plastic nursery pots, smooth metal containers, cachepots, and basic resin planters. Terra-cotta can also be decorated, although its porous and slightly dusty surface requires more careful cleaning and may not hold tape as consistently as smooth plastic or glazed ceramic.
Research support: Colorful duct tape is marketed for decorative crafts, including flowerpot projects, while terra-cotta is recognized as a porous planter material.
Supplies You Will Need
- A clean planter or decorative outer pot
- One or more rolls of colored or patterned duct tape
- Sharp scissors or a craft knife
- A cutting mat if you are using a craft knife
- A ruler or flexible measuring tape
- A pencil and paper for planning the design
- A clean, lint-free cloth
- Mild dish soap and water
- Rubbing alcohol, when compatible with the planter material
- A plastic card or craft scraper for smoothing bubbles
- A saucer to protect indoor furniture
You do not need every item for every design. A simple striped pot may require only one roll of tape and scissors. A honeycomb pattern, on the other hand, benefits from a template, ruler, cutting mat, and enough patience to avoid turning every hexagon into an ambitious potato.
Choose the Right Planter
Plastic and Resin Planters
Smooth plastic and resin pots are usually the easiest surfaces to cover. They are lightweight, inexpensive, and less likely than unglazed clay to produce dust beneath the adhesive. Avoid extremely flexible pots that collapse when squeezed, because repeated bending can loosen seams or create wrinkles.
Glazed Ceramic Planters
Glazed ceramic offers a smooth surface and can produce a polished result. Test a small piece of tape in an inconspicuous area before covering the entire pot, particularly if the glaze is delicate or hand-finished.
Terra-Cotta Pots
Terra-cotta has a warm, classic look, but it absorbs moisture and often sheds fine mineral dust. Wash it, let it dry completely, and wipe away loose residue before applying tape. For the most reliable makeover, place the planted nursery pot inside a separate decorated terra-cotta cachepot rather than allowing damp soil to press directly against the taped container.
Metal Containers
Metal buckets and tins can work beautifully, especially with industrial, farmhouse, or graphic designs. Inspect the rim for sharp edges and never reuse a container that previously held unsafe chemicals. If the container is intended for direct planting, it also needs suitable drainage.
Do Not Sacrifice Drainage for Decoration
A beautiful planter is not much of a victory if the plant inside begins auditioning for a botanical tragedy. Excess water needs a way to escape. Do not cover drainage holes with duct tape, and do not wrap tape beneath the pot in a way that traps water around the base.
If your decorative container has no drainage hole, use the double-potting method. Keep the plant in a slightly smaller nursery pot with drainage holes and place that pot inside the decorated container. Remove the inner pot for watering, allow excess water to drain, and return it only after it has stopped dripping.
For direct planting, use a container-friendly potting mix rather than dense garden soil. Place a saucer under indoor planters, but empty collected water so the roots do not remain submerged.
Research support: Major home-improvement and university extension guides consistently recommend drainage holes, container potting mix, and double potting when decorative containers cannot drain.
How to Decorate a Planter With Duct Tape
Step 1: Empty and Clean the Planter
Whenever possible, decorate an empty planter. Soil, moisture, and leaves make it harder to rotate the pot and keep the tape straight. Wash the exterior with mild dish soap and water, rinse it, and let it dry fully.
For compatible smooth surfaces, a final wipe with diluted rubbing alcohol can remove oily residue. Test first on painted, printed, or delicate finishes. The surface should be clean, dry, stable, and free from dust before the first strip is applied.
Research support: Tape manufacturers recommend applying pressure-sensitive products to smooth, clean, dry surfaces for stronger adhesion.
Step 2: Measure the Pot
Measure the circumference, height, and widest point. Tapered flowerpots are narrower at the bottom than at the top, so one long horizontal strip may drift upward or wrinkle. Shorter sections are easier to control on curved or angled surfaces.
Before cutting expensive patterned tape, wrap a strip of paper around the pot to test the angle. This simple template can reveal whether your planned “perfect stripe” is preparing to become a spiral.
Step 3: Select a Design
Choose a pattern that suits both the plant and its surroundings. A highly patterned plant, such as a polka dot plant or variegated pothos, may look best in a simpler pot. A plain green succulent can handle bolder graphics without creating visual competition.
Limit the palette to two or three colors for a coordinated look. For a playful children’s craft, forget restraint and let every color attend the party.
Step 4: Cut the Tape Cleanly
Use sharp scissors for strips, triangles, and free-form shapes. For repeated geometric pieces, place the tape temporarily on a cutting mat and use a ruler with a craft knife. Adults should handle cutting tools when children participate.
Clean adhesive residue from scissors as needed. Short, controlled cuts usually look better than repeatedly opening and closing the blades through one long section.
Step 5: Apply the First Piece Carefully
Use the back seam of the pot as your starting point. Attach only the first inch, confirm the alignment, and then smooth the tape gradually around the surface. Press from the center toward the edges to push out air.
Do not stretch the tape aggressively. Stretched tape may pull back toward its original shape, causing lifted corners or puckered seams later.
Step 6: Overlap Seams Slightly
When using horizontal bands, overlap each end modestly at the back. For full coverage, let adjacent strips overlap just enough to hide the planter beneath them. Excessive overlap can create bulky ridges, while no overlap may reveal gaps as the tape shifts.
Step 7: Smooth the Surface
Rub each strip firmly with your fingers or the rounded edge of a plastic card. Spend extra time on seams, curves, and the areas near the upper rim. Strong initial contact helps the adhesive conform to the planter.
Step 8: Trim Around the Rim and Base
Leave the drainage system completely open. At the top, stop the tape just below the interior edge so soil and irrigation water do not constantly contact the adhesive. At the bottom, trim the design above the planter’s foot or drainage openings.
Step 9: Reinsert the Plant
Once the design is finished, return the nursery pot to the decorative container or repot the plant if the container is suitable for direct planting. Wipe away soil immediately rather than grinding it into the seams with the enthusiasm of a tiny gardener wearing muddy boots.
Seven Duct Tape Planter Design Ideas
1. Classic Horizontal Stripes
Alternate two solid colors around the pot. Begin at the top and use the tape’s natural width as a spacing guide. Black and white create a modern look, while coral and turquoise feel bright and summery.
2. Diagonal Color Blocking
Divide the pot into two or three diagonal sections. This design is forgiving on tapered pots because the lines are intentionally angled. Metallic tape can serve as a narrow divider between colors.
3. Honeycomb Hexagons
Cut repeated hexagons from several tape colors and arrange them like a honeycomb. Begin near the center of the pot and work outward. This method takes longer but creates a custom mosaic effect similar to dedicated duct tape flowerpot projects.
Research support: Duck Brand’s flowerpot tutorial uses cut tape hexagons arranged across the planter surface.
4. Confetti Collage
Cut small rectangles, dots, and irregular shapes, then scatter them across a plain pot. This is an excellent way to use tape scraps. It is also ideal for people who consider rulers a hostile form of supervision.
5. Faux Woven Pattern
Apply vertical strips first, then place short horizontal pieces over them in an alternating arrangement. Two shades of the same color can create a subtle basket-like appearance.
6. Seasonal Planters
Try orange and black for Halloween, red and green for winter, pastel bands for spring, or patriotic colors for summer celebrations. Decorating an outer cachepot allows the design to be replaced without disturbing the plant’s roots.
7. Personalized Name or Herb Labels
Use contrasting tape to create letters, initials, or simple labels such as “Basil,” “Mint,” or “Parsley.” Chalkboard-style tape can also provide a rewritable label area on a smooth decorative container.
How to Make the Finished Planter Look Polished
Professional-looking results usually come from preparation rather than expensive supplies. Align seams at the back, repeat colors intentionally, and trim edges with a sharp blade. Avoid placing tiny pieces where they will be exposed to frequent water, friction, or handling.
Coordinate the planter with nearby decor rather than treating it as an isolated craft. A pot on a bookshelf might echo the color of a pillow, art print, or book spine. Outdoor planters can repeat colors from patio cushions, door paint, or flowers.
Groups of three often look more deliberate than a collection of unrelated pots. Decorate one planter with a bold print, one with a solid coordinating color, and one with narrow stripes. The designs will feel connected without appearing identical.
Indoor Versus Outdoor Use
A duct tape planter generally lasts longer indoors, where it is protected from intense sunlight, heavy rain, freezing temperatures, and large temperature swings. In a dry indoor location, the finish can remain attractive for an extended period if the pot is handled gently.
Outdoor exposure is harder on adhesive and printed surfaces. Sunlight may fade some colors, moisture can work into seams, and heat may soften adhesive. Place the planter on a covered porch or sheltered balcony for better durability. Inspect it periodically and replace loose strips before dirt and water collect beneath them.
Think of an outdoor duct tape design as refreshable seasonal decor, not a permanent weatherproof coating. That is not a flaw; it is permission to give the pot a new personality whenever the old one becomes tired.
Common Mistakes to Avoid
- Applying tape to a damp pot: Moisture weakens initial adhesion and encourages lifting.
- Ignoring dust on terra-cotta: Adhesive sticks to the loose dust instead of the pot.
- Covering drainage holes: Decoration should never interfere with plant health.
- Stretching the tape: It may contract and pull away from the surface.
- Using one long strip on a steeply tapered pot: Shorter sections are easier to align.
- Wrapping tape over wet soil: Decorate an empty pot whenever practical.
- Expecting permanent outdoor performance: Weather, sunlight, and watering gradually wear down the finish.
- Using too many competing patterns: Let either the plant or the planter be the star.
Cleaning and Maintaining a Duct Tape Planter
Dust indoor planters with a soft, dry cloth. For light soil marks, use a barely damp cloth and wipe gently rather than soaking the surface. Avoid abrasive scrubbers and harsh cleaners, which can scratch printed tape or force moisture beneath the edges.
Water carefully at the soil line. A narrow-spout watering can helps prevent repeated splashing over the rim. When using double potting, remove the inner nursery pot, water it over a sink or tray, and allow it to drain before placing it back inside.
Repair a damaged section by lifting the loose piece slowly, cleaning and drying the exposed area, and replacing it with a fresh strip. Save leftover tape so repairs match the original color and pattern.
Practical Experience Notes: What Makers Learn After the First Planter
The following observations reflect common DIY outcomes and predictable material behavior rather than a promise that every tape-and-planter combination will perform identically.
A typical first attempt begins with enthusiasm and one very long strip of tape. Halfway around a tapered flowerpot, that strip starts climbing toward the rim like it has somewhere important to be. The natural response is to pull harder and force it downward. Unfortunately, stretching creates tension, and the tape may later wrinkle or lift. The better lesson is simple: use shorter sections, accept a small overlap at the back, and let the planter’s shape guide the application.
Surface preparation also makes a larger difference than most beginners expect. A plastic nursery pot may appear clean while still carrying dust, fertilizer residue, or oily fingerprints. Tape applied immediately can look perfect for an hour and begin peeling the next day. Washing the pot and allowing it to dry completely adds only a few minutes of active work, yet it often separates a crisp makeover from a sad collection of curling corners.
Terra-cotta introduces another memorable lesson. Its earthy surface is attractive precisely because it is porous and textured, but those qualities are not ideal for every adhesive. Makers often discover that tape adheres firmly in one area and poorly in another. Using terra-cotta as a decorative outer pot, keeping irrigation water away from the taped surface, and pressing every edge firmly can improve the result. A smooth resin or plastic pot remains the easier choice for a first project.
Design planning becomes more relaxed after one or two planters. Beginners often try to make every stripe mathematically perfect. Then they discover that leaves cover part of the rim, the pot sits against a wall, and nobody is arriving with laboratory equipment to inspect the spacing. Clean edges and intentional color choices matter more than microscopic precision.
Watering habits can determine how long the makeover lasts. Pouring water quickly from above may send a miniature waterfall over the rim and into the seams. Using a narrow spout, watering slowly, or removing an inner nursery pot keeps the decorative surface drier. Double potting is particularly convenient because the plant receives proper drainage while the decorated outer container remains mostly untouched.
Outdoor placement teaches the final major lesson: exposure matters. A planter beneath a covered porch may remain colorful far longer than one sitting in full sun and rain. Rather than treating weather-related wear as failure, experienced crafters plan for it. They keep a little extra tape, repair isolated sections, and redesign the pot when the season changes.
The most satisfying result is not always the most complicated. One clean diagonal stripe can look more stylish than forty tiny shapes applied during a caffeine-fueled burst of ambition. Start with a simple design, learn how the tape behaves on the chosen surface, and save the elaborate flamingo mosaic for planter number two.
Conclusion
Decorating a boring planter with duct tape proves that a useful makeover does not need to be expensive, messy, or intimidating. A clean container, a thoughtful pattern, and careful application can transform a forgettable pot into colorful decor for a windowsill, desk, patio, classroom, or gift.
Keep drainage holes open, protect adhesive from unnecessary moisture, and use double potting when the decorative container cannot drain safely. Most importantly, allow the design to be playful. Plants already perform the serious work of growing. Their pots are free to wear stripes, metallic hexagons, neon confetti, or whatever else makes the room more cheerful.

