
Makeup
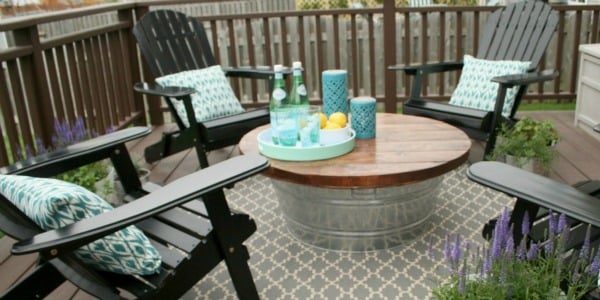
Outdoor Coffee Table with Metal Bucket Base
Jul
An outdoor coffee table with a metal bucket base is what happens when practical patio furniture meets a hardworking farm-supply container and decides to have a little fun. The design is affordable, compact, customizable, and surprisingly useful. Depending on how you build it, the bucket can serve as hidden storage, a temporary beverage cooler, or simply a sturdy pedestal with industrial charm.
This DIY outdoor coffee table is also beginner-friendly. You do not need advanced joinery, a workshop full of mysterious machines, or the patience of a person who hand-carves chair legs for relaxation. A circular saw or jigsaw, a drill, basic sanding tools, and a free weekend are enough for most versions of the project.
The secret is not merely placing a board on a bucket and declaring victory. A reliable patio table needs sensible proportions, a stable base, corrosion-resistant hardware, proper surface preparation, and finishes designed for sunlight and moisture. Outdoor wood benefits from water- and UV-resistant protection, while painted metal performs best when rust, grease, and loose coatings are removed before priming.
Why a Metal Bucket Base Works So Well
A galvanized bucket or utility tub brings instant personality to an outdoor living area. It looks equally comfortable beside Adirondack chairs, a modern sectional, a rustic bench, or a porch swing. The metal contrasts nicely with a warm cedar or stained-wood top, creating a mixed-material look without requiring complicated fabrication.
The base can also perform more than one job. Install the bucket upright and make the tabletop removable, and the interior becomes storage for small outdoor pillows, gardening supplies, citronella candles, or children’s patio toys. Line it with a removable waterproof container, and it can hold ice and canned drinks during a gathering. Use the bucket upside down, and it becomes a simple enclosed pedestal that is especially easy to secure to the tabletop.
A broad galvanized tub is generally better than a narrow household pail. A coffee table receives sideways bumps from knees, pets, children, and that one friend who gestures with their entire body. The wider the bucket’s footprint, the less likely the table is to tip.
Recommended Size and Proportions
For a comfortable patio arrangement, aim for a finished height of approximately 16 to 18 inches. The ideal height depends on the seats around it, so measure before cutting. A tabletop that sits close to the height of the surrounding seat cushions usually feels natural and easy to reach.
A round top measuring 30 to 36 inches in diameter works well for many small and medium seating groups. A 32-inch top paired with a bucket or tub measuring roughly 19 to 22 inches across creates a useful surface without an excessive overhang.
As a practical design rule rather than an engineering standard, choose a base whose widest point is at least 60% of the tabletop’s diameter. A 20-inch-wide tub beneath a 32-inch top, for example, leaves about six inches of overhang on each side. That looks balanced and is far safer than balancing a giant tabletop on a bucket shaped like a pencil cup.
Choosing the Best Materials
Wood for the Tabletop
Cedar is an excellent choice because it is relatively lightweight, attractive, and naturally resistant to outdoor decay. White oak, redwood, teak, eucalyptus, and certain types of acacia can also perform well outdoors. Pressure-treated pine is budget-friendly and resistant to insects and decay, although newly treated lumber may need time to dry before it accepts stain properly.
Ordinary untreated pine can be used on a covered porch, but it requires careful sealing and regular inspection. On an uncovered patio, naturally durable or pressure-treated wood usually provides a more forgiving starting point.
Metal Bucket or Tub
Look for a galvanized steel tub with a rolled rim and a flat, undamaged bottom. Livestock feed tubs, beverage tubs, large utility buckets, and vintage-style wash tubs are good candidates. Avoid containers with sharp edges, extensive rust-through, unstable feet, or sides so thin that they flex when lightly pressed.
Aluminum is lightweight and naturally resistant to rust, while galvanized steel offers a classic farmhouse appearance. Painted steel can also work, but scratches should be repaired before moisture reaches the bare metal.
Fasteners and Adhesives
Use stainless-steel or exterior-rated coated screws rather than drywall screws. Outdoor moisture can corrode ordinary fasteners, and some preservatives in pressure-treated lumber can accelerate corrosion. The American Wood Council and WOOD Magazine recommend corrosion-resistant hardware for exposed or treated-wood applications.
Water-resistant exterior wood glue can supplement screws, but it should not be the only thing holding the project together. Glue is helpful. Glue is not magic soup.
Materials and Tools
Suggested Materials
- Six cedar or exterior-rated 1-by-6 boards, each at least 34 inches long
- Two exterior-rated 1-by-3 boards for underside battens
- Four short wood cleats for the removable-top collar
- One galvanized metal tub approximately 19 to 22 inches wide
- Exterior-rated 1 1/4-inch screws
- Exterior wood glue, if desired
- 80-, 120-, and 180-grit sandpaper
- Exterior stain and sealer, exterior paint, or outdoor-rated spar urethane
- Rust-inhibiting or galvanized-metal bonding primer, if painting the base
- Exterior metal paint
- Rubber feet, rubber matting, or outdoor furniture pads
- An optional sandbag, paving stone, or removable weight for ballast
Suggested Tools
- Tape measure and pencil
- Jigsaw, circular saw, or track saw
- Drill and drill bits
- Clamps
- Random-orbit sander or sanding block
- Compass, string, or homemade circle-cutting guide
- Safety glasses, hearing protection, gloves, and a dust mask
- Wire brush if the bucket has surface rust
How to Build the Outdoor Coffee Table
Step 1: Measure the Seating Area
Arrange your chairs or outdoor sofa before deciding on the tabletop size. Leave enough walking room around the table and make sure seated guests can reach it comfortably. In a tight space, a 30-inch round top may be ideal. A larger conversation area can usually handle a 34- or 36-inch top.
Measure the metal tub’s height and add approximately three-quarters of an inch for the tabletop. If the resulting table is too low, add exterior-rated feet beneath the bucket. If it is too high, choose a shorter container rather than asking everyone to use the coffee table like a dining counter.
Step 2: Prepare the Wood Boards
Cut six 1-by-6 boards to approximately 34 inches long. Lay them side by side with about a 1/8-inch gap between boards. These small spaces provide drainage and allow each board to respond to changes in humidity without forcing the entire top to behave as one oversized slab.
Rearrange the boards until the grain and color look balanced. Mark a large circle measuring about 32 inches across. A shop-made compass can be created with a narrow scrap board, one screw at the center, and a pencil hole at the desired radius.
Do not cut the circle yet. First secure the boards to the underside battens so the entire assembly can be shaped as one unit.
Step 3: Attach the Underside Battens
Place two 1-by-3 battens across the underside of the boards. Position them parallel to each other, approximately six to eight inches away from the centerline. Keep the battens several inches inside the marked circle so they remain hidden.
Drill pilot holes through the battens and drive exterior screws into each tabletop board. Choose screw lengths carefully; the points must not emerge through the tabletop. Avoid driving the screws excessively tight, which can crush soft cedar fibers.
Do not run a continuous glue joint across every board if you want the gaps to remain functional. A small amount of exterior glue beneath each screw location is optional, but mechanical fasteners should do the main work.
Step 4: Cut the Circular Top
Place the assembled panel on a supported work surface. Cut just outside the marked circle with a jigsaw, then sand back to the line. A fine-tooth blade will reduce splintering. Work slowly around the curve rather than trying to steer the saw like it owes you money.
Round over the upper and lower edges using a router, sanding block, or random-orbit sander. A softened edge feels better against hands and knees and is less likely to splinter.
Step 5: Sand Every Surface
Begin with 80-grit paper only where saw marks or uneven edges require it. Continue with 120 grit and finish around 150 or 180 grit. Sand in the direction of the grain and remove dust between stages. Thorough sanding improves appearance and helps finishes adhere more evenly.
Do not ignore the underside, board ends, or drainage gaps. Outdoor moisture rarely respects the concept of “the part nobody sees.”
Step 6: Create a Removable-Top Collar
Place the bucket upright and center it beneath the tabletop. Trace the inside of the bucket rim onto the underside of the top. Attach four short wood cleats just inside that traced line. When the top is lowered onto the bucket, the cleats should fit inside the rim and prevent the tabletop from sliding sideways.
Test the fit before fastening all four cleats permanently. Leave a small amount of clearance so seasonal wood movement does not make the lid impossible to remove. Thin rubber tape or outdoor weatherstripping added to the cleats can reduce rattling.
This collar method avoids drilling into the bucket and preserves access to the interior. For a permanent table, the top can instead be connected with exterior-rated brackets and bolts, but a fixed installation eliminates quick access to storage.
Step 7: Stabilize the Base
Set the assembled table on a flat surface and gently push the tabletop from several directions. If the bucket is narrow or lightweight, add removable ballast to the bottom. A sandbag, rubber-coated paving stone, or sealed container of pea gravel can lower the center of gravity.
Place rubber pads beneath both the ballast and the bucket. The pads reduce noise, prevent scratches, and keep the metal from sitting directly in puddled water on a deck or patio.
If the bucket will serve as a cooler, remove ordinary ballast first and use sealed ice containers or a fitted liner. Empty and dry the tub after entertaining. Do not leave meltwater trapped inside for days unless your design goal is “tiny backyard swamp.”
Step 8: Finish the Wood
Choose a finish specifically labeled for exterior furniture or outdoor wood. A penetrating exterior stain and sealer is easy to renew and allows the grain to remain visible. Exterior paint offers greater color flexibility, while outdoor-rated spar urethane provides a clear film with moisture resistance and UV protection.
Apply the chosen system to the top, underside, edges, battens, cleats, screw holes, and end grain. Minwax recommends coating the undersides of outdoor boards as well, while This Old House emphasizes UV-resistant and water-repellent finishes for patio furniture.
Follow the manufacturer’s instructions for drying time, temperature, number of coats, and recoating. More finish is not automatically better. Thick, impatient coats often remain sticky, trap dust, and collect insect footprints from creatures who apparently enjoy testing wet varnish.
Step 9: Prepare and Paint the Metal Base
Raw galvanized metal can be left unpainted for a classic silver finish. If you want color, wash away oil and dirt, remove loose corrosion, lightly scuff glossy areas, and use a primer specifically compatible with galvanized steel. General-purpose paint may peel when applied directly to a slick galvanized surface.
For rusty steel, remove loose rust with a wire brush or sandpaper. Clean the surface, allow it to dry, and apply a rust-inhibiting primer before the exterior topcoat. Rust-Oleum, Lowe’s, Family Handyman, and Sherwin-Williams all emphasize cleaning, abrasion, rust removal, and compatible primers as essential preparation steps.
Spray outdoors or in a properly ventilated workspace, protect nearby surfaces from overspray, and observe the coating manufacturer’s temperature and humidity limits.
Useful Design Variations
Hidden-Storage Table
Keep the bucket upright and use the removable collar-style tabletop. Store only items that can tolerate outdoor humidity, or place them inside a lidded waterproof bin. Add small handles to the tabletop if it is heavy.
Patio Beverage Cooler
Fit a washable plastic liner inside the metal tub and use the tabletop as a removable lid. A liner makes cleanup easier and limits direct exposure between ice water and scratched metal. Never trap water beneath the liner after the party.
Farmhouse Version
Use a natural cedar top, clear exterior finish, and an unpainted galvanized base. Add black hardware or rope handles for contrast. Keep decorative additions away from sharp edges and moving lid components.
Modern Version
Paint the bucket matte black and finish the tabletop in a medium brown or nearly natural tone. A clean 30-inch circle with minimal overhang creates a restrained silhouette that works with modern patio furniture.
Coastal Version
Use pale gray, navy, or muted blue on the metal base and a lightly whitewashed top protected by a compatible exterior sealer. In salty coastal environments, stainless-steel fasteners are especially important because airborne salt accelerates corrosion.
Common Mistakes to Avoid
- Using a bucket that is too narrow: A wide top on a narrow base creates a tipping hazard.
- Skipping ballast: Lightweight metal tubs may slide or overturn in wind.
- Using indoor finishes: Interior coatings are not designed for repeated sunlight, rain, and temperature changes.
- Painting over rust or grease: The new coating will eventually lift with the contamination beneath it.
- Using ordinary screws: Moisture and treated lumber can quickly corrode unsuitable fasteners.
- Sealing only the visible face: Moisture can enter through the underside and end grain.
- Making the storage cavity airtight: Outdoor storage needs a way to avoid trapped condensation.
- Treating the table as a seat: Unless the structure was specifically designed and tested for seating loads, it is a table, not an emergency stool.
Maintenance for a Longer-Lasting Table
Clean the tabletop with mild soap, water, and a soft brush or cloth. Avoid blasting soft wood with high-pressure water, which can roughen the grain and damage the surface. Lowe’s recommends using gentler pressure on softer woods when cleaning outdoor furniture.
Inspect the finish at the beginning and end of the outdoor season. Fading, dry-looking grain, peeling paint, or water that quickly darkens the wood are signs that maintenance may be due. Clean, dry, and lightly scuff an intact clear finish before applying a compatible maintenance coat.
Check the bucket for scratches and rust, especially around the bottom rim and handles. Touch up damaged coatings promptly. Cover the table or move it into a sheltered area during severe winter weather. Well-fitted outdoor covers can reduce prolonged exposure to moisture, snow, and sunlight, although ventilation remains important.
A Realistic Weekend-Build Experience
The experience of building an outdoor coffee table with a metal bucket base is usually less about difficult woodworking and more about making a dozen small decisions correctly. A realistic project often begins with a confident trip to the home center and an immediate discovery that “large metal bucket” can describe everything from a slender flower pail to a livestock tub capable of bathing a cooperative goat.
The best choice becomes obvious after setting possible buckets on the floor and imagining a 32-inch circle above them. The broad tub may cost a little more, but it looks proportionate and does not wobble when nudged. That single purchasing decision often matters more than whether the tabletop stain is called Warm Chestnut, Rustic Walnut, or Lumberjack’s Breakfast.
Laying out the cedar boards is one of the most satisfying parts of the build. Even inexpensive boards can look intentional when their grain patterns are arranged carefully. A darker board placed in the center creates a focal stripe, while alternating grain directions gives the top a casual, handcrafted character. At this stage, the project begins to look like furniture instead of six boards attending a meeting.
Cutting the circle tends to be the moment that makes beginners nervous. The first few inches may feel awkward, but a jigsaw becomes easier to guide once the builder stops trying to force it around the curve. Cutting slightly outside the line provides room for correction. Sanding then transforms a mildly lumpy circle into something convincingly round. It may not satisfy a spacecraft engineer with measuring equipment, but it will look excellent beside a patio sofa.
The first dry fit often reveals unexpected details. The bucket rim may not be perfectly circular. One handle may touch an underside batten. The top may slide more than expected, or the entire table may feel light when pushed from the side. None of these issues requires starting over. Repositioning the cleats, adding rubber padding, or placing a sealed sandbag in the base usually solves the problem.
Finishing requires the most patience. The temptation is to apply another coat before the first one has dried because the table is almost done and the patio is already imagining its new centerpiece. Waiting according to the product label produces a smoother, tougher result. Finishing the underside feels unnecessary until the table survives its first wind-driven rainstorm without absorbing moisture unevenly.
Once the table is in use, the removable top becomes the feature people notice first. Guests lift it, look inside, and immediately begin suggesting alternate contents: blankets, toys, grilling tools, cold drinks, potting soil, or an emergency supply of marshmallows. A fitted waterproof bin generally makes the storage version more practical because it keeps small items together and can be carried indoors.
The table also changes how the patio is used. Drinks have a central landing spot. A tray of snacks no longer occupies an empty chair. The round shape improves movement through a compact seating area because there are no sharp corners waiting at knee height. The mixed wood-and-metal design looks handmade without appearing unfinished.
After several weeks outdoors, small lessons appear. Water rings are easier to wipe from a well-sealed surface. A table left uncovered beneath trees collects pollen faster than anyone expects. Metal bases can become warm in direct summer sun, although the wood top remains comfortable to touch. Rubber feet help prevent stains on concrete and reduce the scraping noise produced when the table is moved.
The most rewarding part is that the project looks more complicated than it is. Visitors may assume the table came from a specialty outdoor store, while the builder knows its structural philosophy can be summarized as “good wood, wide bucket, proper screws, no shortcuts with paint.” It is a practical weekend project that develops useful skills in measuring, circle cutting, sanding, outdoor finishing, and adapting a design when real materials refuse to match perfect drawings.
Conclusion
An outdoor coffee table with a metal bucket base combines affordable materials, hidden function, and plenty of visual character. The strongest version starts with a broad, stable tub; uses weather-resistant wood and corrosion-resistant fasteners; and protects every exposed surface with an exterior-rated finish.
Build the top as a removable lid for storage, secure it permanently for a simple pedestal table, or add a washable liner for occasional beverage service. With sensible proportions and seasonal maintenance, this DIY patio coffee table can become one of those rare projects that is inexpensive, useful, and attractive enough to inspire suspicious questions about where you bought it.

