
Hair Care
How to Play Heart and Soul on Piano: 14 Steps
Aug
Few piano pieces can summon a duet partner as quickly as Heart and Soul. Play the familiar bass pattern in a room containing another human being, and there is a reasonable chance that person will rush toward the keyboard and attempt the melodywhether invited or not.
The song was written in 1938, with music by Hoagy Carmichael and lyrics by Frank Loesser. Bea Wain recorded it with Larry Clinton and His Orchestra, and that version became a major hit in 1939. Over time, the tune developed a second life as an informal piano duet passed between friends, siblings, classmates, and generations of enthusiastic key-pounders.
This beginner piano tutorial focuses on the simplified arrangement most people recognize: a repeating C–Am–F–G chord progression, a steady rhythm, and a melody played above it. You do not need advanced music theory, lightning-fast fingers, or a concert grand piano. You need a keyboard, a little patience, and the willingness to repeat four chords until your household knows them too.
What You Need Before You Begin
- An acoustic piano, digital piano, or electronic keyboard
- At least 49 full-size keys, although a smaller keyboard can work
- A metronome or metronome app
- Licensed sheet music or a legal tutorial for the exact melody
- Ten to twenty minutes of focused practice
- An optional duet partner who understands the phrase “Please wait for the count-in”
The most common easy arrangement is played in C major. That is good news for beginners because the main chords use only white keys. The harmonic loop is:
| Chord | Notes | Roman Numeral | Suggested Left-Hand Bass |
|---|---|---|---|
| C major | C–E–G | I | C |
| A minor | A–C–E | vi | A |
| F major | F–A–C | IV | F |
| G major | G–B–D | V | G |
How to Play Heart and Soul on Piano in 14 Steps
-
Step 1: Adjust Your Bench and Posture
Sit near the front half of the bench rather than leaning against the back like you are waiting at a bus station. Center yourself in front of the keyboard, keep your shoulders relaxed, and place both feet securely on the floor.
Adjust the bench so your elbows are approximately level with the keyboard. Your forearms should feel comfortably horizontal, not angled sharply upward or hanging below the keys. Good posture gives your arms room to move and helps prevent tension from sneaking into your shoulders, wrists, and hands. Yamaha recommends a centered bench, relaxed shoulders, flat feet, and elbows positioned near keyboard level.
-
Step 2: Shape Your Hands Naturally
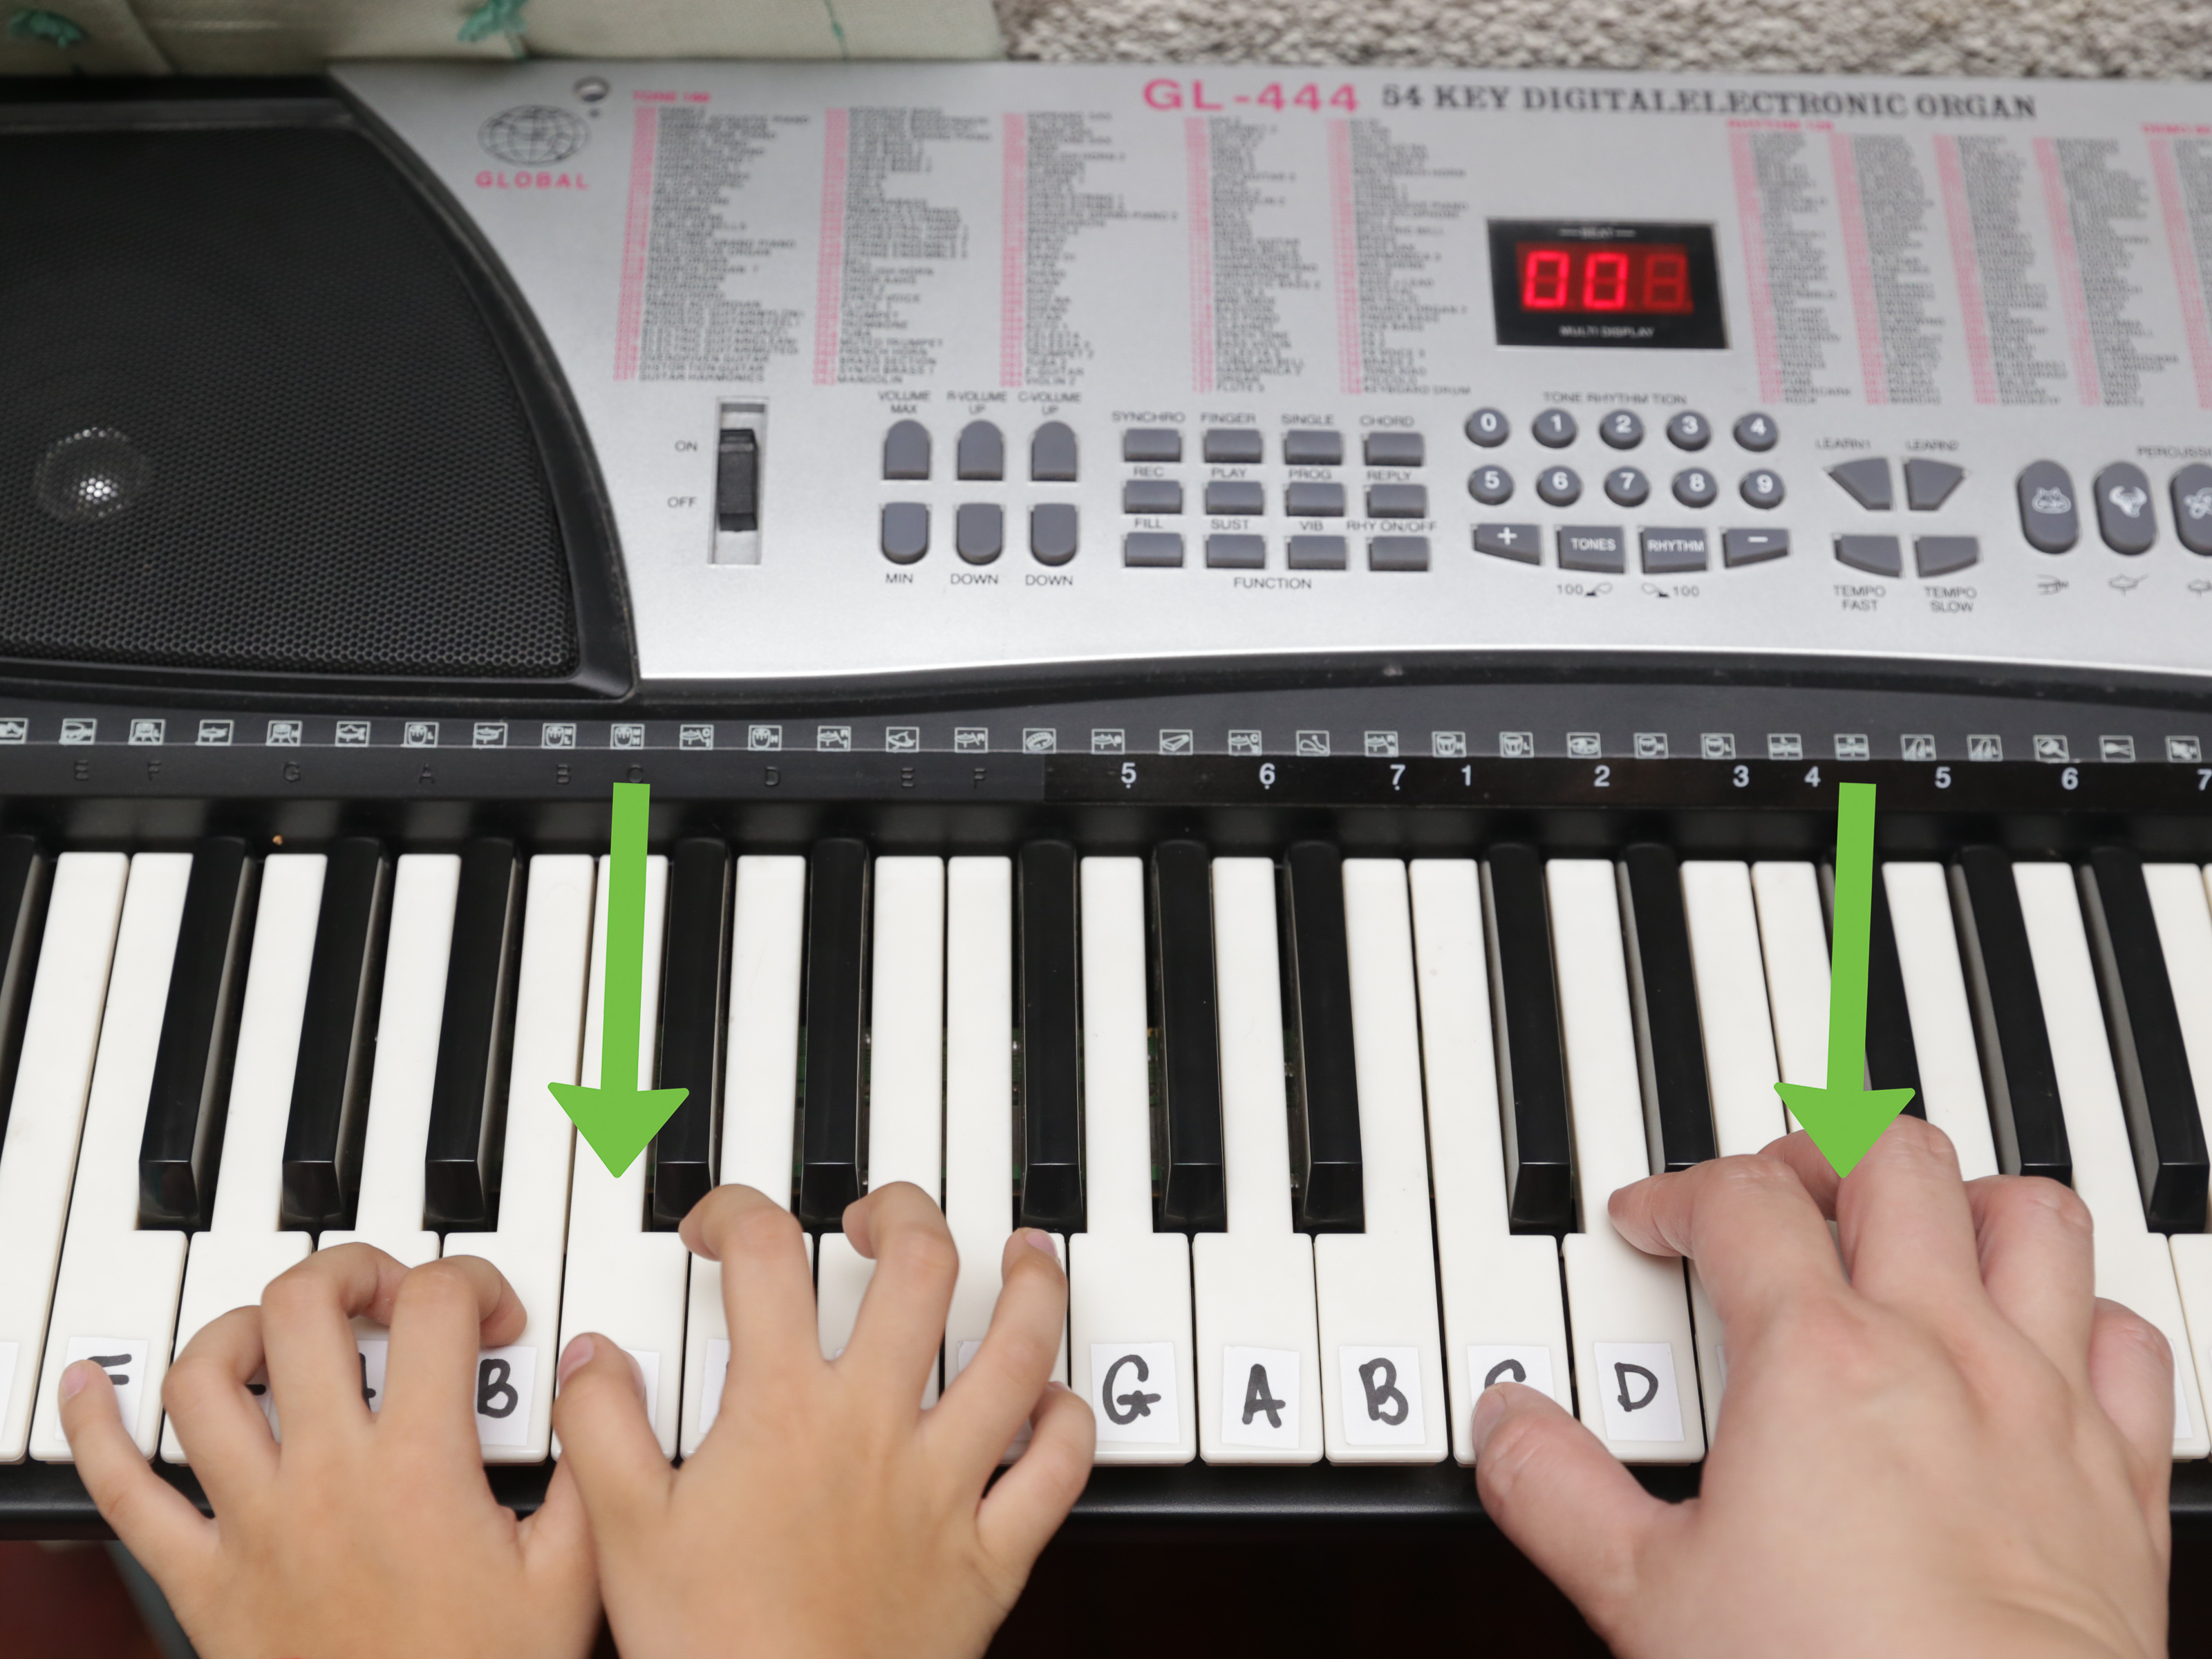
Rest your fingertips lightly on the keys. Keep each hand rounded as though you are loosely holding a small ball or an egg. Do not flatten your fingers, lock your wrists, or raise your pinkies like tiny aristocrats drinking tea.
Your knuckles should remain gently supported, your fingertips should be firm without becoming rigid, and your wrists should stay flexible. A neutral wrist position makes repeated chords easier and allows the melody to move smoothly.
-
Step 3: Find Middle C and the Keyboard Landmarks
Look for groups of two and three black keys. The white key immediately to the left of every group of two black keys is C. Middle C is the C closest to the center of the piano.
Play Middle C several times, then locate the C one octave below it. The lower C is a useful starting point for the accompaniment. Next, find the A, F, and G near that lower C. These four bass notes will become your left hand’s travel itinerary.
-
Step 4: Count a Steady Four-Beat Pulse
Count aloud: “1, 2, 3, 4.” Tap one foot gently or clap the beat. The simplified version of Heart and Soul works well in a steady four-beat meter.
Set a metronome to approximately 60 beats per minute. That may feel slow, but slow practice gives your brain enough time to send polite, accurate instructions to your fingers. Starting too fast usually creates a performance that sounds less like Heart and Soul and more like a kitchen drawer falling down the stairs.
Music educators commonly recommend isolating small sections and using a metronome at the pulse or a subdivided pulse. Practicing slowly also makes it easier to identify fingering and coordination problems before they become habits.
-
Step 5: Learn the Four Bass Notes
With your left hand, play the following notes in order:
C – A – F – G
Use your left pinky for C, move to A with a comfortable finger, then shift to F and G. Exact fingering can vary depending on hand size, but consistency matters more than finding one allegedly magical combination.
Hold each bass note for four counts at first:
C: 1-2-3-4 | A: 1-2-3-4 | F: 1-2-3-4 | G: 1-2-3-4
Repeat the loop until you can move from G back to C without stopping to negotiate with your hand.
-
Step 6: Build the C, Am, F, and G Chords
Play each triad slowly with your right hand:
- C major: C–E–G
- A minor: A–C–E
- F major: F–A–C
- G major: G–B–D
A basic triad contains three notes built around a root. Understanding the notes in these chords will help you recognize the song’s structure instead of memorizing a sequence of mysterious hand shapes.
Practice changing between the chords without rhythm. Aim to land all three notes together. If one note arrives late, slow down and reshape your hand before trying again.
-
Step 7: Choose a Beginner Accompaniment Pattern
There are several ways to play the accompaniment. Begin with the easiest version:
Beat 1: Play the bass note with your left hand.
Beats 2, 3, and 4: Play the matching chord with your right hand.For C major, you would play a low C on beat 1 and the C-major chord on beats 2, 3, and 4. Then repeat the pattern for A minor, F major, and G major.
When this becomes comfortable, try playing each chord twice per measure, on beats 2 and 4. You can also place the chord tones in a higher octave to leave space for a partner’s melody.
-
Step 8: Loop the Accompaniment Without Pausing
Repeat the full progression:
C | Am | F | G
Do not increase the tempo until you can repeat the loop at least five times without losing the beat. The most important transition is G back to C because that is where the pattern begins again.
Keep your eyes slightly ahead of your hands. While playing F, think about G. While playing G, prepare for C. This tiny habit makes your movements feel planned rather than surprised.
-
Step 9: Study the Melody in Short Phrases
Use licensed sheet music or a legal lesson to learn the exact melody. Divide it into phrases of one or two measures rather than trying to memorize the whole tune at once.
Before playing each phrase, sing or hum it. Then locate the notes on the keyboard. This connects the sound in your head with the movement in your fingers. Work on pitch first and rhythm second if trying to solve both at once feels overwhelming.
Beginner arrangements generally keep much of the recognizable melody in a comfortable middle register. Mark any position changes and decide on your fingering before repeating a phrase. Yamaha notes that consistent, planned fingering allows repetition to build reliable movement instead of producing a different solution on every attempt.
-
Step 10: Practice the Melody With One Consistent Fingering
Write finger numbers above difficult notes if your sheet music allows it. Piano fingering uses the following numbers:
- Thumb: 1
- Index finger: 2
- Middle finger: 3
- Ring finger: 4
- Little finger: 5
Avoid playing everything with your index finger simply because it feels dependable. Using several fingers reduces unnecessary movement and helps phrases sound connected.
Repeat each short phrase three to five accurate times. Repeating a mistake fifteen times does not make it correct; it merely gives the mistake confidence.
-
Step 11: Practice Each Part Separately
Play the accompaniment alone until it feels automatic. Then practice the melody alone with the metronome. Do not combine the parts merely because you are bored with practicing them separately.
Separate-hand practice reduces the amount of information your brain must process. It also reveals which part is causing a hesitation. If the melody stops every time the harmony changes, practice only the notes surrounding that chord change.
-
Step 12: Combine the Parts One Measure at a Time
Begin with a drastically simplified combination. Play only the left-hand bass note on beat 1 while the right hand plays the melody. Once that works, add one chord per measure. Finally, add the complete rhythmic accompaniment.
Work in small sections:
- Combine one measure.
- Repeat it accurately.
- Add the next measure.
- Connect the two measures.
- Continue building the piece like musical LEGO.
If coordination collapses, remove notes rather than forcing the tempo. Simplification is not cheating. It is how complicated movements become manageable.
-
Step 13: Turn It Into a Piano Duet
The classic social version works beautifully with two players. One person performs the repeating accompaniment in a lower register, while the other plays the melody higher on the keyboard.
Agree on three things before beginning:
- The starting tempo
- The number of count-in beats
- How many times you will repeat the progression
The accompaniment player should stay steady even if the melody player misses a note. The melody player should rejoin on the next strong beat rather than stopping the entire performance and opening an investigation.
Online tools such as collaborative virtual keyboards can also allow two people to experiment with shared piano playing when they are not in the same room.
-
Step 14: Add Dynamics, Pedal, and a Clean Ending
Once the notes and rhythm are secure, make the arrangement musical. Play the accompaniment slightly softer than the melody. Shape phrases by growing louder toward important notes and relaxing at the end of each musical idea.
Add the sustain pedal sparingly. Press it after playing a chord and release it when the harmony changes. Holding the pedal through the entire C–Am–F–G progression creates a harmonic smoothie in which every ingredient can be heard but none can be identified.
For a simple ending, slow slightly during the final G chord and finish on a C-major chord. Hold the last chord for four counts, release the pedal, and lift your hands together. Congratulations: you have completed Heart and Soul without needing a smoke machine.
Common Problems and Quick Fixes
The Chord Changes Are Too Slow
Practice two chords at a time. Move from C to Am ten times, then Am to F, F to G, and G back to C. Keep your fingers close to the keys instead of lifting your entire hand after every chord.
The Rhythm Speeds Up
Lower the metronome setting and count aloud. Record yourself and listen for places where you rush. Players often accelerate during easy measures and slow down during difficult ones.
The Hands Refuse to Cooperate
Simplify the left hand to one bass note per measure. Add the full chord pattern only after the melody remains steady. Coordination develops through layers, not through glaring angrily at your fingers.
The Chords Sound Harsh
Relax your wrist and avoid attacking the keys from high above the keyboard. Press through the keys with controlled weight. Keep the accompaniment quieter than the melody.
The Sustain Pedal Makes Everything Blurry
Change the pedal with every chord. Practice without pedal first; pedal should improve a clean performance, not place a decorative rug over a messy one.
Realistic Learning Experiences: What Playing Heart and Soul Usually Feels Like
The first surprise for many beginners is that the famous accompaniment sounds complete almost immediately. After learning C, A, F, and G in the bass, a student can produce something recognizable within minutes. That quick reward is one reason the song remains such a popular introduction to piano. It offers the emotional thrill of playing “a real song” before the player has mastered reading two staves, advanced fingering, or complex harmony.
The second surprise is that recognition and control are very different things. A player may know exactly how the tune should sound but still struggle to make the hands produce it. The left hand pauses during a melody leap. The right hand speeds up because the notes feel easy. The chord player repeats G while the melody player has already returned to C. Everyone knows where the music is supposed to go; the fingers simply have not received the meeting notes.
A productive practice experience usually begins when the player stops attempting complete performances. One measure is isolated. Then two measures are connected. The accompaniment is reduced to bass notes. The melody is hummed before it is played. These smaller tasks may feel less exciting than racing from beginning to end, but improvement becomes much more noticeable.
Learners also discover that a metronome can be both helpful and mildly insulting. It does not care that a chord change is difficult. It continues clicking with the emotional sensitivity of a microwave timer. Yet that impartial pulse reveals where hesitation occurs. After several slow repetitions, the click stops feeling like an opponent and starts functioning as a duet partner with exceptionally reliable timing.
Playing with another person creates a different challenge. Solo practice allows a player to pause, restart, or quietly pretend a wrong note was an artistic decision. A duet keeps moving. The accompaniment must maintain the progression, and the melody must find its way back into the measure after a mistake. This teaches one of the most valuable performance skills: recovery.
Beginners often assume that skilled musicians never make errors. In reality, experienced players are frequently better at continuing after an error. While learning Heart and Soul, practice deliberately rejoining the music. Stop the melody for one measure while the accompaniment continues, then return on the next C chord. This exercise turns a potential performance disaster into a manageable detour.
Another common experience is the temptation to play faster as soon as the notes become familiar. Speed initially feels like progress, but it can hide uneven rhythm and tense movements. A more useful milestone is playing the loop several times with relaxed hands and identical timing. When the slow version feels easy rather than merely possible, increase the metronome by three to five beats per minute.
Recording practice sessions can be unexpectedly revealing. While playing, your attention is divided among notes, rhythm, fingering, and survival. During playback, you can hear whether the melody is louder than the accompaniment, whether chord changes are clean, and whether the tempo wanders. The first recording may be humbling. The fifth often provides clear evidence that patient repetition works.
Finally, learners tend to remember the social experience more than the technical exercise. The piece becomes a way to share the keyboard with a child, parent, friend, or classmate. One player may know only the bass pattern, while another knows only the melody, yet together they create a complete arrangement. That instant collaboration is the true charm of Heart and Soul: four familiar chords can turn an ordinary piano bench into a very small band.
Conclusion
Learning how to play Heart and Soul on piano begins with a simple idea: master the repeating C–Am–F–G progression before worrying about speed or decoration. Establish good posture, practice the bass and chords separately, learn the melody in short phrases, and combine the parts one layer at a time.
Once the basic arrangement is secure, experiment with chord inversions, rhythmic variations, dynamics, octave changes, and duet playing. The piece is simple enough for a beginner but flexible enough to teach timing, harmony, coordination, listening, and performance recovery.
Most importantly, keep the pulse steady. A wrong note that remains in time often passes quickly. A perfect note that arrives three beats late tends to make an entrance worthy of its own press conference.

