
Body Care
How to Make Netherite Armor in Minecraft: Step-by-Step Guide
Jul
There is a moment in almost every serious Minecraft survival world when diamond armor stops feeling like the finish line. You have enchanted yournters, and perhaps stared into a lava lake while thinking, “Surely I am a professional now.” That is usually when Netherite enters the conversation.
Learning how to make Netherite armor in Minecraft is not as simple as arranging rare materials in a crafting table. Modern Minecraft requires you to upgrade Diamond armor at a Smithing Table using Netherite Ingots and Netherite Upgrade Smithing Templates. Those templates are tied to Bastion Remnants, making exploration an essential part of the progression system. ocess sounds intimidating, especially when you realize the shopping list includes Ancient Debris, gold, diamonds, a Bastion Remnant, and the courage to walk past Piglin Brutes without becoming a rectangular pancake. Fortunately, the job becomes much easier when broken into clear steps.
This guide explains exactly how to get Netherite armor, where to find the required materials, how to craft Netherite Ingots, and how to avoid the mistakes that waste hours of mining.
What Is Netherite Armor in Minecraft?
Netherite armor is an upgraded form of Diamond armor. You do not normally craft a Netherite helmet, chestplate, leggings, or boots directly from Netherite Ingots. Instead, you take the equivalent Diamond armor piece and upgrade it using a Smithing Table.
Compared with Diamond armor, Netherite gear offers higher armor toughness, improved durability, and knockback resistance. Dropped Netherite items also resist burning in fire and lava. That last feature protects the dropped item, however; wearing Netherite armor does not magically make your character immune to lava. Please continue respecting the giant orange death soup. lete player armor set contains four pieces:
- Netherite Helmet
- Netherite Chestplate
- Netherite Leggings
- Netherite Boots
To upgrade all four pieces, you generally need four Diamond armor pieces, four Netherite Ingots, and four Netherite Upgrade Smithing Templates.
Materials Needed to Make a Full Set of Netherite Armor
Before entering the Nether with heroic music playing in your head, it helps to understand the full material chain.
For the Four Armor Upgrades
- 1 Diamond Helmet
- 1 Diamond Chestplate
- 1 pair of Diamond Leggings
- 1 pair of Diamond Boots
- 4 Netherite Ingots
- 4 Netherite Upgrade Smithing Templates
- 1 Smithing Table
To Craft Four Netherite Ingots
- 16 Netherite Scraps
- 16 Gold Ingots
Because one Ancient Debris smelts into one Netherite Scrap and four scraps are needed for each Netherite Ingot, a full armor set requires 16 Ancient Debris when you obtain all your scraps through mining. Netherite Ingots are made by combining four Netherite Scraps with four Gold Ingots. ll also need enough upgrade templates. Templates are consumed when used, but they can be duplicated. The duplication recipe uses an existing Netherite Upgrade Smithing Template, seven Diamonds, and Netherrack. Each duplication craft effectively gives you one additional template. 1: Get a Complete Set of Diamond Armor
The first step in making Netherite armor is wonderfully familiar: get Diamond armor.
You need a Diamond version of every piece you plan to upgrade. For a full set, that means a Diamond Helmet, Chestplate, Leggings, and Boots. Crafting the complete Diamond armor set requires 24 Diamonds.
Already have enchanted Diamond gear? Good news. Upgrading Diamond equipment through the Smithing Table preserves important item data, including enchantments and custom names. In other words, your Protection IV chestplate does not suddenly forget everything it learned in enchantment school just because it received a Netherite makeover. akes upgrading existing high-quality Diamond armor a sensible strategy. Repairing valuable gear before a dangerous Nether expedition may also be wise, particularly if you are carrying equipment that took hours to enchant.
Step 2: Travel to the Nether
Ancient Debris and Bastion Remnants are found in the Nether, so your next job is opening a Nether Portal.
Before stepping through, prepare properly. A casual Netherite expedition has a remarkable talent for becoming an unplanned inventory donation to the local Piglin population.
Recommended Nether Mining Supplies
- A Diamond or Netherite Pickaxe
- Fire Resistance Potions
- Food
- Building blocks
- A shield
- Spare pickaxes
- Flint and Steel
- Fire-resistant or highly enchanted armor
- One piece of gold armor when dealing with regular Piglins
- Coordinates enabled or another reliable navigation method
Ancient Debris requires a Diamond or Netherite Pickaxe to obtain it successfully. Bringing an inferior mining tool and discovering Ancient Debris is the Minecraft equivalent of arriving at a locked treasure vault with a pool noodle.
Mark your portal coordinates before traveling far. The Nether can look surprisingly similar after 30 minutes of tunneling, especially when every direction contains Netherrack, lava, and regret.
Step 3: Find Ancient Debris
Ancient Debris is the main raw resource in the Netherite production chain. Smelting it produces Netherite Scrap.
Ancient Debris generates in the Nether and is commonly targeted around Y-level 15 because this level has historically offered a particularly favorable concentration. Mining guides frequently recommend working around Y=15 while watching for lava pockets. d 1: Branch Mining
Branch mining is the straightforward approach. Reach approximately Y=15, create a main tunnel, and dig smaller branches from it.
This method is relatively controlled and requires no explosives. The downside is speed. Netherrack breaks quickly, but digging enough tunnels to uncover 16 Ancient Debris can still feel like you have accepted a part-time job beneath a lava ocean.
Carry multiple pickaxes and maintain an organized tunnel pattern. Random digging makes navigation harder and can cause you to repeatedly expose areas you have already searched.
Method 2: Bed Mining
Beds explode when players attempt to sleep in the Nether. Experienced players can use those explosions to expose large volumes of blocks.
Dig a tunnel, create a protected position, place a bed near the end of an opening, and trigger it from behind solid cover. The explosion clears surrounding Netherrack, potentially exposing Ancient Debris.
Bed mining is cheap because beds require renewable materials. It is also dangerous. Explosion damage, fire, and exposed lava can quickly turn a clever mining technique into a lesson about why the respawn screen exists.
Use solid cover and keep Fire Resistance available. Never casually stand beside the bed and click it as though checking into a Nether hotel.
Method 3: TNT Mining
TNT can clear long sections of Netherrack rapidly. Ancient Debris is highly resistant to ordinary explosions, so blast mining can expose it while surrounding blocks are destroyed.
A common strategy is to create a tunnel near the preferred mining level, space TNT along the route, retreat, and detonate the explosives. After the blast, carefully inspect newly exposed surfaces for Ancient Debris. ning is efficient when you have a strong gunpowder supply. Without a Creeper farm or a healthy stockpile, however, using stacks of TNT may simply replace your Netherite shortage with a gunpowder shortage.
Step 4: Mine at Least 16 Ancient Debris
For a complete Netherite armor set, aim for at least 16 Ancient Debris.
The math is simple:
- 4 Ancient Debris = 4 Netherite Scraps
- 4 Netherite Scraps + 4 Gold Ingots = 1 Netherite Ingot
- 1 Netherite Ingot upgrades 1 Diamond armor piece
- 4 armor pieces = 4 Netherite Ingots
- 4 Netherite Ingots require 16 Ancient Debris
You may find Ancient Debris in small groups, but do not assume the first visible block is alone. Mine carefully around it before continuing. Sometimes an additional block is hiding just beyond your initial excavation.
Once you have 16 pieces, you can technically finish the resource portion of a full armor upgrade. Personally, I prefer collecting a few extras whenever possible. Future-you may want a Netherite Pickaxe, Sword, Axe, or another piece of equipment, and future-you is notoriously bad at sending thank-you cards.
Step 5: Smelt Ancient Debris Into Netherite Scrap
Return to a safe location and place your Ancient Debris in a Furnace or Blast Furnace with fuel.
Each block of Ancient Debris smelts into one Netherite Scrap. Therefore, 16 Ancient Debris produces 16 Netherite Scraps.
Do not confuse Netherite Scrap with a finished Netherite Ingot. Scrap is an ingredient. Your Smithing Table needs the finished ingot for the armor upgrade.
Step 6: Craft Four Netherite Ingots
Open a Crafting Table and combine four Netherite Scraps with four Gold Ingots to create one Netherite Ingot. The ingredients do not depend on a complicated armor-shaped pattern. Four scraps plus four gold ingots produce the finished material. ur Netherite Ingots, you need:
- 16 Netherite Scraps
- 16 Gold Ingots
Gold is often the forgotten part of the Netherite process. Players proudly return home with Ancient Debris, fire up the furnace, and then realize their gold supply consists of three nuggets and confidence.
Check your gold reserves before beginning the expedition. Nether Gold Ore, Overworld gold mining, and other normal sources can all help build the required stockpile.
Step 7: Find a Netherite Upgrade Smithing Template
This is the step that older Netherite tutorials frequently get wrong.
In current Minecraft progression, a Netherite Ingot and Diamond armor alone are not enough. You also need a Netherite Upgrade Smithing Template.
Netherite Upgrade Smithing Templates are associated with Bastion Remnant chests. Official Minecraft update documentation states that templates may appear in Bastion Remnant chests and that treasure-room Bastion Remnants contain two guaranteed Netherite Upgrade templates. o Prepare for a Bastion Remnant
Bastions are dangerous. Regular Piglins are one concern, but Piglin Brutes are considerably less interested in your diplomatic wardrobe choices.
Bring strong armor, a shield, ranged weapons, food, and blocks. Fire Resistance Potions are useful because Bastions exist in a dimension where lava appears to have been included in the interior design budget.
Wearing one piece of gold armor can help prevent ordinary Piglins from immediately becoming hostile under normal circumstances. Piglin Brutes are another story and remain aggressive.
Move slowly through the structure. Block dangerous routes, create safe retreat points, and avoid sprinting blindly into rooms. The Netherite Upgrade template is valuable enough that a careful Bastion raid beats a fast one followed by the phrase, “I know roughly where I died.”
Step 8: Duplicate Your Netherite Upgrade Templates
Every armor upgrade consumes a template, meaning a full armor set needs four Netherite Upgrade Smithing Templates.
You do not necessarily need to search four separate Bastions. Once you obtain a template, it can be duplicated at a Crafting Table using:
- 1 Netherite Upgrade Smithing Template
- 7 Diamonds
- 1 Netherrack
The duplication recipe produces two templates while using the existing template as an ingredient, effectively increasing your supply by one.
If you start with one template, you can repeat the duplication process until you have four. That requires three duplication crafts, or 21 Diamonds and three Netherrack.
If you obtain two templates from a treasure-room Bastion, you only need to increase your supply from two to four. Two duplication crafts can accomplish this, costing 14 Diamonds and two Netherrack.
Yes, the Diamond price is significant. Mojang intentionally changed Netherite progression so that Diamond equipment remains relevant longer and the jump to Netherite feels like a more substantial achievement. 9: Craft or Obtain a Smithing Table
You need a Smithing Table to upgrade Diamond armor into Netherite armor.
A Smithing Table can be crafted using two Iron Ingots and four wooden planks. Place the two Iron Ingots above a two-by-two arrangement of planks in the crafting grid. Smithing Tables can also be found in villages. the Smithing Table somewhere safe. You have already survived Ancient Debris mining and a Bastion raid. There is no need to perform the final crafting ceremony beside an open lava pool for “atmosphere.”
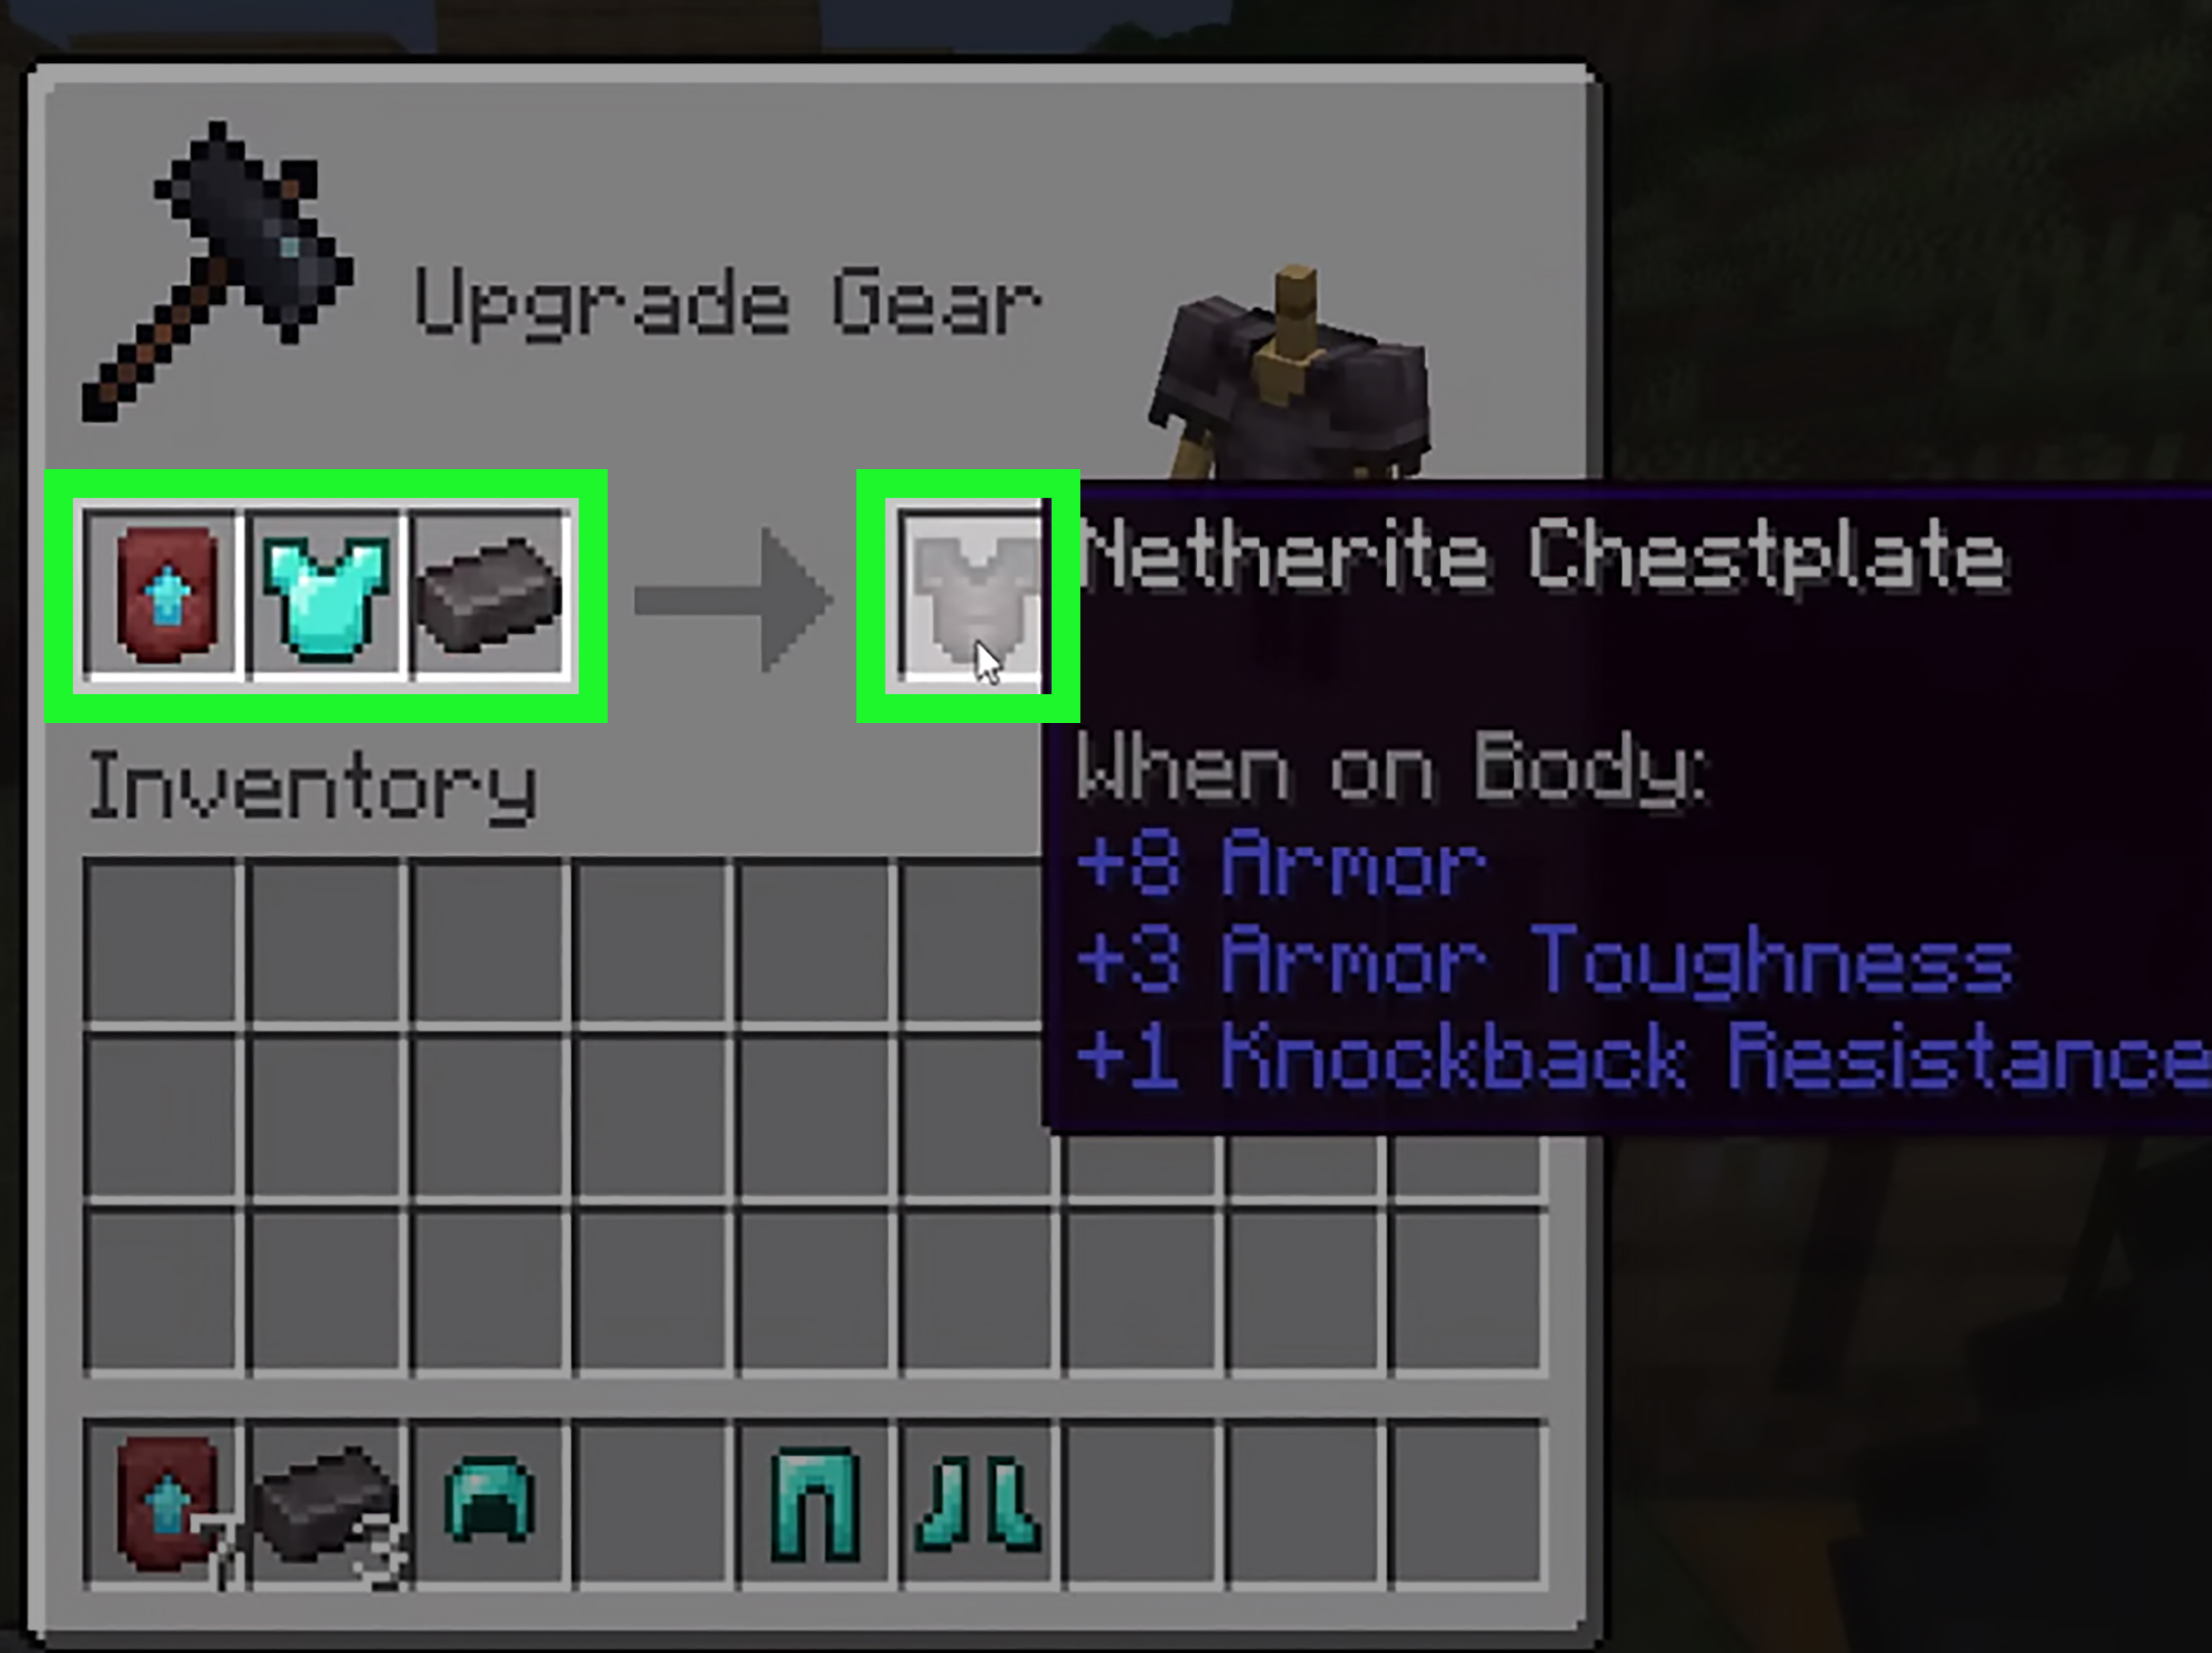
Step 10: Upgrade Diamond Armor to Netherite Armor
Open the Smithing Table. The interface provides slots for the smithing template, base equipment, and upgrade material.
For each armor piece, add:
- A Netherite Upgrade Smithing Template in the template slot.
- A Diamond armor piece in the equipment slot.
- A Netherite Ingot in the material slot.
The output will be the corresponding Netherite armor piece. For example:
- Template + Diamond Helmet + Netherite Ingot = Netherite Helmet
- Template + Diamond Chestplate + Netherite Ingot = Netherite Chestplate
- Template + Diamond Leggings + Netherite Ingot = Netherite Leggings
- Template + Diamond Boots + Netherite Ingot = Netherite Boots
The three-part Smithing Table recipeNetherite Upgrade template, Diamond gear, and Netherite Ingotis the required upgrade process described by modern Minecraft guides and the smithing system. the process four times. Congratulations: you now have a complete Netherite armor set and are legally permitted to stare dramatically across the Nether while pretending you planned everything perfectly.
Best Enchantments for Netherite Armor
Netherite armor becomes significantly more useful when paired with strong enchantments. Your ideal setup can vary by play style, but several enchantments are consistently valuable.
Protection IV
Protection is an excellent general-purpose choice for reducing many common forms of incoming damage. A full survival set commonly uses Protection IV across multiple pieces.
Unbreaking III
Unbreaking helps equipment last longer between repairs. Because Netherite equipment requires considerable effort to obtain, extending its practical life is an obvious priority.
Mending
Mending uses collected experience to repair equipped or held eligible items. Combined with Unbreaking III, it can dramatically reduce the risk of accidentally wearing expensive armor until it breaks.
Feather Falling IV
Feather Falling is especially useful on Netherite Boots. Mountains, End cities, caves, and poorly judged Elytra landings all seem determined to demonstrate the importance of fall protection.
Respiration and Aqua Affinity
For helmets, Respiration improves underwater breathing capabilities while Aqua Affinity helps with underwater mining speed.
Depth Strider
Depth Strider improves underwater movement and is a strong boot enchantment for players who frequently explore oceans and submerged structures.
Common Mistakes When Making Netherite Armor
Following an Outdated Tutorial
Older guides may tell you to combine Diamond armor and a Netherite Ingot in a Smithing Table without an upgrade template. That process predates the modern Netherite upgrade requirements.
Mining Ancient Debris With the Wrong Pickaxe
Use a Diamond or Netherite Pickaxe. Discovering rare Ancient Debris and failing to collect it because of the wrong tool is the sort of mistake that makes a player silently exit the game and reconsider gardening.
Forgetting the Gold Ingots
Ancient Debris alone does not become a Netherite Ingot. Four Netherite Scraps must be combined with four Gold Ingots for each ingot you make.
Using Your Only Template Without Planning
Templates are consumed by upgrades. If you have only one template and need several Netherite items, duplicate it before using your entire supply.
Assuming Netherite Makes You Lava-Proof
Dropped Netherite equipment resists burning in lava, but your character can still take fire and lava damage while wearing it. Carry Fire Resistance when exploring dangerous Nether areas.
Entering a Bastion Unprepared
A Bastion is not a peaceful museum with complimentary Netherite brochures. Prepare for hostile mobs, dangerous drops, and complicated layouts.
Is Netherite Armor Worth the Effort?
For long-term Minecraft survival worlds, Netherite armor is generally an excellent investment. It builds on the protection of Diamond armor while adding greater toughness, durability, and knockback resistance.
The larger advantage is not simply one dramatic stat increase. Netherite offers several small improvements that become valuable during difficult encounters. Better durability matters during extended adventures. Toughness becomes useful against stronger attacks. Knockback resistance can help prevent an enemy from sending you off a ledge at precisely the worst possible moment.
Still, there is no requirement to rush. The modern Netherite progression system deliberately gives Diamond gear more time to shine. Build a reliable food supply, obtain useful enchantments, prepare Fire Resistance Potions, and upgrade when your world is ready.
My Experience Making Netherite Armor: Lessons From the Nether
The first time I approached the Netherite armor process seriously, I made the classic mistake of thinking Ancient Debris would be the difficult part. I prepared pickaxes, food, blocks, and enough Fire Resistance to make a Blaze question its career choices. I found a good mining level, created long tunnels, and eventually returned with a respectable collection of Ancient Debris.
Then I discovered my real problem: I had almost no gold.
There is something uniquely humbling about placing 16 shiny Netherite Scraps in a chest and realizing they are basically expensive gray confetti until you collect enough Gold Ingots. Since then, I always count the entire recipe backward before starting a Netherite project. For full armor, I think in sets of four: four upgrades, four Netherite Ingots, 16 scraps, and 16 Gold Ingots.
Mining around Y=15 has also taught me that organization matters more than enthusiasm. My earliest tunnels looked like a Ghast had been given a pickaxe and several cups of coffee. I dug diagonally, changed elevation constantly, and rarely marked intersections. I found Ancient Debris, but I also spent an embarrassing amount of time searching for my original tunnel.
Now I create a clearly marked central route. Branch tunnels extend from that route at regular intervals. I carry obvious marker blocks that contrast with Netherrack, and I write down important coordinates. It is not glamorous, but neither is wandering underground for 20 minutes insisting, “The portal was definitely this way.”
Bed mining can be productive, although my early technique was approximately 30 percent strategy and 70 percent explosion. The important lesson was learning to control the angle of exposure and maintain strong cover before triggering the bed. I also stopped carrying my entire supply of beds in the immediate blast area. Minecraft has a wonderful way of turning one bad explosion into a chain of increasingly educational events.
TNT mining feels more controlled to me when resources are available. A prepared tunnel and deliberate TNT placement can expose a lot of blocks quickly. However, I still inspect the blast area slowly. Ancient Debris can appear on walls, ceilings, floors, or behind awkward ledges. Rushing through the crater sometimes means overlooking the resource you created the explosion to find.
Bastion Remnants changed my Netherite routine the most. Ancient Debris mining is repetitive but predictable. Bastions are not. Their layouts, hostile inhabitants, and vertical spaces reward patience. My safest Bastion runs involve creating controlled paths instead of treating the structure like a speedrunning course. I block corridors, establish temporary safe zones, and keep my shield accessible.
I have also learned never to carry all my newly mined Ancient Debris into a Bastion unless there is a very good reason. Deposit valuable materials first. A Bastion raid is dangerous enough without turning your inventory into a grand prize for whatever kills you.
Another lesson is to plan template duplication before touching the Smithing Table. The excitement of obtaining a Netherite Upgrade Smithing Template can make the upgrade button extremely tempting. However, I prefer counting every armor piece and checking my remaining templates first. Once the materials are organized in a chestfour Diamond armor pieces, four ingots, and four templatesthe final crafting process becomes pleasantly boring.
And honestly, that final moment is satisfying. You spend time finding diamonds, entering the Nether, mining Ancient Debris, gathering gold, surviving a Bastion, and managing templates. Then, piece by piece, the familiar blue Diamond armor becomes dark Netherite gear.
The best advice from all those trips is simple: Netherite rewards preparation more than speed. Carry the correct pickaxe. Bring Fire Resistance. Record coordinates. Count your gold. Duplicate templates intentionally. Deposit valuable loot before taking unnecessary risks.
You can certainly charge into the Nether with half a stack of bread and unstoppable confidence. Minecraft will allow it. Minecraft will also document the results with a death message.
Conclusion
Knowing how to make Netherite armor in Minecraft turns a complicated late-game objective into a manageable checklist. Start with Diamond armor, mine at least 16 Ancient Debris for a complete set, smelt the debris into Netherite Scrap, combine the scraps with Gold Ingots, and secure Netherite Upgrade Smithing Templates from Bastion Remnants. Then use a Smithing Table to upgrade each Diamond armor piece with one template and one Netherite Ingot.
The process demands exploration, mining, and careful resource management, which is exactly why a complete Netherite armor set feels so rewarding. Prepare properly, respect the lava, and remember that Piglin Brutes have never been impressed by your résumé.

