Hair Care
Easy DIY Industrial Pot Rack
Jun
If your pots and pans currently live in a cabinet situation best described as “metal avalanche with lids,” an easy DIY industrial pot rack may be exactly what your kitchen needs. It is practical, affordable, stylish, andbest of allit gives your cookware a proper home instead of forcing you to wrestle a skillet out from under three saucepans every time you want eggs.
An industrial pot rack uses sturdy materials such as black iron pipe, galvanized pipe, wood, flanges, rails, chains, or metal hooks to create open storage for cookware. The look is a little restaurant kitchen, a little urban loft, and a little “yes, I know where my sauté pan is.” Whether you mount it on a wall, hang it over an island, or build a shelf-and-rail combo, the goal is simple: free up cabinet space, keep everyday tools within reach, and add character to the room without remodeling the entire kitchen.
This guide walks through planning, materials, step-by-step building, installation safety, styling ideas, and real-world lessons from actually living with a pot rack. Because DIY should be satisfyingnot a surprise episode of “Why Is There a Hole in My Wall?”
Why Build an Industrial Pot Rack?
A DIY industrial pot rack solves one of the most common kitchen problems: cookware takes up a ridiculous amount of space. Pots are bulky. Pans do not stack politely. Lids behave like tiny cymbals with no respect for peace. A pot rack moves those awkward pieces out of cramped cabinets and into vertical space that often goes unused.
It Saves Cabinet Space
Wall-mounted and ceiling-mounted pot racks are especially useful in small kitchens, apartments, galley layouts, and older homes with limited cabinetry. By hanging the pieces you use most often, you open cabinet space for mixing bowls, food storage containers, small appliances, or the one roasting pan that only appears during the holidays like a festive sea creature.
It Keeps Cookware Easy to Reach
A good pot rack is not just decorative. It should support the way you cook. Place your skillet, saucepan, Dutch oven, and favorite utensils where your hand naturally reaches while making dinner. When the rack is installed near the range, prep zone, or kitchen island, cooking becomes smoother because you are not digging through dark cabinet corners while onions burn in the pan.
It Adds Industrial Style Without a Full Renovation
Industrial design works well because it celebrates honest materials: metal, wood, visible hardware, and simple shapes. A black pipe pot rack can make a plain kitchen feel more custom. Add stained wood for warmth, matte black hooks for contrast, or galvanized pipe for a slightly lighter farmhouse-industrial look. The finished rack becomes storage and decor at the same time, which is the best kind of double dutylike a spatula that also opens stubborn drawers. Kidding. Mostly.
Best Places to Install a DIY Industrial Pot Rack
Before buying materials, decide where the rack will go. The location determines the size, mounting method, hardware, and how comfortable it will be to use every day.
Wall-Mounted Pot Rack
A wall-mounted industrial pot rack is the easiest version for many DIYers. It can be made from a single metal pipe attached to wall flanges, a pipe rail mounted below a wood shelf, or a rectangular pipe frame secured to studs. This option works well on blank kitchen walls, pantry walls, or the side of a cabinet run.
Choose a wall near the cooking zone if you want everyday access. Choose a pantry or side wall if you mainly need storage for occasional cookware. Either way, measure carefully. Hanging pans should not hit cabinet doors, light switches, outlets, or your forehead.
Ceiling-Mounted Pot Rack
A ceiling-mounted pot rack can look dramatic over a kitchen island, peninsula, or open prep area. It is great when wall space is limited, but it requires stronger planning. The rack must be anchored into ceiling joists or proper structural framing, not just drywall. Cookware is heavy, especially cast iron, and gravity is famously committed to its job.
Ceiling racks should hang low enough to reach but high enough to avoid blocking sightlines or becoming a metal chandelier of regret. A common approach is to keep the bottom of hanging pans above head height for the tallest regular kitchen user, while still reachable with a comfortable arm extension.
Shelf-and-Rail Pot Rack
A shelf-and-rail design gives you two kinds of storage in one project. The top shelf can hold cookbooks, jars, cutting boards, small baskets, or decorative pieces, while the lower pipe rail holds hooks for pans and utensils. This is a smart choice if you want the rack to look built-in rather than like a pipe randomly escaped from the plumbing aisle.
Materials and Tools You Will Need
The exact supply list depends on the design, but most easy DIY industrial pot racks use similar parts. Keep the design simple if this is your first build. A straight rail with flanges is usually easier than a full rectangular frame with corners, elbows, and ceiling chains.
Basic Materials
- Black iron pipe or galvanized steel pipe, usually 1/2-inch or 3/4-inch diameter
- Pipe flanges for wall or ceiling mounting
- Pipe elbows, tees, or end caps, depending on the design
- S-hooks or pot rack hooks sized to fit the pipe
- Wood board if building a shelf-and-rail rack
- Wood stain, sealant, or paint
- Heavy-duty screws appropriate for studs or joists
- Drywall anchors or toggle bolts only when suitable for the load and wall type
- Painter’s tape for layout marks
Helpful Tools
- Stud finder
- Drill and drill bits
- Level
- Tape measure
- Pencil
- Socket wrench or screwdriver
- Sandpaper
- Safety glasses
- Step ladder
Safety note: if you are installing a heavy ceiling rack, drilling near wiring, mounting into masonry, or working above your comfort level, ask an experienced adult or qualified professional for help. A pot rack should make cooking easier, not introduce your skillet to the floor at high speed.
Easy DIY Industrial Pot Rack Plan
Here is a beginner-friendly wall-mounted version: a black pipe rail attached to a stained wood backer board. The board helps spread the load, gives the rack a finished look, and makes it easier to mount the whole piece securely to studs.
Recommended Size
For most kitchens, a rack between 30 and 48 inches wide is practical. A shorter rack works for a few everyday pans. A longer rack can hold multiple skillets, saucepans, utensils, and maybe a colander if you enjoy living boldly. Keep the depth shallow so cookware hangs close to the wall without swinging into walkways.
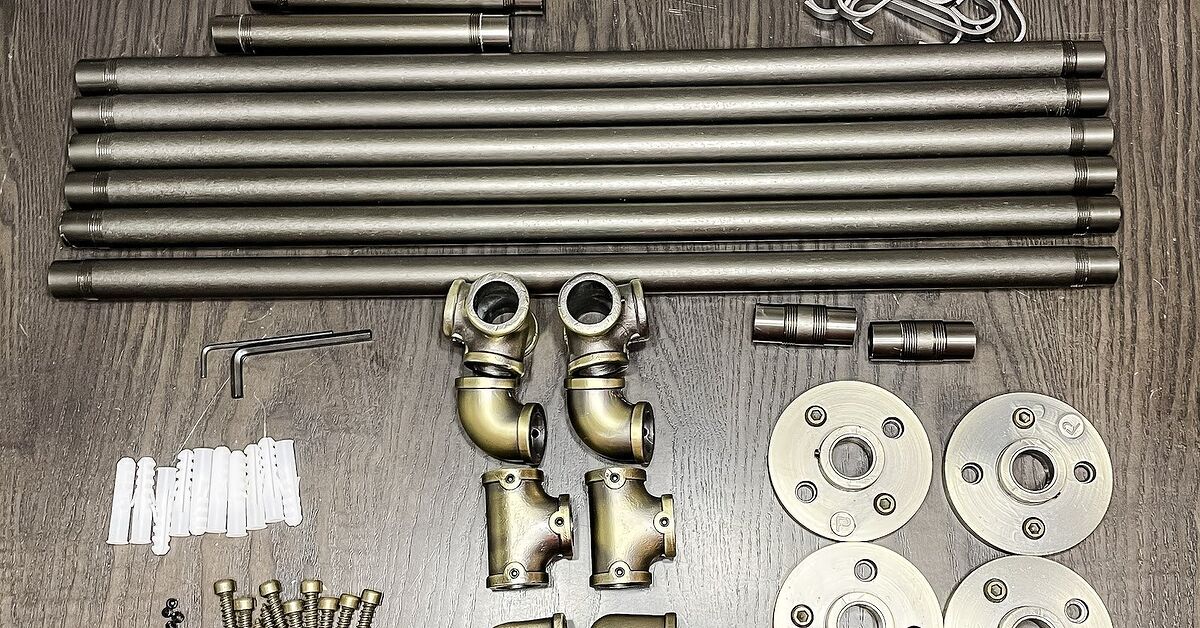
Simple Cut and Part List
- One wood board, approximately 1 inch thick, 6 to 8 inches tall, and 36 to 48 inches long
- One black iron pipe, 30 to 42 inches long
- Two pipe flanges
- Two short pipe nipples, 2 to 4 inches long, to project the rail from the board
- Two 90-degree elbows
- Eight to twelve S-hooks
- Wood screws for attaching flanges to the board
- Structural screws for mounting the board into wall studs
Step-by-Step Instructions
Step 1: Measure Your Cookware
Lay your most-used pans on the counter and measure their height from handle tip to bottom edge. This tells you how much vertical space the rack needs. Do not guess. Pan handles are sneaky. A skillet that looks modest on the counter may become a dangling medieval shield once it is on the wall.
Leave room below the rack so the cookware does not hit the countertop, backsplash, stove controls, or small appliances. If installing over a counter, make sure the lowest hanging pan still leaves comfortable working space.
Step 2: Choose the Mounting Height
Hold a pan against the wall where you want the rack. Mark the top and bottom positions with painter’s tape. Stand back and check the sightline from the kitchen entrance. The rack should feel intentional, not like cookware is slowly climbing the wall.
For daily-use pots, the hooks should be reachable without stretching or using a stool. For occasional cookware, higher placement is fine, but avoid creating a storage system that requires a gymnastics scholarship.
Step 3: Find the Studs
Use a stud finder to locate wall studs behind the drywall. Mark the stud centers with painter’s tape. Mounting into studs is strongly preferred for a pot rack because cookware weight adds up quickly. A cast-iron skillet, saucepan, and Dutch oven can turn a decorative rail into a serious load.
If the studs do not line up with your ideal flange positions, use a wood backer board. Secure the board to studs, then attach the pipe flanges to the board. This gives you more flexibility and a stronger installation.
Step 4: Prepare the Wood Board
Sand the board until smooth, especially along edges and corners. Stain it for a warm rustic look, paint it black for a bolder industrial finish, or seal natural wood for a lighter kitchen. Let the finish dry fully before installation. Damp stain and clean cookware are not friends.
If you want a more polished look, slightly round the board edges with sandpaper. This small detail makes the rack look finished instead of “I found a board and had ambition.”
Step 5: Clean and Assemble the Pipe
Black iron pipe often has manufacturing oil or residue on it, so wipe every piece thoroughly before bringing it near your cookware. A mild degreaser followed by a clean dry cloth usually works well. You can also seal the pipe with a clear protective finish if you want to reduce smudging.
Assemble the pipe rail on the floor first. Connect the flanges, short nipples, elbows, and long rail. Tighten by hand, then adjust until the flanges sit flat and the rail is level. Do a dry fit against the board before drilling.
Step 6: Attach the Pipe to the Board
Center the assembled pipe rail on the board. Use a level to make sure it is straight. Mark the flange holes, then drill pilot holes. Attach the flanges with screws that are long enough to grip securely but not so long that they poke through the back of the board like tiny metal porcupines.
Step 7: Mount the Board to the Wall
Hold the finished board against the wall, aligning it with the stud marks. Check that it is level. Drill pilot holes through the board and into the studs, then fasten it securely with appropriate screws. If your wall type is masonry, plaster, tile, or another specialty surface, use hardware designed for that material.
Do not rely on light-duty plastic anchors for heavy cookware. If anchors are necessary, choose hardware rated for the load, follow the manufacturer’s instructions, and keep well below the maximum rating. When in doubt, mount into studs or consult someone experienced.
Step 8: Add Hooks and Cookware
Place S-hooks along the rail and start with your lightest cookware. Add heavier pieces gradually while watching for movement. The rack should feel solid, with no shifting, cracking, or pulling at the wall. Arrange cookware by frequency of use: everyday pans in the easiest spots, occasional pieces toward the ends.
Design Ideas for a Better-Looking Pot Rack
Keep the Display Edited
Open storage looks best when it is curated. You do not need to hang every pan you own. Choose cookware with similar finishes or shapes if possible. Stainless steel, cast iron, carbon steel, copper, and enamel pieces can all look beautiful, but too many random items may create visual clutter.
Mix Function and Decor
Add a few useful accents: a small cutting board on the shelf, a jar of wooden spoons, a linen towel, or a hanging herb bundle. Keep it practical. This is still a working kitchen, not a museum exhibit titled “Ode to the Saucepan.”
Match the Hardware Finish
For a cohesive look, repeat finishes already in the kitchen. Matte black pipe works well with black cabinet pulls, dark faucets, or black light fixtures. Galvanized metal can complement stainless appliances. Copper pipe feels warmer and more vintage, though it can be pricier and softer than steel.
Common Mistakes to Avoid
Installing It Too High
A pot rack should be reachable. If you have to stretch, climb, or perform a dramatic kitchen ballet move, the rack is too high. Storage that is inconvenient will not stay organized for long.
Ignoring Weight
Do not install first and calculate later. Count the cookware you plan to hang and estimate the total weight. Include the rack itself. Heavy pans need strong mounting. This is not the place to test the emotional resilience of drywall.
Hanging Too Much
More hooks do not always mean better storage. Crowded pans bang together, scratch finishes, and make the rack look messy. Leave enough space to remove one item without taking three others with it.
Placing It in a Greasy Zone
Hanging cookware directly above a range may look chef-like, but it can collect grease quickly if ventilation is poor. If you cook often, consider placing the rack beside the stove, above a prep counter, or on a pantry wall.
Maintenance Tips
Dust the rack regularly and wipe the pipe with a dry or lightly damp cloth. If the rack is near the stove, clean it more often to prevent grease buildup. Check screws and hooks every few months, especially during the first season of use. Wood can expand and contract slightly, and hardware may need a gentle tightening.
Inspect cookware contact points too. If hooks scratch your pans, add rubber-coated hooks or small protective sleeves. For cast iron, make sure pans are fully dry before hanging. Nobody wants a beautiful pot rack with a side quest called rust.
Budget-Friendly Variations
Single-Rail Pipe Rack
The simplest version is one pipe mounted between two flanges directly into studs or onto a board. It is affordable, fast, and perfect for apartments or compact kitchens.
Industrial Shelf Pot Rack
Add a wood shelf above the rail to create extra storage. This version costs a little more but looks more custom and gives you a place for cookbooks, baskets, or decorative jars.
Ceiling Ladder Rack
A rectangular pipe frame hung with chains can work above an island. It offers more hanging capacity, but it requires secure joist mounting and careful height planning.
Pantry Pot Rack
If you prefer a cleaner kitchen look, install the rack inside a pantry or utility area. You still gain storage, but your cookware display stays behind closed doors.
Real-Life Experience: What It Is Like to Live With an Easy DIY Industrial Pot Rack
The best part of an easy DIY industrial pot rack is not the moment you finish installing it, although that moment does feel suspiciously heroic. The real reward comes a week later, when you reach for your favorite skillet and it is simply there. No cabinet excavation. No lid landslide. No mysterious clanging from the lower cupboard that makes everyone in the house ask, “Are you okay?”
In daily use, the biggest improvement is workflow. A pot rack turns cookware into a visible system. You start to notice which pans you actually use and which ones have been freeloading in your cabinets since 2018. The everyday skillet earns the prime hook. The small saucepan gets a spot nearby. The oversized stockpot may move to a lower cabinet because it is useful, yes, but also shaped like a metal pumpkin.
There is also a surprising design benefit. An industrial rack can make a basic kitchen feel more personal. Even a simple black pipe rail against a painted wall adds texture and contrast. If the kitchen has white cabinets, the dark metal creates a clean graphic line. If the kitchen has wood tones, the pipe gives it a workshop-meets-bistro feeling. Guests may assume the project was more complicated than it was. Accept the compliment gracefully. Do not immediately confess that you spent twenty minutes arguing with one elbow fitting.
However, living with a pot rack also teaches restraint. At first, you may want to hang everything. This is normal. The hooks are empty, the possibilities are endless, and suddenly even the colander looks like decor. But after a few days, the best setup usually becomes simpler. Hang only what you use often or what looks good enough to be on display. Store scratched nonstick pans, rarely used lids, and odd specialty pieces elsewhere. Open storage rewards editing.
Cleaning is another reality check. A rack near the stove will gather dust and cooking residue faster than one in a pantry. This does not mean it is a bad idea; it just means the rack should be part of your normal kitchen wipe-down routine. Smooth pipe and simple hooks are easier to clean than ornate racks with lots of curves. Industrial style wins again by being low-fuss and slightly smug about it.
The most important lesson is to overthink the mounting before you install, not after. A pot rack feels effortless only when it is solid. Finding studs, using the right fasteners, checking level twice, and loading cookware gradually are not glamorous steps, but they are the difference between a project you love and a project that makes you stare nervously at the wall every time someone closes a cabinet.
Another experience-based tip: test the sound. Metal hooks on metal pipe can make a little noise when pans move. Some people love that restaurant-kitchen clink. Others find it annoying before coffee. If you prefer quiet, use coated hooks or add small silicone sleeves where the hooks meet the rail. Tiny detail, big peace.
Finally, a DIY industrial pot rack changes how you think about kitchen storage. Instead of hiding everything, you create a working display. It encourages you to keep your cookware clean, accessible, and intentional. It also makes cooking feel a bit more inviting, as if the kitchen is ready for action. Even if tonight’s action is boxed mac and cheese, at least the pan will be easy to find.
Conclusion
An easy DIY industrial pot rack is one of those rare home projects that delivers style, storage, and satisfaction without requiring a full renovation. With black pipe, a sturdy board, reliable hardware, and careful mounting, you can transform unused wall or ceiling space into a practical cookware station. The key is to plan around your real cooking habits, mount into solid support, keep the display edited, and choose finishes that match your kitchen’s personality.
Whether you build a simple wall rail, a shelf-and-hook combination, or a dramatic ceiling rack, the result should make your kitchen easier to use. A great pot rack does not just hold pans. It saves cabinet space, speeds up dinner prep, protects cookware from cabinet chaos, and adds a confident industrial touch. In other words, it lets your kitchen say, “I am organized,” even if there is still one drawer full of mystery takeout sauce packets.
