
Beauty Tools & Accessories
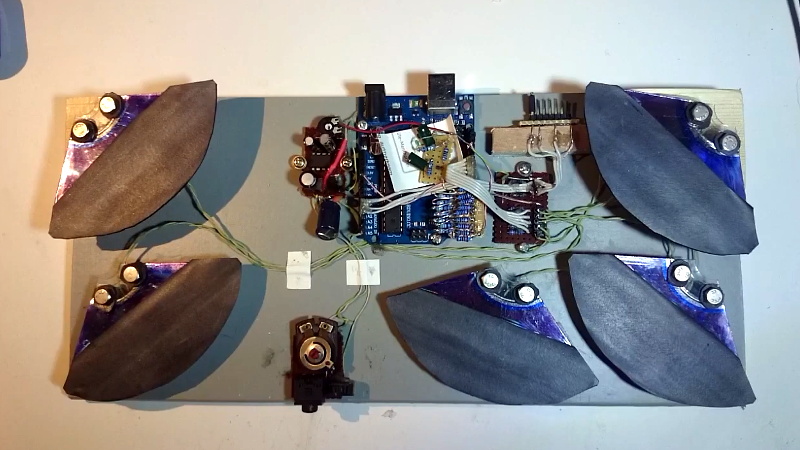
Arduino Drums Bring The Noise, No MIDI Required
Aug
There are two kinds of people in the world: those who hear a cardboard box and think “recycling,” and those who hear a cardboard box and think “that would make an excellent snare.” Arduino drum projects are for the second group.
An Arduino-powered drum machine does not need a laptop, a digital audio workstation, or a MIDI cable coiled on the floor like a disappointed spaghetti noodle. With a microcontroller, a few sensors or buttons, proper driver electronics, and something worth hitting, you can create a robotic percussion instrument that makes real physical sound. Not a sampled kick drum. Not a virtual cymbal. A real object getting smacked on purpose by a tiny machine with rhythm ambitions.
That is the charm of Arduino drums. The Arduino handles timing, patterns, triggers, and interaction. Solenoids, servos, motors, or other actuators provide the movement. The drum, pot lid, wood block, cowbell, metal bowl, or suspiciously resonant coffee can supplies the voice. It is part electronics project, part instrument design, and part excuse to make your garage sound like a robot band rehearsal.
What “No MIDI Required” Really Means
MIDI is useful, but it is not a mandatory admission ticket to the world of electronic percussion. MIDI is simply a communication protocol that lets devices exchange musical messages such as note events, timing data, and velocity information. It can be great for connecting an Arduino instrument to a computer, keyboard, or sequencer. But an Arduino drum machine can create rhythm all by itself.
Instead of waiting for MIDI notes, your Arduino can trigger drum hits from:
- Push buttons that launch preset beats.
- Potentiometers that control tempo, swing, or pattern length.
- Piezo sensors that detect a person striking a pad or drum.
- Light sensors, distance sensors, or capacitive touch controls.
- Stored rhythm patterns written directly into the sketch.
- Randomized rules that generate controlled chaos without hiring a drummer who owns twelve tambourines.
This approach turns the Arduino into both conductor and drummer. It keeps time, decides which actuator fires, and can react to a player without relying on a computer. That makes a no-MIDI Arduino drum project especially appealing for interactive art, classroom demonstrations, kinetic sculptures, tabletop instruments, arcade-style rhythm games, and standalone beat machines.
How Arduino Drums Actually Make Sound
The basic idea is wonderfully simple: the Arduino sends a low-voltage control signal, a driver circuit handles the higher current needed by an actuator, and the actuator strikes a physical object. The sound comes from the physical impact.
The Brain: Arduino Timing and Sequencing
An Arduino board is well suited to repetitive timing tasks. A basic drum sequencer can divide a measure into steps, such as 8, 12, or 16 positions. Each step tells the Arduino whether to fire the kick, snare, hi-hat, wood block, bell, or whatever else has been drafted into percussion duty.
For example, a four-on-the-floor pattern may activate a low drum on every quarter note, while a lighter tapping sound plays on eighth notes. A more experimental rhythm might use irregular step lengths, probability-based hits, or alternating accents. The Arduino does not care whether it is playing funk, techno, polyrhythms, or the sound of a washing machine achieving spiritual enlightenment.
For responsive drum projects, it is usually better to use non-blocking timing with millis() or micros() rather than long delay() calls. A delay can make the whole project pause while one event finishes. Non-blocking timing allows the Arduino to keep listening for buttons, reading sensors, updating LEDs, and scheduling the next hit while a pattern is already playing.
The Muscle: Driver Electronics
An Arduino output pin should not directly power a solenoid, motor, or other high-current actuator. The board is the conductor, not the weightlifter. A control pin should send a signal to a suitable driver stage, often built around a logic-level MOSFET, transistor array, relay module, motor driver, or a purpose-built actuator driver board.
Solenoids are especially popular in robotic percussion because they move in a fast, direct line. When energized, the internal plunger moves and can strike a drumhead, bell, metal bar, or wooden surface. However, solenoids can draw far more current than an Arduino pin can safely supply. They also create inductive voltage spikes when switched off, so each channel needs appropriate protection, commonly including a flyback diode or a driver board designed for inductive loads.
Use a separate power supply sized for the actuators, follow the voltage and duty-cycle requirements of each solenoid, and connect grounds correctly when using a shared-ground low-side driver design. A project that works for thirty seconds but turns into a tiny space heater after five minutes is not “high performance.” It is merely auditioning for a cautionary tale.
The Voice: Physical Percussion Objects
The most exciting part of an Arduino drum machine is that nearly anything can become an instrument. A small practice pad produces a focused thump. A metal bowl can become a bright, ringing bell. A spring makes a wonderfully strange twang. A piece of hardwood can create a click that cuts through a mix. A plastic bucket can become a low-budget kick drum with surprisingly high self-esteem.
Material, shape, mounting method, and striker tip all matter. A bare metal solenoid plunger may create a sharp, aggressive attack. Adding a rubber cap, felt pad, silicone bumper, wooden dowel, or small foam mallet can soften the hit and change the tone dramatically. In many builds, mechanical adjustment matters as much as code. Moving an actuator a few millimeters can transform a dull knock into a useful musical sound.
Choosing the Right Actuator for an Arduino Drum Project
Solenoids: Fast, Punchy, and Slightly Dramatic
Solenoids are the classic choice for robotic drums because they can produce quick impacts with simple on-off control. They are excellent for short percussive attacks, especially when mounted securely above a drumhead, tongue drum, block, cymbal, or metal object.
The tradeoff is heat. A solenoid that stays energized too long can overheat, lose performance, or fail. Drum code should use short pulses and allow enough recovery time for the actuator. The exact pulse duration depends on the particular solenoid, striker mass, supply voltage, and target surface, so testing is essential. Start conservatively and increase only after observing reliable movement and safe operating temperature.
Servos: Better for Arms, Mallets, and Expressive Motion
Servo motors are useful when you want a more visible mechanical performance. A servo-driven arm can lift and lower a mallet, sweep across a row of bells, or tap a cymbal with a theatrical flourish. Servos are generally slower than solenoids, but they can create larger motions and more expressive gestures.
They work well for projects where the audience should see the machine play, not just hear a series of mysterious clicks from inside a box. A robotic drummer with moving arms has a certain stage presence. It may not request a backstage fruit platter, but it is getting ideas.
Motors and Eccentric Mechanisms: Useful for Repeating Motion
DC motors, geared motors, and cam mechanisms can create repeated strikes or rotating beaters. These systems are useful for kinetic sculptures, automated shakers, rotating brushes, or continuous percussion effects. They require more mechanical planning than a simple solenoid, but they can produce sounds that feel alive and less like a machine gun made of cookware.
Building a Standalone Arduino Drum Sequencer
A simple no-MIDI sequencer can be organized around a rhythm grid. Each row represents an instrument, and each column represents a time step. A value of 1 means “hit now,” while 0 means “stay quiet and contemplate your artistic choices.”
The Arduino advances through the pattern one step at a time. At every step, it checks which instruments should trigger. The tempo can be calculated from beats per minute, while a potentiometer can adjust tempo in real time. Another knob can control swing by delaying every second step slightly, which helps a rigid pattern feel less like it was composed by a very punctual spreadsheet.
You can add more personality with several simple controls:
- Tempo knob: Changes the beat speed.
- Pattern selector: Switches among rock, techno, breakbeat, ambient, or experimental patterns.
- Fill button: Adds a short burst of extra hits at the end of a measure.
- Randomness control: Introduces occasional variations without destroying the groove.
- Accent control: Changes pulse length or actuator behavior for stronger hits.
- Mute switches: Turn individual percussion channels on or off.
For a more advanced Arduino drum machine, use multiple patterns, chain them into songs, and store settings in nonvolatile memory. That allows the instrument to remember a favorite tempo or performance mode after power is removed. It is a small detail, but it makes the project feel less like a science fair prototype and more like an actual instrument.
Piezo Sensors Turn Arduino Drums Into Playable Instruments
A piezo sensor can turn a physical strike into an electrical signal. When the sensor flexes from vibration, it produces a voltage that the Arduino can read. This makes it possible to build drum pads, trigger zones, stomp boxes, or hybrid instruments where a human player and robotic percussion system perform together.
Piezo sensors are useful for more than just detecting a hit. With thoughtful code, the Arduino can estimate relative strike strength from the sensor’s peak signal. A harder hit can trigger a louder-looking LED animation, a longer solenoid pulse, a faster rhythmic response, or a second layer of percussion.
Piezo inputs need proper conditioning and protection because a hard strike can create a voltage spike beyond what a microcontroller input should receive directly. Use a tested input circuit, include appropriate resistors and protection components, and experiment with threshold values in code. Too low a threshold creates false triggers from vibration. Too high a threshold makes the drum pad feel like it requires a personal grudge to activate.
Mechanical Design Is Half the Music
It is tempting to focus entirely on code, but Arduino drums are physical instruments. The mount has to be rigid enough that the actuator strikes consistently. The target object must not wobble away from the striker. Wires need strain relief. Moving parts need clearance. And the whole structure should survive the occasional overenthusiastic test pattern.
Start with one reliable channel before building a twenty-piece robot orchestra. Mount a single solenoid above a practice pad or wood block. Test different pulse lengths. Try a rubber striker and then a harder plastic tip. Move the actuator closer and farther away. Listen carefully. You are not just debugging hardware; you are tuning an instrument.
For multi-instrument builds, organize the frame so each actuator can be adjusted independently. Slotted mounting holes, adjustable brackets, small pivots, and removable striker tips save enormous amounts of frustration later. A fixed mount may look tidy until it produces a tone that resembles someone dropping a spoon in a bathtub. Adjustable hardware lets you rescue the sound without rebuilding the entire machine.
Common Arduino Drum Problems and How to Fix Them
The Arduino Resets When a Drum Hits
This usually points to a power or noise problem. Actuators can create electrical noise and current demands that affect the Arduino if wiring, grounding, power distribution, or suppression components are inadequate. Keep high-current actuator wiring organized, use a suitable power supply, avoid powering solenoids from the Arduino board, and make sure protective components are correctly installed.
The Solenoid Moves but Barely Hits Anything
Check the actuator voltage, current capability of the supply, driver selection, mechanical alignment, and striker distance. A solenoid may be moving correctly but losing its energy before it reaches the target. Reducing unnecessary striker weight and improving the mount can make a bigger difference than simply increasing the pulse duration.
The Beat Feels Late or Uneven
Long blocking delays, slow mechanical return, inconsistent actuator travel, or overloaded code can all affect timing. Use a structured timing loop, keep pulse events short, and test each channel at the intended tempo. Mechanical systems have limits. A solenoid can be fast, but it is not obligated to become a 300 BPM jazz drummer just because you typed a larger number into a variable.
Why Arduino Drums Are More Than a Weekend Gadget
An Arduino drum machine teaches several disciplines at once: programming, timing, electronics, power management, mechanical design, acoustics, and creative experimentation. It encourages the kind of learning that happens when theory meets a real object and the real object responds by making an unexpectedly loud noise.
It is also a reminder that electronic music does not have to live behind a screen. A drum machine can have moving parts, imperfect timing, visible mechanics, and a sound shaped by wood, metal, rubber, tension, and air. Those imperfections are not always bugs. Sometimes they are the reason a robotic instrument feels memorable.
Hands-On Experience: What Building Arduino Drums Feels Like
The first real experience of building Arduino drums usually begins with misplaced confidence. You connect a small actuator, upload a sketch, tap the serial monitor like a nervous stage manager, and expect an elegant mechanical beat. Instead, the first strike may sound like a stapler falling down a staircase. This is normal. In fact, it is practically the official opening ceremony of robotic percussion.
After the first successful hit, the project becomes addictive. A single tap is interesting. Two taps in a repeating rhythm are exciting. Add a second sound, and suddenly the workbench is no longer a workbench. It is a tiny rehearsal studio where a coffee tin plays backup to a wooden block, while an Arduino quietly keeps everyone on schedule.
The most surprising lesson is how much sound depends on physical details. A solenoid mounted one centimeter too high may make a weak click. Move it closer, add a rubber tip, and the same code produces a warm knock. Replace the rubber with a metal cap, and the project turns into something closer to industrial techno. The code may remain unchanged while the instrument’s personality transforms completely.
There is also a strange satisfaction in debugging a beat. Software bugs are often invisible, but an Arduino drum project makes its mistakes loudly. A skipped step becomes an obvious missing hit. A timing problem becomes a clumsy rhythm. A loose bracket announces itself with a rattle that no amount of pretending can hide. The machine gives immediate feedback, sometimes with the subtlety of a marching band in a library.
Once the project becomes reliable, it starts inviting performance ideas. A button can launch a fill. A knob can slow the tempo until every strike feels enormous. A piezo sensor can let a human player wake up the robot drummer with a tap. LEDs can flash with each hit, turning the device into a small visual instrument as well as a sound machine.
That is when an Arduino drum project stops feeling like a pile of components. It becomes an instrument with habits. It has a particular attack, a particular groove, and a particular set of weird noises that only happen when the room is quiet and someone asks, “What does this switch do?” The best builds leave room for those accidents. They are often where the most interesting rhythms begin.
Ultimately, the experience is less about replacing a human drummer and more about discovering new ways to create rhythm. Arduino drums can be precise, messy, mechanical, playful, and deeply personal. They make sound visible. They turn code into motion, motion into impact, and impact into music. And they do it without demanding that MIDI attend the party.

