Body Care
A Nixie Clock, The Hard Way
Jun
A Nixie clock is already a wonderfully unnecessary object. Your phone, microwave, laptop, car dashboard, smart speaker, and possibly your refrigerator can all tell time with less drama. Yet none of them glow like a tiny orange laboratory from 1964. None of them make visitors lean in and say, “Wait, are those actual numbers inside glass?” And none of them require you to respect a high-voltage power supply that could ruin your afternoon faster than a misplaced screwdriver.
The phrase “A Nixie Clock, The Hard Way” captures a very specific kind of maker energy: taking a simple problemdisplaying hours, minutes, and secondsand solving it with antique test equipment, high-voltage electronics, careful timing, and a heroic disregard for the easy path. The famous hard-way approach turns a vintage Nixie-based frequency counter into a clock by feeding it a carefully generated signal. Instead of building a normal six-digit clock, the project persuades a piece of old Hewlett-Packard-style lab equipment to display time as if it were frequency. Is that practical? Not especially. Is it beautiful? Absolutely.
This article explores what makes Nixie clocks special, how the “hard way” differs from a standard DIY build, what components matter, where the technical traps hide, and why people still fall in love with these glowing relics decades after LEDs took over the world.
What Is a Nixie Tube?
A Nixie tube is a cold-cathode numeric display. Inside the glass envelope is a wire-mesh anode and a stack of cathodes shaped like numerals, usually 0 through 9. When high voltage is applied and one cathode is selected, the gas around that numeral ionizes and glows. The result is not a pixel, not a segment, and not a printed symbol. It is a real number made of metal, surrounded by orange plasma. Basically, it is typography with a tiny thunderstorm.
Most Nixie tubes use a low-pressure gas mixture based on neon, often with argon and, in some later tubes, small amounts of mercury to improve life and reduce cathode issues. Unlike vacuum tubes used in amplifiers, Nixie tubes do not rely on heated filaments for thermionic emission. That is why they are called cold-cathode displays. They look like vacuum tubes, but electrically they behave more like specialized neon lamps with a talent for counting.
Nixie tubes became popular in the 1950s and 1960s for laboratory instruments, calculators, counters, industrial controls, telephone equipment, and early digital readouts. They were eventually replaced by LEDs, LCDs, and vacuum fluorescent displays because those technologies were cheaper, lower-voltage, more compact, and easier to drive. Still, modern makers keep coming back to Nixies because their glow feels warm, mechanical, and strangely alive.
Why Build a Nixie Clock the Hard Way?
The easy way to make a Nixie clock is to buy a kit. Many kits include a microcontroller, a real-time clock chip, a boost converter, tube sockets, driver circuitry, and a nice PCB. You solder the parts, test the board, place it in a case, and proudly tell everyone you built a clock. That is a perfectly respectable path.
The hard way is different. The hard way means you design your own high-voltage supply. Or you write your own multiplexing firmware. Or you rescue old tubes from mystery boxes that smell faintly like dust, machine oil, and geopolitical tension. In the most wonderfully absurd version, you take a vintage Nixie frequency counter and use a signal generator to feed it values that correspond to the current time.
In that version, the frequency counter does what it was born to do: count pulses. The trick is to generate a frequency that makes the counter’s display resemble a clock. If the signal is controlled precisely enough, the glowing digits can show hours, minutes, and seconds. You have not so much built a clock as negotiated with a 1960s instrument until it agrees to become one.
The Frequency Counter Trick
A frequency counter measures how many cycles occur in a defined time window, often one second. If you feed it 12,345 pulses per second, it displays 12,345 in the appropriate range. That basic behavior can be turned into a clock by generating a sequence of signals that represent time. For example, a programmed generator can step through values that map to 00:00:00, 00:00:01, 00:00:02, and so on.
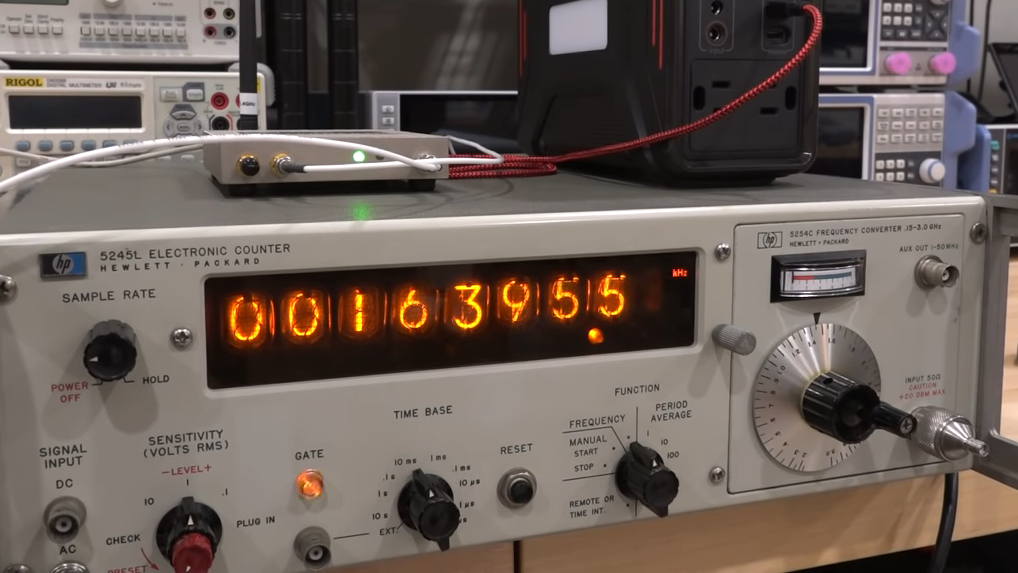
The hard-way Nixie clock concept becomes especially charming when the display device is not a modern screen but an old frequency counter with Nixie tubes on the front. The counter already has the display, power supply, digit logic, case, switches, and gorgeous lab-bench personality. The builder’s job is to repair it, calibrate it, understand it, and then feed it the right signal without permanently damaging the instrument.
This is an important detail: a good restoration-minded project avoids destructive modifications whenever possible. Vintage test equipment has historical and practical value. Adding a reversible interface, external signal generator, or plug-in timing circuit keeps the original machine intact. That approach respects the object while still letting it enjoy a second career as the world’s most overqualified clock.
Core Parts of a Traditional Nixie Clock
A standard DIY Nixie clock usually has five major sections: the tubes, the high-voltage supply, the digit drivers, the timekeeping circuit, and the enclosure. Each part sounds simple until it is on your bench at midnight and one digit is ghosting like it saw a tiny electronic ghost.
1. Nixie Tubes
Popular tubes include IN-12, IN-14, IN-16, IN-18, and various Burroughs or National-branded types. Tube choice affects everything: voltage, current, socket style, digit shape, availability, price, and enclosure size. Large tubes look dramatic but cost more. Smaller tubes are easier on the budget but may require more careful layout if you want a balanced front panel.
2. High-Voltage Power Supply
Most Nixie tubes need roughly 150 to 180 volts DC to strike and glow properly, though exact values depend on the tube model and current-limiting resistor. Builders often use a boost converter powered from a 12-volt adapter. Circuits based on switching regulators, inductors, fast diodes, MOSFETs, and high-voltage capacitors are common. The power supply does not need to deliver huge current, but it must be stable, safe, and quiet enough to avoid flicker or audible whining.
3. Driver Circuitry
A Nixie tube is not driven like a seven-segment LED. Each numeral is a separate cathode. To light the number 7, the circuit pulls the 7-shaped cathode to ground while the anode is held at high voltage through a resistor. Traditional driver chips such as the SN74141 or Soviet K155ID1 convert binary-coded decimal inputs into one-of-ten cathode outputs. Other designs use shift registers and high-voltage transistors such as MPSA42 or similar parts.
4. Timekeeping
For a normal Nixie tube clock, timekeeping may come from a DS3231 real-time clock module, a microcontroller connected to Wi-Fi and NTP servers, a GPS time source, or an external precision reference. The DS3231 is popular because it is inexpensive, accurate, and simple to integrate. Wi-Fi designs can correct themselves automatically, though they add software complexity and network dependency.
5. Enclosure and Interface
The case matters more than beginners expect. Nixie clocks look best when the enclosure feels intentional: walnut, aluminum, acrylic, brass, or a repurposed instrument case. Controls should be reachable but not ugly. Ventilation, strain relief, insulation, and service access matter too. A clock that looks like a museum piece but requires a full archaeological excavation to replace one tube is less charming after the first repair.
Direct Drive vs. Multiplexing
One major design decision is whether to directly drive each tube or multiplex the display. In a direct-drive design, every tube has its own driver path. This uses more components, more board space, and more wiring, but it is straightforward and can produce steady brightness.
Multiplexing reduces the number of driver components by lighting one tube at a time very quickly. Your eyes blend the rapid sequence into a continuous display. For a six-tube clock, multiplexing can reduce the required control lines dramatically. The trade-off is that firmware timing becomes more important, peak currents may be higher, and poor blanking can cause ghost digits. Multiplexing is elegant when done well and haunted-looking when done poorly.
Many builders add dimming, cross-fading, or slot-machine-style digit cycling. These features are not just decorative. Cycling through digits can help reduce uneven cathode wear, especially for numbers that appear less often. A clock that only shows a limited set of digits for long periods may develop cathode poisoning, where parts of a numeral stop glowing evenly.
The High-Voltage Lesson Nobody Should Learn Twice
Nixie projects are approachable, but they are not toys. A 170-volt supply may be low current, but high-voltage capacitors can hold a charge after power is removed. Safe builders use bleeder resistors, proper insulation, fused inputs, enclosed terminals, and sensible testing procedures. They also keep one hand away from the circuit when probing live boards, because becoming part of the return path is not a recommended debugging method.
The most common beginner mistake is treating the high-voltage side like ordinary Arduino wiring. It is not. Breadboards are convenient for logic-level experiments, but high-voltage circuits deserve spacing, careful layout, and components with appropriate voltage ratings. A beautiful Nixie clock begins with respect for electricity, not bravery. Bravery is what happens right before someone says, “Interesting smell.”
Accuracy: From Cheap Clocks to Lab-Grade Time
A basic Nixie clock only needs to stay reasonably accurate for daily use. A DS3231 module can do that nicely. A Wi-Fi microcontroller can sync with internet time. A GPS-based clock can use satellite time. But the hard-way frequency-counter approach invites a different mindset: if the display instrument is a precision counter, why not feed it from a stable reference?
Vintage counters often depend on internal oscillators that may drift with age. Restoring one can involve recapping power supplies, cleaning switches, checking timebase stability, and calibrating against a known reference. Some builders add or use an external 10 MHz reference, such as an oven-controlled crystal oscillator, GPS-disciplined oscillator, or lab standard. At that point, the clock is no longer simply “close enough.” It is aggressively correct, which is very funny for an object that still looks like it belongs beside a slide rule.
Common Problems in Nixie Clock Builds
Ghosting happens when a digit faintly glows even though it should be off. It often points to multiplex timing, leakage paths, insufficient blanking, or driver issues.
Flicker can come from low refresh rates, unstable high voltage, poor filtering, or software timing problems. If the clock looks nervous, the circuit probably is too.
Uneven brightness may be caused by mismatched tubes, incorrect current-limiting resistors, aging cathodes, or multiplex duty-cycle differences.
Coil whine can come from the boost converter. Inductor selection, switching frequency, load behavior, and mechanical vibration all matter. Sometimes the electronics are working perfectly but singing an unwanted solo.
Bad driver chips are another real-world headache. Vintage SN74141 and K155ID1 parts may be old, counterfeit, damaged, or simply inconsistent. Socketing ICs makes troubleshooting much less painful.
Why the Hard Way Is Worth It
Building a Nixie clock the hard way teaches more than soldering. It touches digital logic, analog power supplies, timing references, PCB layout, thermal design, restoration, firmware, enclosure design, and electrical safety. A kit teaches assembly. A scratch build teaches systems thinking. A vintage frequency-counter clock teaches humility with a side order of glowing numerals.
The best part is that the finished object tells two kinds of time. First, it tells the hour. Second, it tells the history of electronics: cold-cathode displays, lab instruments, TTL logic, precision counters, and the long human habit of making simple things wonderfully complicated because the complicated version has soul.
Experience Notes: What Building One Feels Like
The experience of building a Nixie clock, especially the hard way, begins with confidence and ends with a much healthier respect for datasheets. At first, the project looks straightforward. Six tubes, six digits, a microcontroller, a clock chip, a power supply, and a case. Easy. Then you realize every tube has a pinout that appears to have been designed by someone who enjoyed puzzles a little too much. The socket footprint must be correct. The digits are stacked in physical depth, so some numerals look slightly different from different angles. Suddenly, “just display the time” has become a small engineering department.
The first real thrill comes when one tube lights. Not the whole clock. Not even a proper digit sequence. Just one orange number glowing on the bench while the rest of the circuit looks like a cyberpunk spaghetti dinner. That moment is ridiculously satisfying. It proves the high-voltage supply works, the tube is alive, and the idea is no longer theoretical. It also proves that you now have 170 volts sitting nearby, so the celebration should not involve waving both hands over the board.
Debugging is where the project develops personality. One digit refuses to appear. Another appears in the wrong tube. A colon lamp blinks like it knows something you do not. The firmware says it is 12:34:56, while the display says something closer to “12:84:5G,” which is impressive because there is no G. This is when a logic analyzer, multimeter, and patient labeling become your best friends. The hardest bugs are often not glamorous. They are swapped pins, missing grounds, reversed transistors, incorrect resistor values, or code that updates the display before the previous digit is properly blanked.
The enclosure phase adds another kind of lesson. Electronics people often underestimate mechanical work until they drill a hole two millimeters off-center in a beautiful wooden case. A Nixie clock deserves symmetry. Tube spacing, viewing angle, power connector placement, button feel, and cable routing all affect the final impression. A good enclosure turns a working circuit into an object people want to keep. A bad enclosure turns it into a science fair project that escaped.
The vintage frequency-counter method adds a restoration mindset. Instead of asking, “How do I make a display?” you ask, “How do I preserve this instrument while giving it a new trick?” That changes the project. You clean contacts, replace tired capacitors, check calibration, study signal levels, and avoid drilling random holes in classic equipment. You become a caretaker as much as a builder. When the old counter finally displays time, it feels less like you made a clock and more like you taught a retired machine a new language.
The final reward is daily use. A Nixie clock does not merely sit on a shelf; it performs. The digits roll forward with a soft glow, the case warms visually even if the tubes themselves stay modest, and the room gains a small piece of functional nostalgia. It is inefficient in the best possible way. A $5 digital clock can tell time. A hard-way Nixie clock tells time, tells a story, and quietly reminds you that electronics can be both engineering and theater.
Conclusion
A Nixie Clock, The Hard Way is not about choosing the fastest route. It is about enjoying the scenic road through high voltage, old test equipment, glowing gas, timing references, and careful craftsmanship. Whether you build a traditional microcontroller-based Nixie clock or convert a vintage frequency counter into a time display, the appeal is the same: visible electronics with character.
The hard way demands patience. It asks you to read datasheets, respect power supplies, plan driver circuits, solve timing problems, and make the outside look as good as the inside works. But when the orange numerals finally settle into a clean, accurate display, the effort makes sense. You did not just build a clock. You built a conversation piece, a history lesson, and a tiny glowing monument to doing things beautifully, even when there was a much easier option.
