
Hair Care
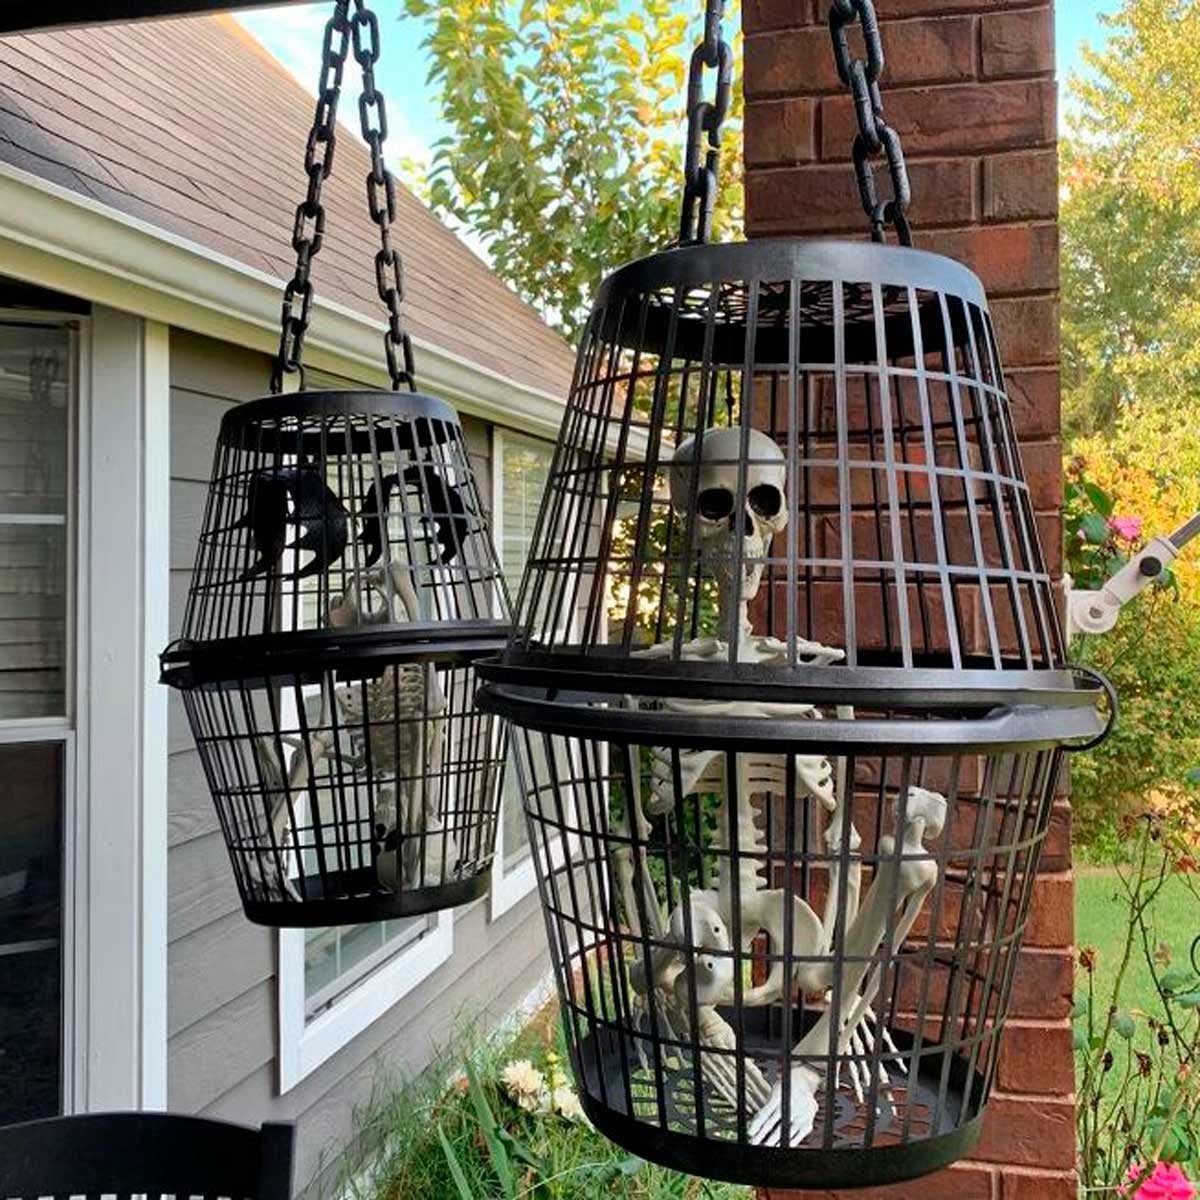
How to Turn a Laundry Basket into a Spooky Halloween Cage Decoration
Jul
Halloween decorating does not have to involve a fog machine, a storage unit full of animatronics, or a budget that makes your skeleton clutch its bony chest. Sometimes the best spooky decor starts with something wildly unglamorous: a plastic laundry basket. Yes, the same humble basket that normally holds socks, towels, and one mysterious shirt nobody in the house claims can become a creepy hanging cage for a skeleton, ghost, raven, or unlucky plastic ghoul.
This DIY Halloween cage decoration is popular for a reason. It is cheap, lightweight, surprisingly dramatic, and easy enough for beginners. By combining two laundry baskets, zip ties, spray paint, chain, creepy cloth, battery-operated lights, and a small skeleton, you can create a haunted cage that looks like it escaped from a cursed dungeon yard sale. Better still, it works for porches, trees, entryways, garage displays, haunted house corners, and front-yard graveyard scenes.
In this guide, you will learn how to turn a laundry basket into a spooky Halloween cage decoration step by step, plus how to make it look aged, secure it safely, light it without fire risks, and customize it so it does not scream “laundry day” louder than “haunted prison.”
Why a Laundry Basket Makes the Perfect Halloween Cage
A plastic laundry basket already has the basic structure of a cage. It has vertical or grid-style openings, a rounded or rectangular form, and enough flexibility to be cut, tied, stacked, or painted. Once it is sprayed black, brushed with silver or brown highlights, and dressed with chains, bones, or tattered fabric, it stops looking like a household chore container and starts looking like something a vampire landlord would keep in the basement.
The biggest advantage is cost. Dollar stores, discount shops, thrift stores, and big-box retailers often sell lightweight laundry baskets for very little money. Since you need two baskets per cage, this project remains budget-friendly even if you make several. A cluster of three hanging cages at different heights can create a full haunted-yard moment without the price tag of store-bought Halloween props.
Another advantage is weight. Plastic baskets are much easier to hang than metal cages, wood frames, or heavy props. That makes them ideal for porch hooks, tree limbs, shepherd hooks, garage beams, or indoor ceiling hooks, as long as the hanging point is sturdy and the display is placed safely away from walkways and open flames.
Supplies You Will Need
Before you begin, gather everything in one place. Halloween crafting is more fun when you are not wandering around with wet spray paint on your hands looking for zip ties like a confused goblin.
Basic Materials
- Two matching plastic laundry baskets for each cage
- Black zip ties
- Black outdoor spray paint or spray paint made for plastic
- Silver, gray, brown, or copper paint for aging effects
- Plastic chain, rope, twine, or faux metal chain
- Small plastic skeleton, skull, raven, ghost, doll, or monster prop
- Battery-operated LED lights, glow sticks, or flameless candles
- Creepy cloth, faux spider webs, plastic spiders, moss, or gauze
- Scissors or utility knife
- Sandpaper or sanding sponge
- Drop cloth or cardboard for painting
- Protective gloves and eye protection
Optional Extras
- Shower curtain rings for hanging chains
- Foam bones or loose skeleton parts
- Rust-colored craft paint
- Dry brush for weathering
- Fishing line for floating effects
- Motion-activated sound device
- Battery tea lights
- Matte clear sealer for outdoor durability
Step 1: Choose the Right Laundry Baskets
The best baskets for this Halloween cage decoration are lightweight, flexible, and full of open slots. Round baskets create a classic hanging birdcage shape, while rectangular baskets create a more dungeon-like prison cage. Both can work beautifully. The key is to choose two baskets that match in size and shape so their rims can meet neatly.
If you want to place a full small skeleton inside, test the fit before you start cutting. A three-foot skeleton may work in larger baskets, while smaller skeletons, skulls, ravens, or bones fit better in dollar-store baskets. Do not force a prop that is too large, unless your Halloween theme is “skeleton doing yoga in a trash can.”
Look for baskets with sturdy rims. The rim is where you will attach the two halves together, and it also helps support the hanging chain or rope. Avoid brittle, cracked, or sun-damaged baskets, especially if the cage will hang outdoors.
Step 2: Cut the Baskets to Create Cage Halves
Most laundry basket cage projects use two baskets facing rim to rim. Depending on your basket style, you may need to remove the solid bottom from one or both baskets so the inside looks open and cage-like. Use sharp scissors or a utility knife, and cut slowly. Plastic can crack if you rush.
For a rounded hanging cage, cut out the bottom panels while leaving the side walls and rim intact. If your basket already has plenty of open space, you may not need much cutting. The goal is to create a hollow shape that can hold your skeleton or prop while still looking like bars surround it.
After cutting, check for sharp edges. Trim rough plastic pieces and lightly sand any scratchy spots. This is especially important if children will help decorate or if the cage will be stored and reused next year.
Step 3: Clean and Prep the Plastic
Paint sticks better to clean, dry, slightly scuffed plastic. Wash the baskets with mild soap and water to remove dust, oils, store residue, or laundry-room mystery film. Let them dry completely. Moisture trapped under paint can cause bubbling, peeling, or an uneven finish.
Next, lightly sand the surface. You do not need to attack the basket like you are removing evidence from a haunted crime scene. A gentle scuff is enough to help the paint grip. Wipe away sanding dust with a damp cloth and let the baskets dry again.
Use spray paint designed for plastic or an all-purpose indoor/outdoor paint that lists plastic as a suitable surface. For outdoor displays, choose a paint that can handle weather exposure. A primer made for plastic can also help if your baskets are glossy or brightly colored.
Step 4: Spray Paint the Cage Black
Place the baskets on a drop cloth or flattened cardboard in a well-ventilated outdoor area. Shake the spray paint thoroughly, then apply several light coats instead of one heavy coat. Heavy coats drip, pool, and make the basket look less like aged iron and more like it lost a fight with a tar pit.
Hold the can about 10 to 12 inches from the surface and keep your hand moving. Spray from multiple angles so the paint reaches the inner edges of the basket openings. Let each coat dry according to the paint instructions before adding the next one.
Black paint gives the cage its base color and hides the original plastic. Matte black usually looks more realistic than glossy black, especially if you want an old iron effect. However, a little shine can work if your display is theatrical or if it will be seen mostly at night.
Step 5: Add Rust, Metal, and Age Effects
This is where the cage stops looking like a painted basket and starts looking like it belongs in a haunted castle with terrible plumbing. Use a dry brush to add silver, gray, copper, or brown paint to the raised edges and bars. Dip the brush lightly, wipe most of the paint off on a paper towel, then drag it across the basket texture.
Silver highlights make the plastic look like worn metal. Brown and orange tones create a rusty effect. Gray softens the black and gives the cage a dusty, old-world look. Focus on corners, rims, handles, and areas where real metal would naturally wear down.
If you want a creepier finish, dab on a little moss green or dark brown near the bottom edges. This makes the cage look damp, ancient, and possibly cursed by a homeowner association.
Step 6: Place the Skeleton or Prop Inside
Now choose your prisoner. A small skeleton is the classic choice, but you can also use a skull, raven, bat, zombie doll, ghost figure, witch hand, or pile of bones. For a funny display, position the skeleton as if it is waving, lounging, or holding a tiny sign that says “I skipped leg day.”
Attach the prop to one basket half using zip ties, fishing line, floral wire, or twine. This keeps it from sliding around when the cage moves in the wind. If you want the skeleton to look suspended, tie fishing line around its shoulders or rib cage and attach it to the top of the cage.
Add creepy cloth, faux spider webs, plastic spiders, or small bones around the prop. Use restraint, though. Too many webs can hide the cage shape. You want “abandoned dungeon,” not “craft store sneezed into a basket.”
Step 7: Join the Two Baskets Together
Place the two baskets rim to rim, creating a closed cage. Use black zip ties around the rim to connect them. Space the zip ties evenly so the cage stays aligned. Pull them tight, then trim the excess ends.
If you want the cage to open later for storage or changing props, use a few zip ties as hinges on one side and removable twist ties or small black carabiners on the other. This makes it easier to replace lights, fix decorations, or remove a skeleton that has clearly had enough.
Check the full structure after tying it together. Shake it gently. If it wobbles, add more zip ties. If the rims separate, tighten the connections. A sturdy cage looks better and is safer to hang.
Step 8: Add Chain, Rope, or Hanging Hardware
A hanging cage needs a strong top attachment. Plastic chain looks great for Halloween and weighs very little. You can also use rope, jute twine, black cord, or lightweight metal chain. If using real chain, make sure the basket rim and hanging point can support the weight.
Attach three or four chain sections around the upper rim of the cage and bring them together at the top, like a hanging planter. Shower curtain rings, zip ties, or small carabiners can help connect the chain to the basket openings. For a more realistic look, spray the chain black or age it with brown and silver paint.
Before hanging, test the cage at a low height. Lift it by the chain and make sure nothing slips. If the top pulls unevenly, adjust the chain lengths until the cage hangs straight or slightly crooked in a spooky-but-intentional way.
Step 9: Light It Safely
Lighting makes this DIY Halloween cage decoration dramatically better. Battery-operated LED lights, flameless candles, or glow sticks are the safest options. Place a small light behind the skeleton’s ribs, under a skull, or along the bottom rim to create eerie shadows.
Avoid real candles. Plastic baskets, faux webs, creepy cloth, and dry leaves do not mix well with open flames. If your cage will be outdoors, use lights rated for outdoor use and keep battery packs protected from rain. For plug-in lights, use outdoor-rated cords, avoid walkways, and plug into a GFCI-protected outlet.
Warm white lights give a haunted antique glow. Green lights make the cage look toxic and swampy. Purple lights feel theatrical and fun. Red lights, used sparingly, create a horror-movie effect. The best choice depends on whether your Halloween style is spooky, gothic, silly, or “the neighbors are definitely discussing this.”
Step 10: Display the Cage for Maximum Spook Factor
Where you hang the cage matters. A porch corner is ideal because it protects the cage from heavy weather while keeping it visible to visitors. A tree branch can look fantastic, especially if the cage sways slightly in the breeze. A garage entry or covered patio also works well.
Keep the cage away from doorways, stairs, and narrow walkways. Trick-or-treaters should not have to duck under a dangling skeleton jail on the way to candy. Also avoid placing it where it blocks emergency exits, porch lights, house numbers, railings, or security cameras.
For the best scene, combine the cage with tombstones, pumpkins, faux ravens, a fog machine placed safely on the ground, and low pathway lighting. The cage should be a focal point, not a random object swinging in darkness like the world’s creepiest laundry reminder.
Creative Variations to Try
The Caged Skeleton
This is the most popular version. Put a small skeleton inside, zip tie its hands to the bars, and add chain around the cage. For extra personality, tilt the skull or pose one hand outside the bars.
The Haunted Birdcage
Use a raven, crow, or bat instead of a skeleton. Add moss, black feathers, and a small skull at the bottom. This version looks elegant and gothic, perfect for indoor mantels or covered porch displays.
The Witch’s Captive Spell Cage
Fill the cage with potion bottles, bones, battery fairy lights, and torn cheesecloth. Add a tag that says “Do Not Open” or “Cursed Since 1692.” It is simple, funny, and great for party decor.
The Glowing Ghost Cage
Place a small foam ball or balloon under white gauze to create a ghost shape. Add battery lights inside the gauze so it glows. This is less scary and more family-friendly for homes with younger trick-or-treaters.
Common Mistakes to Avoid
The first mistake is using baskets that are too flimsy. Very thin plastic can bend, crack, or sag after cutting and painting. Choose baskets that are light but not fragile.
The second mistake is rushing the paint. If you spray one thick coat, the paint may run and the plastic may still show through in the openings. Light coats create a better finish and help the cage look more like metal.
The third mistake is overloading the cage. Heavy props, real chain, large skeletons, or too many decorations can strain the plastic. Keep the inside lightweight.
The fourth mistake is unsafe placement. A decoration is not successful if it trips a guest, blocks a door, or gets tangled in electrical cords. Spooky is good. Liability goblin is bad.
How to Store and Reuse It Next Year
One of the best things about this project is that it can be reused. At the end of the season, remove batteries, wipe off dirt, and store the cage in a dry place. If space is limited, cut the zip ties and stack the two basket halves. Keep the skeleton, chain, and lights in a labeled bag so you are not hunting for tiny bones next October.
If the paint chips after outdoor use, touch it up with black spray paint and a quick dry-brush layer. In fact, a few scratches can make the cage look older and creepier. Halloween is the rare holiday where “slightly damaged” can be considered a design choice.
Real-World Experience: What This Project Is Like to Make
The first time you make a laundry basket Halloween cage, the biggest surprise is how quickly the transformation happens. At the beginning, you are staring at two cheap baskets and questioning your life choices. After the first coat of black paint, though, the whole project suddenly makes sense. The grid pattern starts to read as metal bars, the rim looks like a cage frame, and you begin to feel like a spooky craft genius with suspiciously sticky fingers.
The most important lesson is to test everything before you commit. Place the skeleton inside before cutting. Hold the two baskets together before painting. Check where the chain will attach before you zip tie the rims. A few minutes of testing can prevent the classic DIY moment where you realize the skeleton only fits if its legs stick out like it is trying to escape through airport security.
Another useful experience is that paint coverage takes patience. Laundry baskets have many little edges, holes, and curves. You may think you painted the entire thing, then turn it slightly and discover a bright white stripe hiding inside one of the slots. Spray from above, below, and the sides. Let the basket dry, flip it, and check again in daylight. Nighttime hides mistakes, but daylight is brutally honest.
Dry brushing is the detail that makes people ask, “Where did you buy that?” A plain black basket looks fine, but a black basket with silver edges and rusty brown corners looks like a prop. Use almost no paint on the brush. The drier the brush, the better the effect. If you accidentally add too much silver, dab black paint over it and try again. Halloween props are forgiving. They have seen things.
When hanging the cage, go lighter than you think. Plastic chain often looks just as good as metal chain once painted, and it is much easier on the basket. If you hang the cage from a tree, check the branch carefully and avoid windy spots. A gently swaying cage is creepy. A cage spinning wildly like a skeleton-themed carnival ride is less charming.
For outdoor displays, battery lights are the easiest choice. They avoid cord problems, reduce tripping hazards, and let you place the cage almost anywhere. The best lighting trick is to hide the light source. Tuck a small LED strand behind bones, under creepy cloth, or inside the rib cage. The viewer should see the glow, not the hardware.
This project is also surprisingly fun to personalize. One cage can be scary with a skull and red light. Another can be silly with a skeleton holding a plastic candy bucket. A third can be gothic with ravens, moss, and purple lights. If you are decorating with kids, let them name the skeleton or write a tiny warning sign. “Do Not Feed Gary” has more personality than any store-bought label.
The best part is the reaction. People recognize that the decoration is clever, but they often do not immediately realize it came from laundry baskets. That little moment of discovery is half the fun. It proves that Halloween decorating is not about buying the biggest prop on the shelf. It is about taking an ordinary object, adding imagination, and making the front porch feel like a tiny haunted attraction.
Conclusion
Turning a laundry basket into a spooky Halloween cage decoration is one of those DIY projects that feels almost too easy for how good it looks. With two baskets, zip ties, black paint, a lightweight prop, chain, and safe lighting, you can create a dramatic Halloween display without spending much money. The project is beginner-friendly, customizable, and reusable, which makes it perfect for anyone who wants big spooky energy on a small budget.
The secret is in the finish. Clean the plastic, use light coats of paint, add metallic and rust details, secure the structure well, and choose lighting that brings the whole cage to life. Whether you hang a caged skeleton from the porch, trap a raven in a haunted birdcage, or build a glowing ghost prison, this laundry basket Halloween craft proves that great seasonal decor can come from the most ordinary household items.
So before you toss that old laundry basket or leave it buried under towels, consider giving it a second life as a creepy cage. Your socks can wait. The skeleton has a reservation.

