
Makeup
How to Find North on Google Maps on Android: 2 Methods
Jul
If you’ve ever opened Google Maps, seen the map spinning like a caffeinated figure skater, and thought, “Cool… but which way is north?”, you are absolutely not alone. Google Maps is great at showing where you are, but when your orientation is off, even a simple walk can feel like a puzzle game with no hints.
The good news: finding north on Google Maps on Android is easy once you know what to look for. In this guide, you’ll learn 2 reliable methods to find north, plus a few quick accuracy fixes so your phone stops pointing at the coffee shop behind you when you’re clearly facing the pizza place in front of you.
This article is written for Android users and based on real, current Google Maps behavior and Android location settings. We’ll keep it practical, clear, and beginner-friendlyno tech wizard hat required.
Why Knowing North in Google Maps Actually Matters
Sure, you can follow turn-by-turn directions without thinking about north. But knowing how to find north in Google Maps on Android becomes surprisingly useful when:
- You’re walking in a crowded city and the map keeps rotating.
- You’re matching the map to street signs or landmarks.
- You’re hiking, biking, or exploring an unfamiliar area.
- You’re checking property directions, sunrise/sunset orientation, or neighborhood layout.
- You’re trying not to walk confidently in the wrong direction (a universal experience).
In short, north helps you anchor the map to the real world. Once north is clear, everything else becomes easier to read.
Method 1: Use the Compass Icon in Google Maps
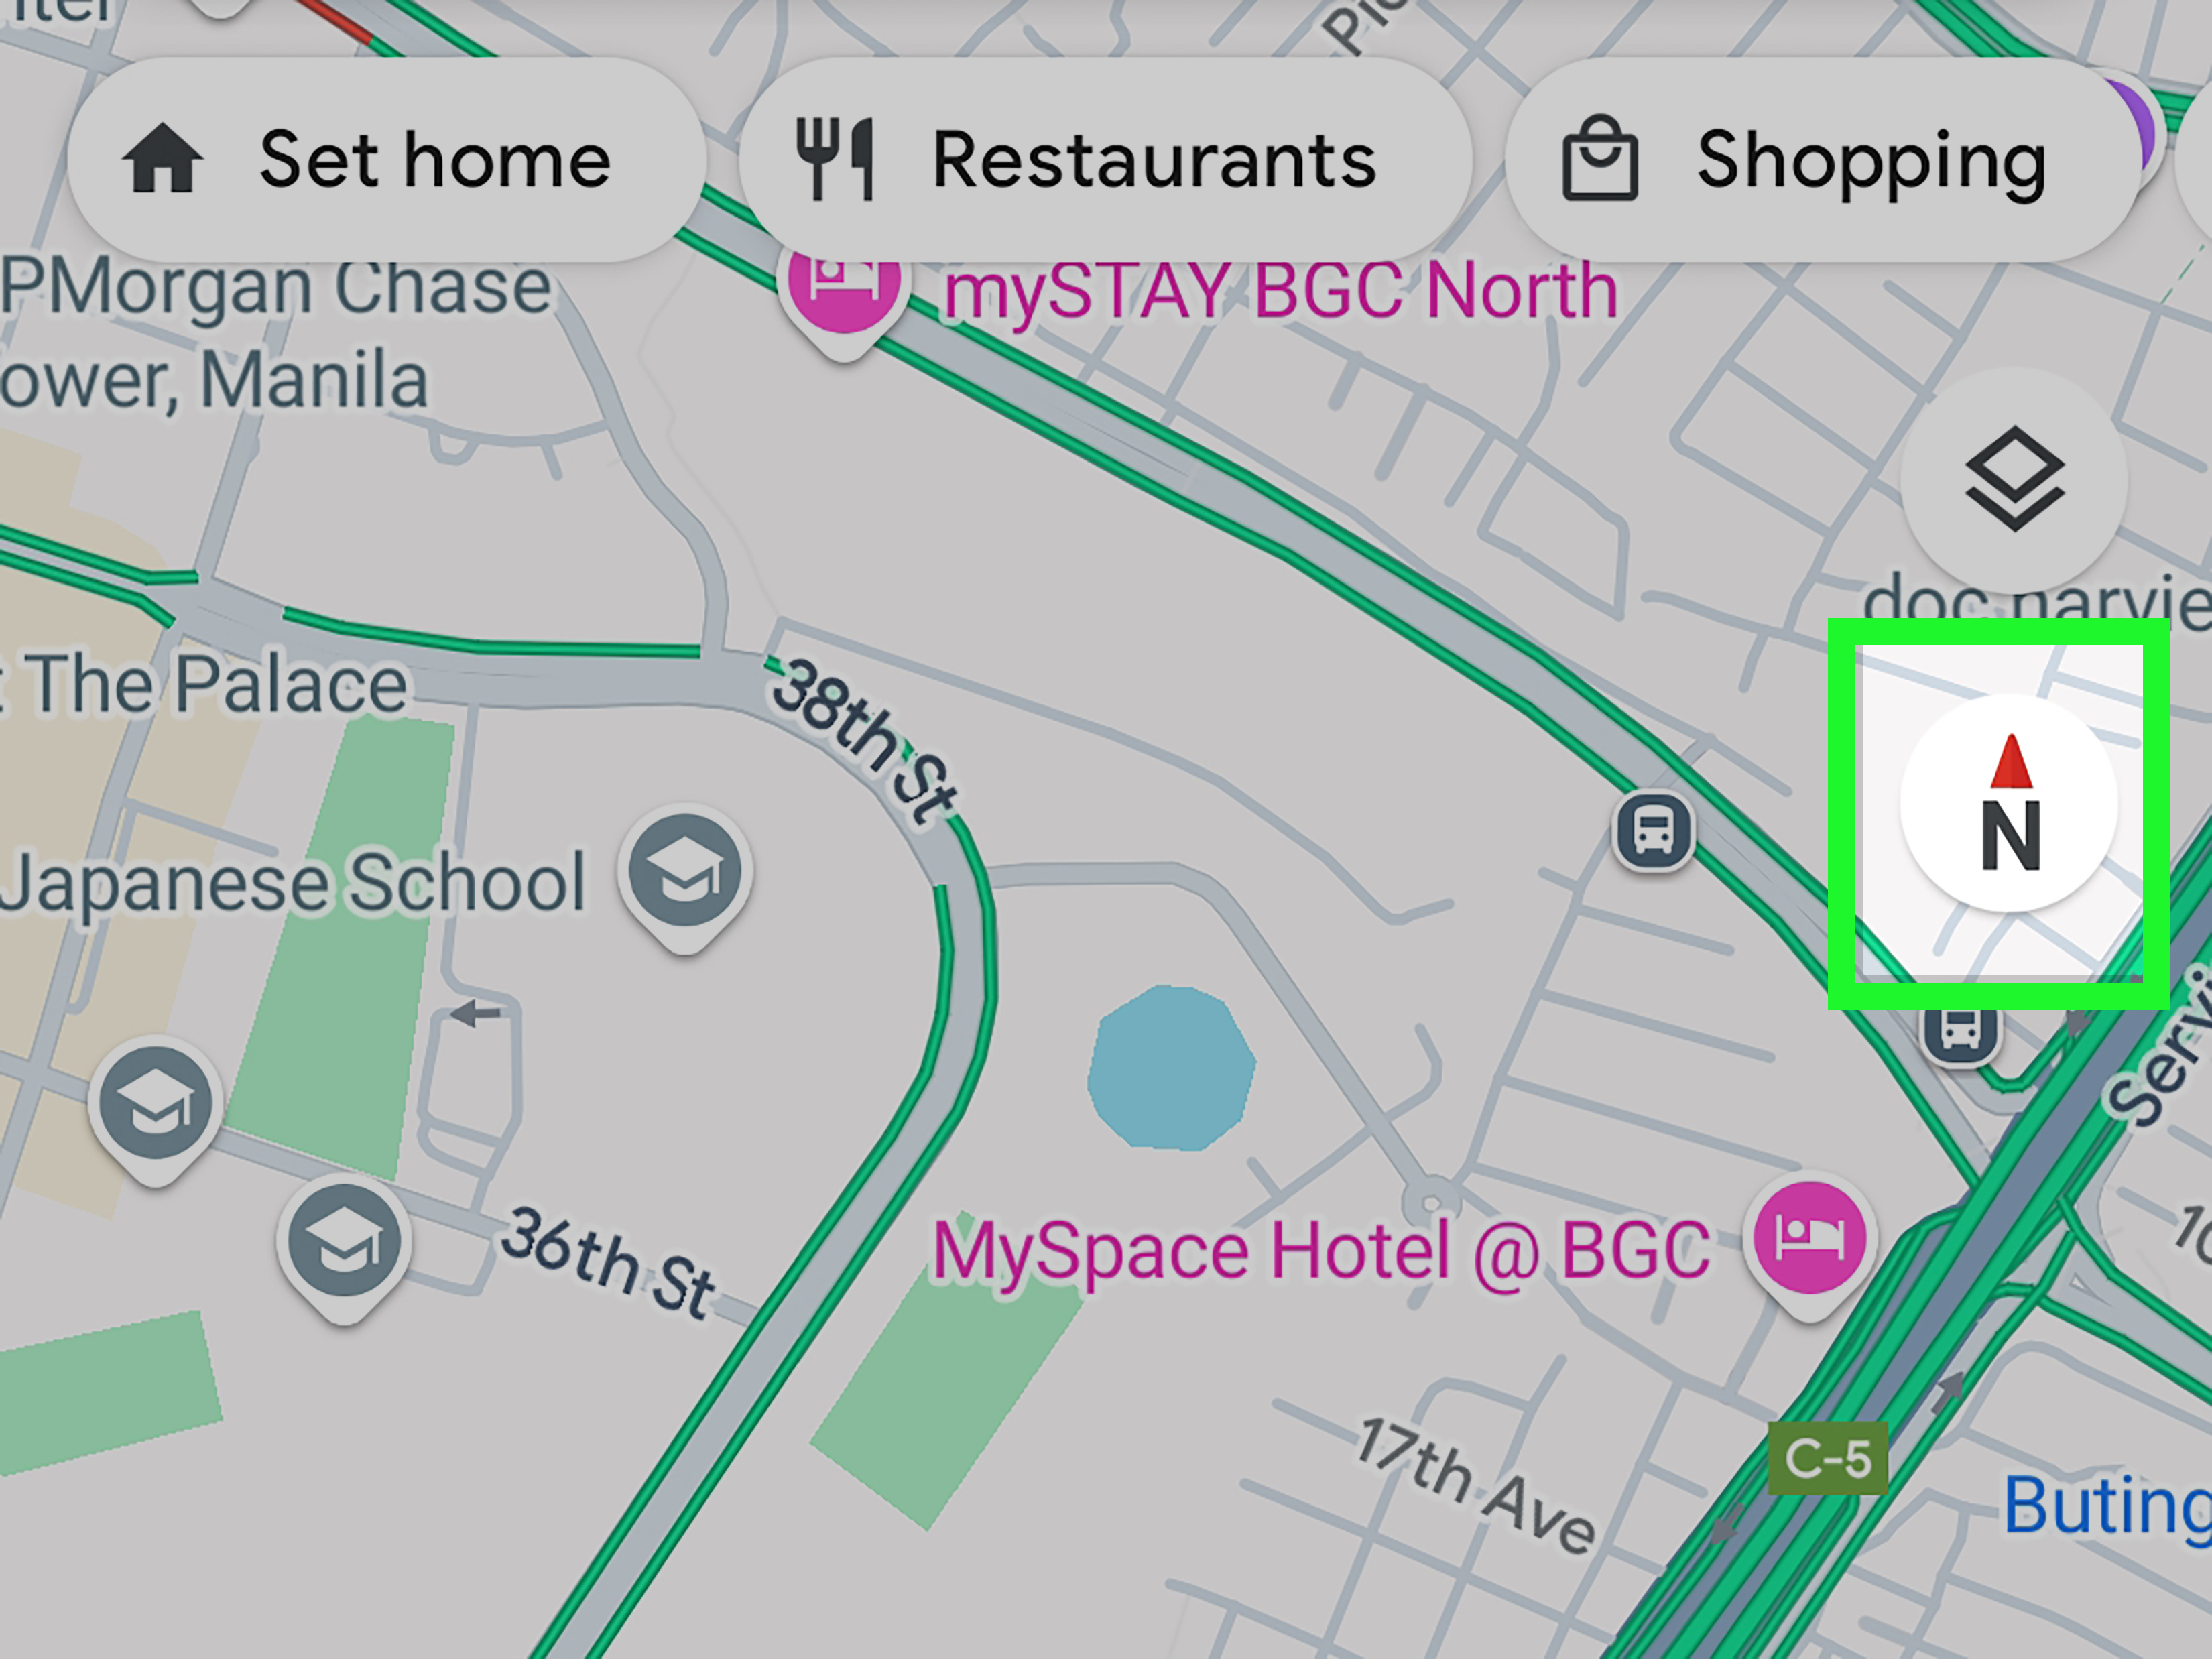
This is the fastest and most direct method. Google Maps includes a compass icon that appears when the map is rotated. The red part of the compass points north, so you can instantly tell orientation.
How to Find North with the Compass Icon
- Open Google Maps on your Android phone.
- Rotate the map with two fingers (twist gesture) if needed.
- Look for the compass icon near the top-right side of the map.
- The red side of the compass points north.
- If you want to reset the map, tap the compass to snap the map back so north faces up.
That’s it. No settings, no extra apps, no dramatic speech to the GPS gods.
What If the Compass Icon Is Missing?
This confuses a lot of people. In many cases, the compass icon only appears after you rotate the map a little. If your map is already perfectly north-up, Google Maps may hide the compass because it thinks, “Nothing to see here.”
Try this:
- Place two fingers on the map and twist slightly.
- The compass should appear.
- Now use the red needle to identify north.
Bonus Tip for Navigation Mode
If you’re using turn-by-turn navigation, the map may prioritize the direction you’re facing. That’s useful while driving or walking, but sometimes you just want a classic north-up map.
In navigation mode, you can usually tap the compass to make north face the top of the screen. This is great when you want a stable map view that doesn’t keep rotating every time you turn your body.
When Method 1 Works Best
Use the compass icon method when:
- You want a quick answer right now.
- Your map is rotating and you need to reorient fast.
- You’re comparing the map with street layout or a paper map.
- You don’t need to fix location accuracyjust direction.
Method 2: Use the Blue Dot Direction Beam and Calibrate Your Compass
If Method 1 tells you where north is but your phone still seems “off,” Method 2 is your best friend. This method uses the blue dot and its direction beam in Google Maps, then improves it by calibrating your compass.
This is especially helpful when:
- Your blue dot is in the right place, but the direction beam points the wrong way.
- The beam is super wide (meaning low direction accuracy).
- You’re indoors, near tall buildings, or in a dense area with weak signals.
Step 1: Tap Your Location Button
Open Google Maps and tap the Your location button (bottom-right corner). Google Maps will center the map on your current location and show the blue dot.
The blue dot is your location. A small blue beam extending from it shows the direction your phone thinks you’re facing.
If that beam is narrow, greatyour orientation is pretty accurate. If it’s wide, your phone is basically saying, “I have a guess… several guesses, actually.”
Step 2: Tap the Blue Dot, Then Tap Calibrate
Tap the blue dot. A location panel should appear with options, including Calibrate (or a prompt to improve accuracy if Google Maps detects a problem).
From here, Google Maps may offer:
- Live View calibration (camera-based, using nearby buildings/landmarks)
- Use Compass (classic compass calibration on Android)
Step 3: Calibrate Using One of These Android Options
A) Live View Calibration (Most Accurate Outdoors)
If available, Live View can improve direction and location accuracy by scanning your surroundings. Point your camera at buildings and signs (not the sidewalk, not your shoes, not the sky), and follow the on-screen prompts.
This works best outdoors where Street View landmarks are available. It’s a strong option in city areas, tourist zones, and commercial streets.
B) Use Compass + Figure-Eight Motion (Classic Fix)
If Live View isn’t availableor you just want the fast fixchoose Use Compass. Then move your phone in a figure-eight motion a few times.
Yes, it feels a little silly. Yes, it works.
As you calibrate, the blue direction beam should become narrower and point more accurately. Once it narrows down, your phone has a much better sense of direction, and finding north becomes far more reliable.
Step 4: Check North Again
After calibration:
- Rotate the map slightly to make the compass icon appear.
- Check the red compass needle (north).
- Compare it with your blue beam direction.
Now you should have both:
- A clear north reference (compass), and
- A more accurate facing direction (blue beam)
That combination is the sweet spot for walking navigation and quick orientation checks.
Troubleshooting: Why Google Maps Still Feels “Wrong”
If Google Maps still struggles after calibration, don’t panic. It’s usually a signal issue, a sensor issue, or a setting that needs a quick tweak.
1) Turn On Location Accuracy on Android
Android’s Location Accuracy feature helps your phone use multiple signals (not just GPS). That includes Wi-Fi, nearby networks, and device sensors, which can improve both location and direction performance.
On many Android phones, you can check this in:
Settings > Location > Location Services > Google Location Accuracy (path may vary by device brand).
2) Turn On Wi-Fi (Even If You’re Not Connected)
This sounds weird, but it’s a real trick: having Wi-Fi turned on helps Google Maps estimate your location more accurately by scanning nearby networks. You don’t always need to connectjust having Wi-Fi enabled can help.
3) Move Away from Interference
Phone compasses rely on internal sensors, including the magnetometer. Metal objects, magnetic mounts, chargers, or certain electronics can interfere with readings.
If your direction looks wrong:
- Step away from large metal structures.
- Remove your phone from a magnetic car mount.
- Try calibrating again outdoors.
4) Tall Buildings and Indoor Areas Can Throw It Off
Google Maps can estimate location using GPS, Wi-Fi, and cell towers, but GPS may be weaker indoors, underground, or between tall buildings. In those cases, your blue dot and beam may drift or wobble.
When possible, step into an open outdoor area for a better reading.
5) Keep Map North-Up During Navigation (Optional)
If rotating maps make you dizzy, check Google Maps navigation settings for options like Keep map north up. This can make the map easier to read consistently, especially if you prefer a static orientation.
Common Mistakes to Avoid
Mistake #1: Confusing the Blue Dot Direction with North
The blue beam shows which way you’re facing, not north. North is shown by the red compass needle.
Mistake #2: Assuming the Compass Is Broken Because It’s Hidden
If the map is already aligned north-up, Google Maps may hide the compass. Rotate the map slightly and it should reappear.
Mistake #3: Calibrating Indoors Next to Electronics
Compass calibration works best in open areas. Doing it next to a laptop, speaker, car mount, or elevator can produce weird results.
Mistake #4: Ignoring a Wide Blue Beam
A wide beam is Google Maps waving a tiny flag that says, “Direction uncertain.” Calibrate before trusting it.
Quick Comparison: Which Method Should You Use?
Use Method 1 (Compass Icon) When:
- You just need to know where north is immediately.
- The map is readable but rotated.
- You want to snap back to north-up view quickly.
Use Method 2 (Blue Dot + Calibration) When:
- Your phone’s direction seems wrong.
- The blue beam is wide or inaccurate.
- You’re walking in a dense city or unfamiliar area.
- You want better overall navigation accuracy, not just north.
Real-World Experiences and Practical Situations (Extra Field Notes)
Let’s make this more real. Here are a few common situations where knowing how to find north on Google Maps on Android can save time, confusion, and unnecessary cardio.
1) The “I Got Out of the Subway and Lost My Soul” Scenario
You exit a subway station, the street is busy, and there are six possible directions to walk. Google Maps says your destination is “0.2 miles away,” which is helpful in the same way “somewhere over there” is helpful.
This is where Method 1 shines. Rotate the map slightly, make the compass appear, and check the red needle. Once you know north, you can instantly tell if your destination is northeast, west, or directly behind you. Tap the compass to reset the map north-up and compare the street grid to what you actually see. Suddenly, the city looks less like a maze and more like a plan.
2) The “Parking Lot of Doom” Situation
Huge shopping center. Giant parking lot. Identical rows. You parked “near a tree,” which is adorable because there are 84 trees.
If you dropped a pin or saved parking, the blue dot plus compass combo is a lifesaver. Start with Method 2: tap your location, calibrate if the beam is wide, and get your direction sorted. Then use the compass to identify north and walk the correct row pattern. This is one of those moments when a narrow direction beam feels like a superpower.
3) Walking in a Downtown Area with Tall Buildings
Dense downtown areas are notorious for confusing GPS. Signals bounce, maps drift, and your blue dot may look like it had three espressos. In this case, don’t trust the first reading blindly.
Use Method 2 and tap the blue dot to calibrate. If Live View is available, use it. Point the camera at building signs and storefrontsnot the sidewalk. Once Google Maps re-locks your position, check the compass again. The difference can be dramatic. It’s like your phone goes from “vague guess” to “tour guide energy.”
4) Hiking, Parks, and Open Spaces
In parks or trails, roads may be limited and landmarks can be far apart. In these cases, cardinal directions matter more. If a trail map says “head north toward the overlook,” you need an accurate north referencenot just a blue dot floating in green space.
Method 1 helps you quickly identify north using the compass icon, while Method 2 helps you make sure your phone’s direction beam is accurate. In open outdoor areas, calibration often works better because there’s less interference. Just remember that battery saver mode, poor reception, or nearby metal structures can still affect results.
5) The “Why Is My Phone Pointing Backwards?” Moment
This happens more than people expect. You’re clearly facing one way, but the blue beam points another way. Usually, the culprit is calibration drift or magnetic interference. A figure-eight calibration fixes this surprisingly often. It may feel goofy, but it beats taking three wrong turns and pretending it was “for the scenery.”
The big lesson from all these situations: use north and direction together. The compass tells you the map’s orientation. The blue beam tells you your phone’s facing direction. When both agree, your confidence goes way upand so does your chance of arriving at the right place on the first try.
Conclusion
Finding north on Google Maps on Android is easy once you know where the compass lives and how to calibrate your phone when it gets confused. Start with the compass icon for the fastest answer, then use the blue dot + calibration method when your direction feels off.
These two methods cover almost every real-world situationfrom downtown walking and parking lots to travel days and trail maps. And once you get used to reading the red compass needle and blue direction beam together, Google Maps becomes much easier (and way less chaotic) to use.
In other words: fewer wrong turns, less awkward backtracking, and a much better chance of looking like you totally knew where you were going all along.

