
Beauty Unlocked
How to Enable Secure Boot for Valorant on Windows 10 & 11
Aug
Note: This guide is based on current real-world guidance from Riot Games, Microsoft Windows documentation, and major PC manufacturer BIOS instructions. BIOS menus vary by brand and motherboard model, so treat the steps below as a practical roadmapnot a magic spell carved into a gaming keyboard.
If Valorant refuses to launch and throws a message about Secure Boot, TPM 2.0, VAN9001, or VAN9003, you are not alone. Many players install Valorant, prepare mentally for a clean one-tap on Haven, and instead get tackled by a Windows security setting before the game even opens. The good news: in most cases, you can fix the problem by enabling Secure Boot in your PC’s UEFI/BIOS settings and confirming that Windows recognizes it correctly.
This in-depth guide explains how to enable Secure Boot for Valorant on Windows 10 and Windows 11, how to check your current settings, what to do if Secure Boot is “enabled” in BIOS but still shows as off in Windows, and how to avoid common mistakes that can make your PC boot like it just saw a Yoru fakeout.
What Is Secure Boot, and Why Does Valorant Care?
Secure Boot is a security feature built into modern UEFI firmware. Its job is to help make sure that only trusted, digitally signed software loads when your computer starts. In plain English: it guards the front door before Windows wakes up, stretches, and starts pretending everything is fine.
Valorant uses Riot Vanguard, Riot Games’ anti-cheat system. Because Valorant is a competitive shooter where cheating can ruin matches faster than an instalock duelist with no mic, Vanguard relies on system-level security checks. On Windows 11 especially, Vanguard expects a modern security stack, including Secure Boot and TPM 2.0. If either one is missing, disabled, or misconfigured, Valorant may block launch with errors such as VAN9001 or VAN9003.
Secure Boot Requirements for Valorant on Windows 10 vs Windows 11
Windows 11
Windows 11 is the stricter sibling. Riot Vanguard commonly requires Secure Boot and TPM 2.0 to be enabled on Windows 11 systems. If Secure Boot is disabled, Valorant may show an error saying this version of Vanguard requires Secure Boot. If TPM 2.0 is disabled or unavailable, you may see a TPM-related VAN error.
Windows 10
Windows 10 is usually more flexible, but that does not mean you can ignore Secure Boot forever. Some players on Windows 10 still run into Vanguard security errors, especially after hardware changes, BIOS resets, Windows upgrades, dual-boot experiments, or moving from Legacy BIOS to UEFI. Enabling Secure Boot can also prepare your PC for Windows 11 and improve boot-level protection.
Before You Change BIOS Settings: Read This First
BIOS changes are not dangerous when done carefully, but they deserve respect. Think of BIOS like the backstage area of your PC. You can fix things there, but you probably should not press random buttons just because they look powerful.
- Back up important files before changing boot mode or disk partition settings.
- Write down your current BIOS settings or take photos with your phone.
- Do not switch from Legacy/CSM to UEFI blindly if your Windows drive uses MBR instead of GPT.
- Suspend BitLocker first if your drive is encrypted, or Windows may ask for a recovery key after changes.
- Use your motherboard or laptop manual if a setting name looks unfamiliar.
Step 1: Check Whether Secure Boot Is Already Enabled
Before entering BIOS, check what Windows sees. This prevents you from fixing a thing that is already fixed, which is the PC equivalent of replugging your monitor while the power button is off.
Check Secure Boot with System Information
- Press Windows Key + R.
- Type msinfo32 and press Enter.
- In System Information, look for BIOS Mode.
- Look for Secure Boot State.
Your ideal result should be:
- BIOS Mode: UEFI
- Secure Boot State: On
If BIOS Mode says Legacy, Secure Boot cannot work properly until your system is configured for UEFI. If Secure Boot State says Off, you need to enable it in BIOS. If Secure Boot State says Unsupported, your firmware, boot mode, or hardware may not support Secure Boot in its current configuration.
Check Secure Boot with PowerShell
You can also check Secure Boot using PowerShell:
Run PowerShell as administrator. If the command returns True, Secure Boot is enabled. If it returns False, your PC supports Secure Boot but it is off. If it says the cmdlet is not supported, your system may be using Legacy BIOS mode or lacks UEFI Secure Boot support.
Step 2: Check TPM 2.0 for Valorant
Because Valorant errors often mention Secure Boot and TPM together, check TPM before celebrating. A Secure Boot fix without TPM 2.0 on Windows 11 is like buying a gaming mouse and forgetting the mousepad: technically progress, emotionally incomplete.
- Press Windows Key + R.
- Type tpm.msc and press Enter.
- Look for Status and Specification Version.
You want to see:
- Status: The TPM is ready for use
- Specification Version: 2.0
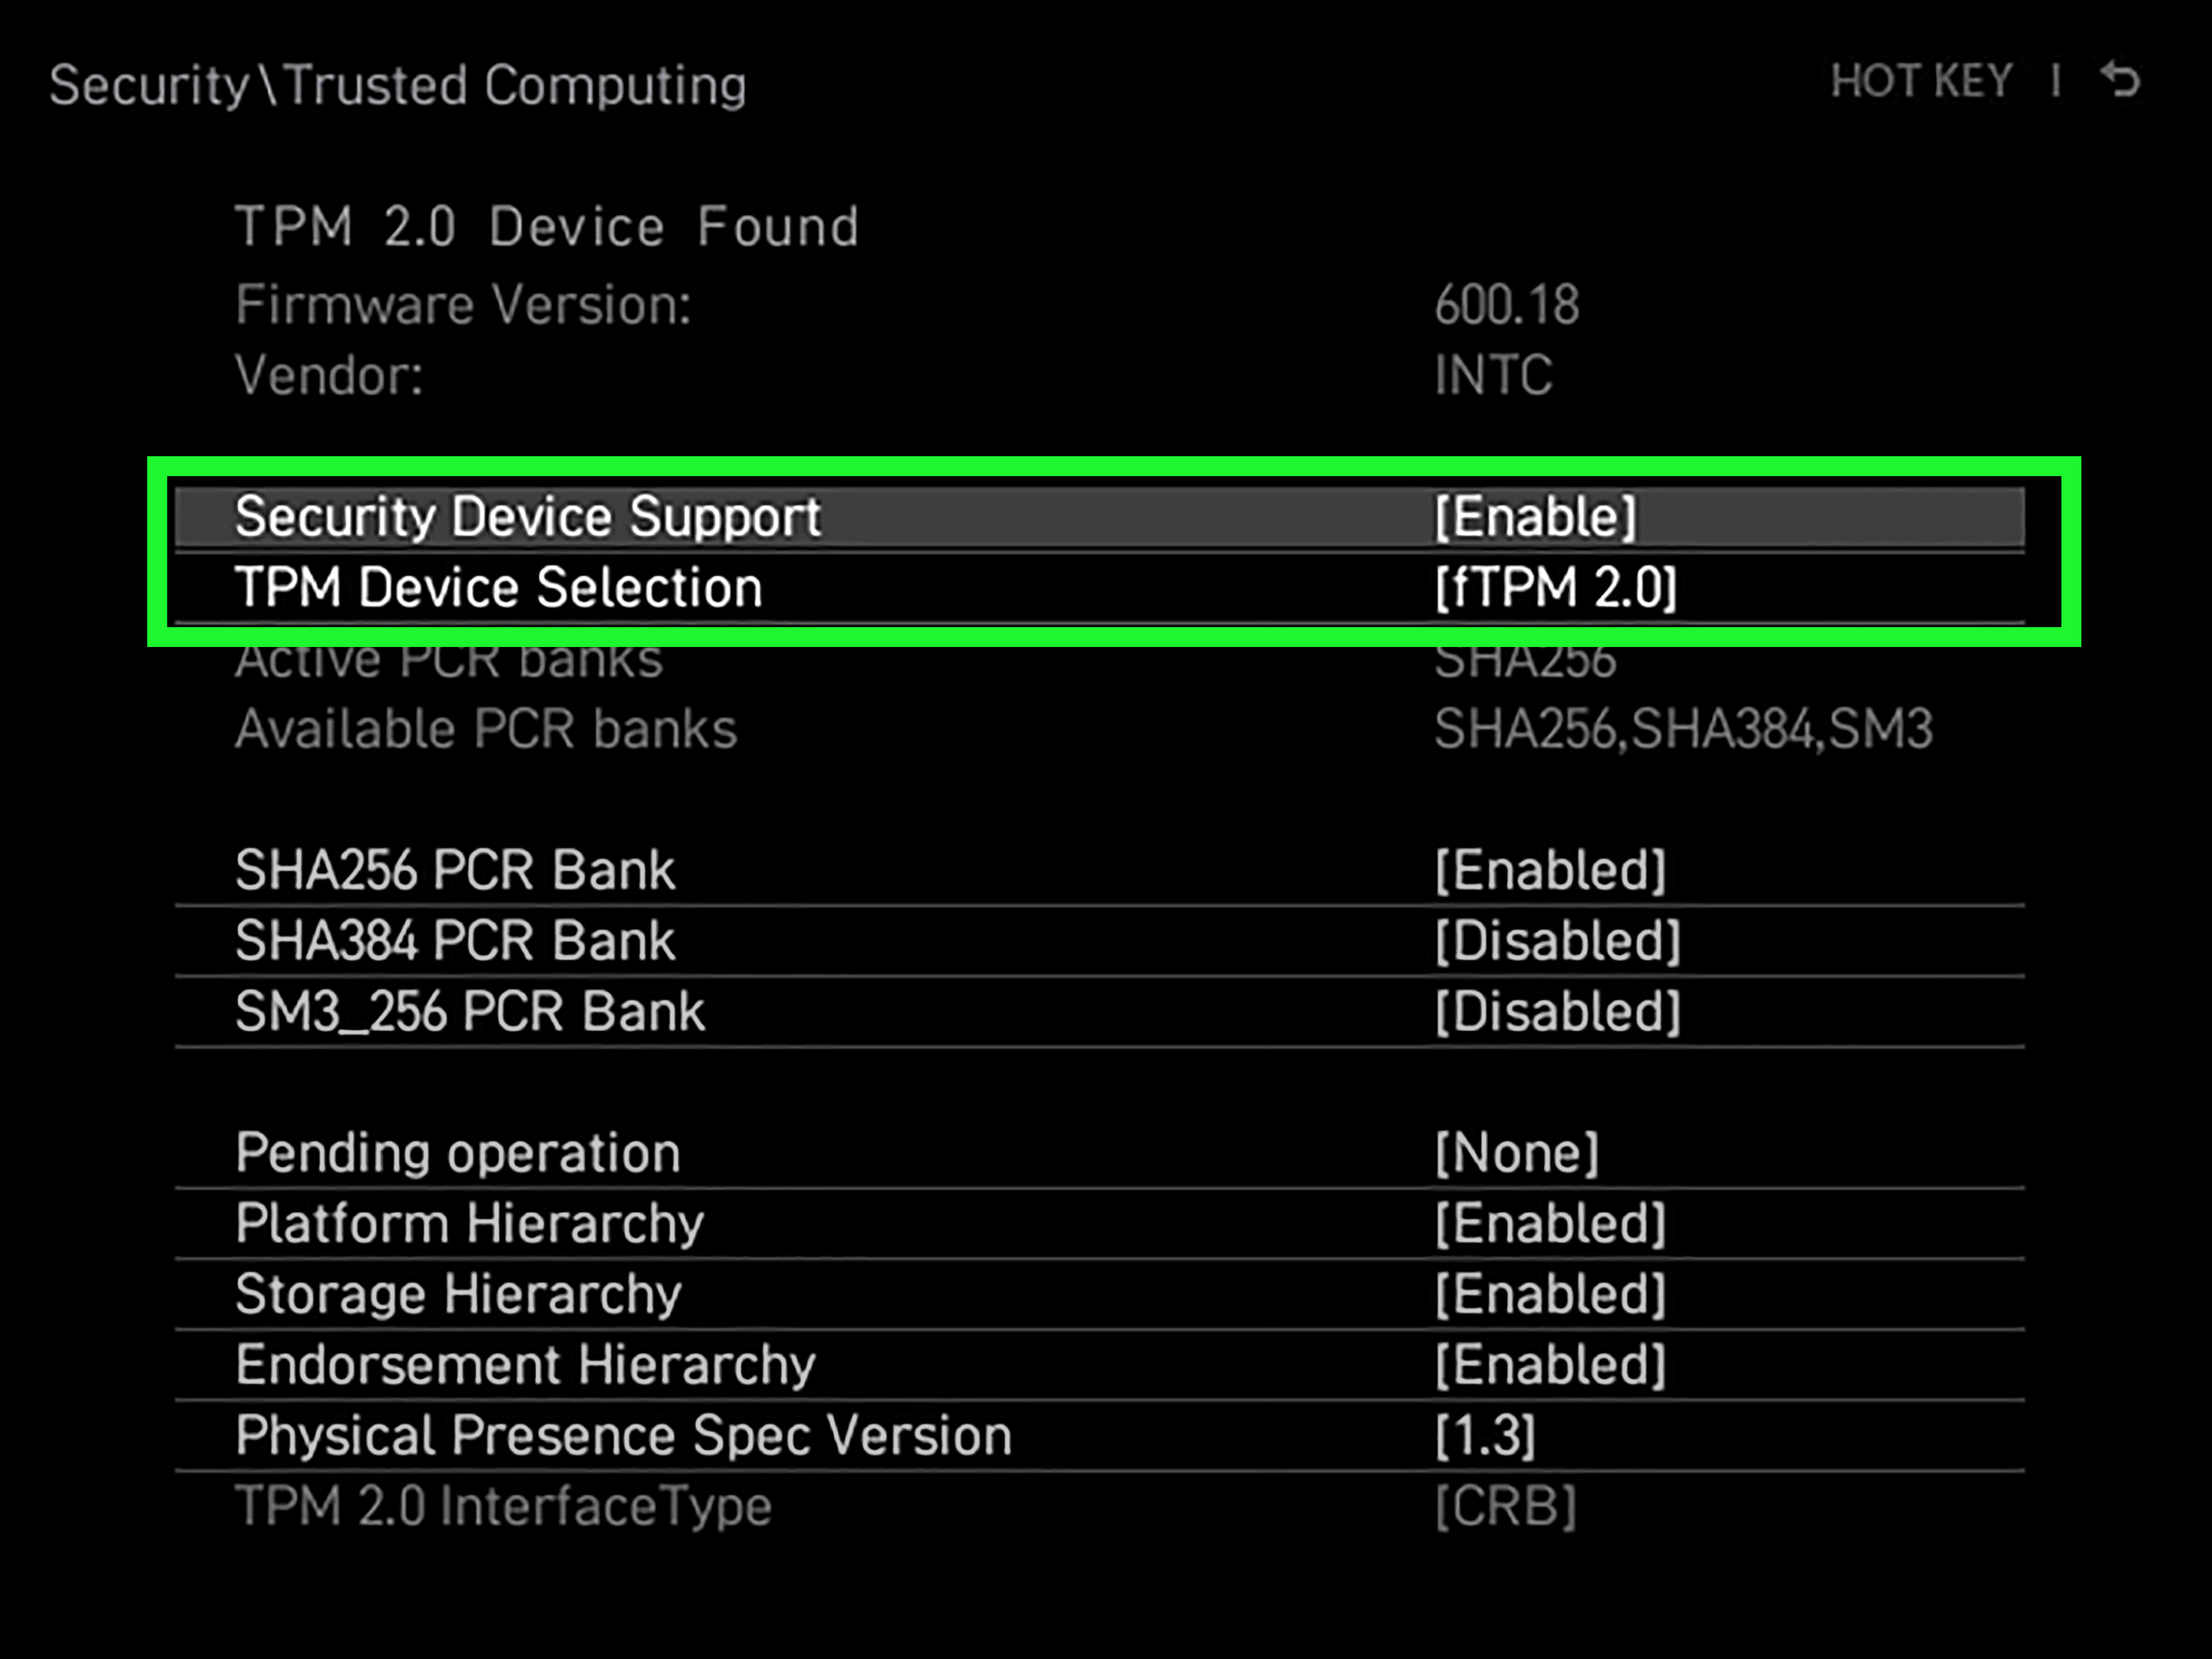
If TPM is disabled, you may need to enable it in BIOS. On Intel systems, it may appear as Intel PTT. On AMD systems, it may appear as AMD fTPM, Firmware TPM, or simply TPM Device.
Step 3: Enter UEFI/BIOS from Windows 11
The easiest way to reach BIOS on Windows 11 is through Advanced Startup:
- Open Settings.
- Go to System.
- Select Recovery.
- Under Advanced startup, click Restart now.
- After the blue recovery screen appears, choose Troubleshoot.
- Select Advanced options.
- Choose UEFI Firmware Settings.
- Click Restart.
Your PC should restart directly into the firmware menu. This is cleaner than trying to mash the Delete key like you are speedrunning a boss fight.
Step 4: Enter UEFI/BIOS from Windows 10
On Windows 10, the route is similar but the settings menu is slightly different:
- Open Settings.
- Go to Update & Security.
- Select Recovery.
- Under Advanced startup, click Restart now.
- Choose Troubleshoot.
- Select Advanced options.
- Choose UEFI Firmware Settings.
- Click Restart.
If you do not see UEFI Firmware Settings, your system may be installed in Legacy BIOS mode, or your firmware may not expose that shortcut to Windows.
Step 5: Enable Secure Boot in BIOS
Once inside BIOS/UEFI, the exact layout depends on your PC or motherboard brand. Look under tabs such as Boot, Security, Authentication, Advanced, or Windows OS Configuration.
General BIOS Steps
- Find Boot Mode and set it to UEFI.
- Disable CSM or Legacy Boot if your system is ready for UEFI.
- Find Secure Boot.
- Set Secure Boot to Enabled.
- If available, set OS Type to Windows UEFI Mode.
- If Secure Boot is grayed out, install or restore default/factory Secure Boot keys.
- Save changes and exit, usually with F10.
After the restart, return to Windows and run msinfo32 again. Confirm that BIOS Mode says UEFI and Secure Boot State says On.
Brand-Specific Secure Boot Tips
ASUS
On many ASUS motherboards, press Delete or F2 during startup. Go to Advanced Mode, open the Boot tab, then select Secure Boot. ASUS boards often use an OS Type setting. Choose Windows UEFI Mode instead of Other OS. If needed, go into key management and install default Secure Boot keys.
Dell
On Dell laptops and desktops, press F2 at the Dell logo. Look for Boot Configuration or Secure Boot. Set boot mode to UEFI, enable Secure Boot, apply changes, and exit.
HP
On HP systems, press Esc repeatedly during startup, then choose F10 for BIOS Setup. Secure Boot is often under Security or Boot Options. HP systems may require Legacy Support to be disabled before Secure Boot can be enabled.
Lenovo
On Lenovo ThinkPad, ThinkCentre, ThinkStation, and Legion systems, common BIOS keys include F1, F2, or the Novo button. Look under Security or Startup, enable Secure Boot, and save changes.
MSI and Gigabyte
On MSI and Gigabyte motherboards, press Delete during boot. Secure Boot is usually under Settings, Boot, or Windows OS Configuration. You may need to disable CSM first. Some boards require setting Secure Boot mode to Standard or installing default keys before Windows recognizes Secure Boot as active.
The Big Trap: Legacy BIOS, CSM, MBR, and GPT
If msinfo32 shows BIOS Mode: Legacy, do not simply switch BIOS to UEFI and hope for the best. Your Windows drive may use the older MBR partition style. UEFI boot commonly expects GPT. If your system drive is MBR and you disable Legacy/CSM without converting properly, Windows may fail to boot.
To check your disk style:
- Right-click Start.
- Select Disk Management.
- Right-click your system disk, usually Disk 0.
- Choose Properties.
- Open the Volumes tab.
- Check Partition style.
If it says GUID Partition Table (GPT), you are in better shape for UEFI Secure Boot. If it says Master Boot Record (MBR), you may need to convert the disk using Microsoft’s MBR2GPT tool or perform a clean Windows installation in UEFI mode. Back up your data before attempting conversion. This is not the moment to be brave with your only copy of a school project, business files, or 900 screenshots of match MVP screens.
How to Fix “Secure Boot Enabled in BIOS but Off in Windows”
This issue is common and deeply annoying. BIOS says Secure Boot is enabled, Windows says it is off, and Valorant sits in the corner refusing to cooperate. Try these fixes:
1. Confirm BIOS Mode Is UEFI
Secure Boot needs UEFI. If Windows is still booting in Legacy mode, Secure Boot may appear enabled in firmware but not actually protect the Windows boot path.
2. Disable CSM
CSM, or Compatibility Support Module, allows legacy booting. Many motherboards require CSM to be disabled before Secure Boot fully works.
3. Install Default Secure Boot Keys
Some BIOS menus show Secure Boot as enabled but inactive because the platform keys are missing. Look for options such as Install Default Secure Boot Keys, Restore Factory Keys, or Reset to Setup Mode followed by loading default keys.
4. Set Secure Boot Mode to Standard
If your BIOS offers Standard and Custom Secure Boot modes, choose Standard unless you have a specific enterprise or Linux dual-boot reason to manage custom keys.
5. Update BIOS/UEFI Firmware
If your motherboard firmware is old, update it from the manufacturer’s official support page. Firmware updates can improve Secure Boot compatibility, TPM behavior, and Windows 11 support. Do not download BIOS files from random forums unless your hobby is turning motherboards into decorative coasters.
Common Valorant Secure Boot Errors
VAN9001
VAN9001 is commonly associated with TPM 2.0 and Windows security requirements. On Windows 11, check both TPM 2.0 and Secure Boot. Run tpm.msc and msinfo32 to confirm both are active.
VAN9003
VAN9003 is commonly linked to Secure Boot. If you see this error, check Secure Boot State in System Information. If it is off, enable Secure Boot in BIOS and make sure your system is booting through UEFI.
“This Version of Vanguard Requires Secure Boot”
This message means Vanguard does not see a trusted Secure Boot state. Follow the BIOS steps above, restore default keys if needed, and confirm the result in Windows.
Valorant Still Will Not Open After Enabling Secure Boot
Restart your PC fully, not just sleep and wake. Then uninstall and reinstall Riot Vanguard if necessary. Open the Riot Client again and let Vanguard reinstall. After installation, restart once more. Vanguard loves restarts the way duelists love asking for heals while standing across the map.
Should You Disable Secure Boot After Playing Valorant?
No, not unless you have a specific technical reason. Secure Boot improves protection against bootkits and unauthorized boot-level software. Leaving it enabled is generally the better choice for everyday Windows security, Windows 11 compatibility, and Valorant stability.
You may need to temporarily disable Secure Boot for certain Linux setups, older hardware, custom drivers, or recovery tools. If you do, re-enable it afterward. For most gamers, Secure Boot should stay on permanently.
Does Secure Boot Reduce FPS in Valorant?
Secure Boot itself should not meaningfully reduce FPS. It verifies trusted boot components during startup; it is not rendering smokes on Bind or calculating your crosshair placement. If you experience lower FPS after changing BIOS settings, the cause is more likely another setting that changed at the same time, such as XMP/EXPO memory profiles, virtualization settings, CPU boost behavior, or a BIOS reset that restored default performance options.
Practical Checklist: Enable Secure Boot for Valorant Fast
- Run msinfo32.
- Confirm BIOS Mode: UEFI.
- Confirm Secure Boot State: On.
- Run tpm.msc.
- Confirm TPM Specification Version: 2.0.
- If Secure Boot is off, enter BIOS from Advanced Startup.
- Disable CSM/Legacy Boot only if your Windows installation supports UEFI boot.
- Enable Secure Boot.
- Install default Secure Boot keys if required.
- Save, restart, and recheck in Windows.
- Launch Valorant.
Extra Experience: What Enabling Secure Boot for Valorant Is Actually Like
In real life, enabling Secure Boot for Valorant is rarely as dramatic as it sounds. The phrase “go into BIOS” makes many players imagine a dark hacker room with green code raining down the screen. In reality, it is usually a blue, gray, or aggressively gamer-themed menu with tabs like Boot, Security, Advanced, and Exit. The biggest challenge is not technical difficultyit is knowing which setting names your motherboard manufacturer decided to use.
For example, one player on an ASUS motherboard may need to change OS Type from Other OS to Windows UEFI Mode. Another player on a Gigabyte board may need to disable CSM Support before Secure Boot becomes available. A Dell laptop owner may only need to tap F2, enable Secure Boot, click Apply, and move on with life. Meanwhile, an older custom-built PC may require checking whether Windows is installed on an MBR disk before any UEFI switch is safe.
The most common emotional journey looks like this: first confusion, then panic, then five minutes of BIOS menu wandering, then the discovery that the setting was hiding under a tab with a name that sounds only vaguely related. Once Secure Boot is enabled and Windows confirms it with msinfo32, Valorant usually stops complaining. If it does not, reinstalling Riot Vanguard and restarting often clears the remaining issue.
The best experience-based advice is simple: do not rush. Take photos of every BIOS page before changing settings. Change one major thing at a time. Confirm results in Windows after each restart. If your system fails to boot after switching from Legacy to UEFI, go back into BIOS and restore the previous boot mode. That usually means the drive partition style or bootloader needs attention before Secure Boot can work correctly.
Also, remember that Valorant is not asking for Secure Boot just to annoy you personally, even if it feels personal at 1:00 a.m. when your friends are already in lobby. Competitive anti-cheat systems increasingly rely on hardware-backed and firmware-level trust signals because cheat developers also operate at low levels of the system. Secure Boot and TPM 2.0 help establish that the machine is starting from a known, trusted state before the game runs.
For gamers building a new PC, the easiest path is to set everything correctly from day one: install Windows in UEFI mode, use a GPT system drive, enable TPM 2.0, enable Secure Boot, update BIOS, install chipset drivers, then install Valorant. For existing PCs, the process may take more patience, but it is still manageable. The key is understanding the chain: UEFI first, GPT if needed, Secure Boot enabled, TPM 2.0 enabled, Windows verification, Vanguard reinstall if necessary.
Once configured properly, Secure Boot becomes invisible. You do not need to toggle it every time you play. You do not need to perform a ritual before launching Valorant. You simply boot Windows, open Riot Client, and queue up. Whether you top-frag after that is between you, your aim routine, and whatever mysterious force causes teammates to peek one at a time.
Conclusion
Enabling Secure Boot for Valorant on Windows 10 and Windows 11 is mostly about getting your PC’s security foundation in the right order. Start by checking msinfo32 for BIOS Mode and Secure Boot State. Then check tpm.msc for TPM 2.0. If Secure Boot is off, enter UEFI firmware settings, disable Legacy/CSM when appropriate, enable Secure Boot, restore default keys if necessary, and save your changes.
Windows 11 players should pay special attention because Valorant’s Vanguard anti-cheat is stricter on Windows 11 and commonly requires Secure Boot and TPM 2.0. Windows 10 players can still benefit from enabling Secure Boot, especially if they plan to upgrade or want better system protection. The process may feel intimidating the first time, but once you understand the menu names and the UEFI requirement, it becomes a straightforward fix.
Do it carefully, verify everything inside Windows, and avoid random BIOS experiments. Your reward is simple: fewer Vanguard errors, a more secure PC, and one less excuse before your next ranked match.

