
Body Care
How Make Furniture from a Repurposed Credenza Sideboard
Aug
A forgotten credenza is not merely an oversized box collecting dust, mystery cables, and takeout menus from three years ago. With thoughtful planning, basic woodworking skills, and the right finish, it can become a media console, entryway bench, home bar, bathroom vanity, kitchen island, office cabinet, or another genuinely useful piece of furniture.
This guide explains how to evaluate, redesign, repair, and finish a repurposed credenza sideboard without accidentally sanding through thin veneer, painting over grease, or attaching stylish new legs to a cabinet that cannot support them.
Why Repurpose a Credenza Sideboard?
Credenzas and sideboards are excellent candidates for furniture upcycling because they already provide the hardest parts of a furniture build: a cabinet box, doors, drawers, shelves, and a broad top. Instead of starting with a pile of lumber and an optimistic sketch, you begin with a mostly functional structure.
Older pieces may also offer features that are expensive to reproduce, including hardwood frames, dovetail drawers, wood veneer, solid doors, and sturdy internal dividers. Even a less glamorous laminate credenza can become attractive furniture when its structure is sound and its surface is prepared correctly.
Repurposing also lets you create furniture for a specific room rather than forcing a generic store-bought cabinet into an awkward space. A low credenza can become a media console. A deep sideboard can become a coffee station. A cabinet with damaged doors may work better as an open bookshelf or entryway bench.
Inspect the Credenza Before You Buy or Modify It
Check the Structure First
Ignore the color, knobs, decorative trim, and other cosmetic details for a moment. Open every door and drawer. Press gently on the top and sides. The cabinet should not sway like a shopping cart with one rebellious wheel.
Look for loose joints, cracked panels, sagging shelves, swollen particleboard, water damage, missing drawer parts, and separating veneer. Minor scratches and chipped finishes are manageable. Extensive moisture damage, severe warping, crumbling particleboard, or major structural failure may make the project more expensive than it is worth.
A useful secondhand-furniture checklist includes confirming that the piece is solid, appropriately sized, realistically repairable, and suitable for the maker’s skill level. Strong joinery and smooth-moving drawers are especially valuable.
Identify the Surface Material
Your finishing plan depends on what covers the cabinet:
- Solid wood: Can usually be sanded, stained, painted, or clear-coated.
- Wood veneer: Can often be repaired and refinished, but aggressive sanding may cut through the thin decorative layer.
- Laminate or melamine: Cannot absorb stain like natural wood, but it can be painted with careful cleaning, light abrasion, and a bonding primer.
- Particleboard or MDF: Can be painted, veneered, or covered, but damaged edges and swollen areas require special attention.
When examining veneer, inspect the corners and damaged areas for a thin wood layer over a different core. Use hand sanding near questionable edges. A powerful belt sander can turn “lightly refreshed walnut” into “surprise particleboard” with impressive speed.
Measure the Piece and Its Destination
Record the overall width, height, and depth, plus the dimensions of doors, drawers, shelves, and internal openings. Measure the intended room location as well as nearby outlets, vents, baseboards, door swings, and walking paths.
Do not assume matching doors or openings are identical. Older cabinets can be slightly out of square, so measure each component separately before ordering hinges, replacement fronts, veneer, or decorative panels.
Choose a New Purpose Before Starting Demolition
A successful credenza makeover begins with function. Removing doors and trim simply because demolition is entertaining can leave you with a handsome but confused cabinet.
Media Console
Remove or modify the back panel to create ventilated openings for power cords and electronic equipment. Adjustable shelves can hold game consoles, routers, speakers, and media accessories. Use cable grommets or neatly finished openings rather than hacking a hole with whatever drill bit happens to be nearby.
Entryway Bench
A long, low credenza can become a bench with shoe storage. The top must be reinforced to support sitting weight, particularly when the original cabinet has a thin top or wide unsupported span. Add a fitted cushion, open shoe compartments, and drawers for keys, gloves, or dog-walking supplies.
Home Bar or Coffee Station
Install an easy-to-clean top, interior shelves, stemware racks, mug hooks, or a pull-out preparation surface. A removable tray or waterproof mat can protect the cabinet from spills. Avoid placing heat-producing appliances inside a closed compartment unless the manufacturer permits it and adequate ventilation is provided.
Bathroom Vanity
A credenza can become a distinctive vanity, but this conversion requires precise plumbing cuts, reinforcement around the sink, and serious moisture protection. A stone, solid-surface, sealed wood, or properly finished countertop is usually more practical than relying on an old furniture top beside a sink.
Kitchen Island
Add a durable worktop, reinforce the base, and provide adequate clearance around the island. Locking casters can make a smaller unit mobile, while fixed legs or a stable plinth are better for a larger cabinet. Never assume the original top is suitable for direct food preparation.
Office Storage Cabinet
Convert one section into a printer compartment, file drawer, charging station, or supply cabinet. A slide-out shelf can improve access to heavy equipment, while internal cable management prevents the familiar office phenomenon known as the Cord Jungle.
Tools and Materials
Your exact supply list will depend on the conversion, but a typical repurposed credenza project may require:
- Safety glasses, hearing protection, gloves, and a suitable dust mask or respirator
- Screwdrivers, drill-driver, bits, and a measuring tape
- Combination square, level, pencil, and painter’s tape
- Sandpaper in several grits and sanding blocks
- Wood glue, clamps, wood filler, and veneer repair supplies
- Plywood or hardwood for shelves, reinforcement, trim, or a new base
- Primer selected for wood, laminate, or another existing surface
- Cabinet or furniture paint, stain, and an appropriate protective topcoat
- Fine-finish roller, quality brush, paint tray, and drop cloths
- New knobs, pulls, hinges, legs, casters, or mounting plates
Follow the safety and application instructions printed on each finish, adhesive, stripper, or primer. Ventilation is especially important when using solvent-based products.
How to Repurpose a Credenza Step by Step
1. Photograph and Label Everything
Before removing anything, take photographs of the doors, hinges, drawer slides, shelf positions, and hardware. Label each door and drawer with painter’s tape. Put screws and fittings into separate labeled bags.
This five-minute habit prevents a two-hour puzzle later, particularly when several hinges look identical but have aged into slightly different personalities.
2. Remove Doors, Drawers, Shelves, and Hardware
Disassemble only the parts required for the conversion. Remove knobs, pulls, hinges, catches, decorative trim, and detachable legs. Painting doors horizontally generally makes it easier to avoid runs and reach the edges.
Labeling components and removing hardware before surface work are standard cabinet-refinishing practices because they improve access and make reassembly more accurate.
3. Clean Before Sanding
Vacuum dust from corners, then wash the surfaces with a cleaner suitable for the material and existing finish. Pay special attention to areas around handles, where furniture polish, cooking residue, and hand oils tend to accumulate.
Allow the cabinet to dry completely. Sanding a greasy surface does not remove the contamination efficiently; it spreads it around in a thin layer, which is a surprisingly sophisticated way to make primer fail.
4. Make Structural Repairs
Tighten fasteners, reglue loose joints, replace damaged shelf supports, and reinforce weak spans. Use clamps to hold glued joints in alignment until the adhesive cures. Fill unwanted hardware holes and minor dents with a filler compatible with the final finish.
If the top will become a bench or support a heavy countertop, add internal cleats, a center divider, plywood reinforcement, or another load-bearing structure. Attach new legs to strong framing or a reinforced basenot merely to a thin bottom panel.
5. Repair Loose or Missing Veneer
Loose veneer can often be carefully lifted, cleaned, glued, and clamped flat. Missing areas may be patched with matching veneer. Level a patch gradually with a scraper, block plane, or sandpaper while protecting the surrounding original surface.
Color matching should be tested on scrap material or a hidden area before the repaired section is finished. Even a perfectly shaped patch can remain obvious when its color and sheen differ from the surrounding wood.
6. Modify the Cabinet
Now make the cuts and additions required by the new design. You might remove a damaged door, add a shelf, install a slatted front, cut cable openings, build a toe-kick base, or add decorative trim.
Measure twice, test the layout, and use scrap wood to confirm unfamiliar cuts or joints. Dry-fit every new component before applying glue or paint.
7. Sand According to the Material
For painted furniture, the goal is usually to clean, smooth, and dull the existing surfacenot to excavate all the way to the center of the cabinet. Feather chipped areas, smooth repairs, and create enough texture for primer adhesion.
Use gentle hand sanding on thin veneer and laminate. Laminate should be lightly abraded without cutting through its surface. Benjamin Moore recommends fine paper around 220 grit for laminate, while other systems may specify a different grit, so follow the chosen coating manufacturer’s directions.
8. Prime the Surface
Use a bonding primer for glossy laminate or melamine. On stained wood, choose a primer that can block discoloration and improve adhesion. Spot-prime repairs when appropriate, or prime the entire piece for a consistent painted finish.
Apply a thin, even layer and respect the recommended drying and recoat times. A primer that feels dry on top may not be ready to sand or paint.
9. Paint, Stain, or Apply New Veneer
Apply furniture or cabinet paint with a fine-finish roller, brush, or sprayer. Several thin coats usually look better than one heroic coat thick enough to preserve fingerprints.
If the piece is real wood or suitable wood veneer, stain can highlight the grain. Test stain in an inconspicuous location because solid wood, replacement patches, and veneered panels may absorb color differently.
Another option is to apply new wood veneer or thin decorative panels to flat doors and exposed cabinet surfaces. Work from the center outward to minimize trapped air, then trim edges carefully and finish them without sanding through the new material.
10. Add a Protective Finish
A clear protective coating is useful on tabletops, bar cabinets, benches, vanities, and other hardworking surfaces. Choose a product compatible with the stain or paint beneath it.
Water-based clear finishes generally preserve light paint colors more effectively, while some oil-based products can add warmth or amber tones. Apply the number of coats recommended by the manufacturer, allowing proper drying time and lightly sanding between coats when directed.
11. Install Hardware and Reassemble
Create a simple drilling template or hardware jig so pulls are evenly positioned. Predrill holes, especially near edges, and avoid overtightening screws into particleboard.
Reinstall doors and drawers only after the finish has cured sufficiently. Adjust hinges until gaps are even and doors operate without scraping. Finally, add felt pads, shelf liners, cable clips, baskets, or other accessories that support the cabinet’s new job.
Design Details That Make a Credenza Look Custom
Replace the Base
A new base can dramatically change the proportions of an old sideboard. Tapered wood legs suggest midcentury style, a recessed plinth creates a modern floating effect, and a simple hardwood frame adds visual weight without looking bulky.
Update the Door Fronts
Apply fluted trim, cane webbing, wallpaper, thin wood strips, geometric molding, or fresh veneer. Keep added material thin enough that doors can still open without colliding.
Mix Paint and Natural Wood
When some veneer is attractive and some is badly damaged, use a two-tone design. Refinish the top or drawer fronts in natural wood and paint the less attractive cabinet frame. This approach looks intentional and reduces the need to make every repaired area match perfectly.
Use Better Hardware
New knobs and pulls can modernize furniture with relatively little work. Choose hardware that relates to other finishes in the room, but do not feel required to match every metal exactly. A well-balanced mix often looks more collected than a room where every object appears to have joined the same uniformed organization.
Common Credenza Upcycling Mistakes
- Choosing a weak cabinet: Paint cannot repair badly swollen panels or widespread structural failure.
- Skipping cleaning: Dust, wax, grease, and silicone furniture polish can interfere with adhesion.
- Over-sanding veneer: Once the thin face layer disappears, the exposed substrate can be difficult to disguise.
- Using ordinary primer on laminate: Glossy synthetic surfaces usually require stronger adhesion preparation.
- Attaching legs to a weak bottom: Build or reinforce a load-bearing base before installing elevated legs.
- Reassembling too soon: Paint may feel dry while remaining soft enough to stick, dent, or peel around hardware.
- Ignoring ventilation: Electronics, appliances, and some finishes require adequate airflow.
- Forgetting tip-over protection: Tall, top-heavy, heavily loaded, or frequently opened storage furniture may need a suitable wall restraint.
The U.S. Consumer Product Safety Commission continues to emphasize effective furniture anchoring and the use of compliant tip restraints. Select appropriate hardware, attach it to strong points in the furniture and wall, and follow its installation instructions.
Conclusion
Learning how to make furniture from a repurposed credenza sideboard is less about performing one dramatic trick and more about making a sequence of sensible decisions. Start with a structurally sound piece. Identify its materials. Give it a specific purpose. Repair weaknesses before hiding them, and select preparation products that match the actual surface.
The best transformation does not erase every trace of the credenza’s former life. It preserves the useful construction while improving its proportions, appearance, and function. The result can be more personal than mass-produced furniture and far more satisfying than sending a repairable cabinet to the landfill.
Experience-Based Lessons from a Credenza Makeover
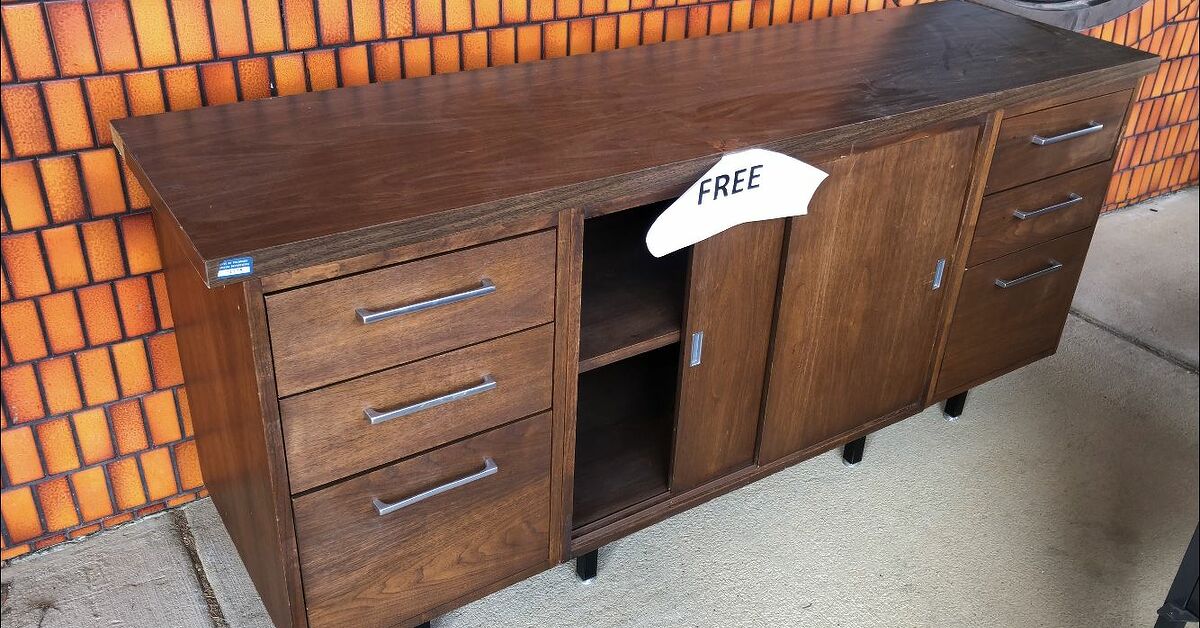
Imagine beginning with a long, dark-brown credenza found at a resale shop. Its brass-colored handles are scratched, the finish looks tired, and one door hangs lower than the others. At first glance, it seems to need little more than paint and new hardware. That assumption lasts until the first drawer is removed.
Inside, the cabinet reveals three different materials: a solid-wood front frame, veneered side panels, and a particleboard bottom. This discovery changes the plan. The original idea was to add four tall legs directly beneath the cabinet, but the bottom panel is not designed to carry the entire load at four small attachment points. A rectangular hardwood base is built instead, distributing the weight along the stronger cabinet frame.
The next surprise appears during cleaning. Years of furniture polish have left an almost invisible slick layer around the drawer pulls. A quick test coat of primer separates easily when scratched. The affected areas are cleaned again, rinsed as directed, and allowed to dry. The second primer test bonds far better. The lesson is obvious: when paint fails during a test, blaming the paint is less useful than investigating the surface.
The veneer creates another important moment. A random-orbit sander works well on the solid frame, but the first light pass on a side panel exposes how thin the veneer is. From that point forward, the veneered areas are sanded by hand. The goal changes from removing the old finish to gently dulling it. This slower approach is not exciting, but neither is explaining why a cabinet now has a pale oval patch the size of a dinner plate.
One loose veneer corner is repaired with adhesive and a flat clamping block protected by wax paper. A missing chip near the back is filled and painted rather than patched with new veneer because the final design uses paint on the cabinet body. The top, which has attractive grain, is refinished separately and kept natural. Combining painted surfaces with a wood top turns a limitation into the main design feature.
Hardware placement becomes the detail that makes the project feel professional. Instead of measuring every handle independently, a small template is made from scrap plywood. Each hole lands at the same height, and the doors immediately look more orderly. The original hinges are cleaned and adjusted rather than replaced because they remain strong and fit the existing recesses.
The finished credenza becomes a media console with two adjustable shelves and a discreet cable opening in the back. The opening is sanded smooth and fitted with a grommet. Ventilation space is left around the electronics, while the center drawer stores remotes, controllers, and the collection of cables that apparently reproduces when the cabinet doors are closed.
The most valuable experience is not the painting technique or the hardware upgrade. It is learning to revise the design when the furniture reveals how it was built. A successful upcycling project is a conversation with the existing piece. Occasionally, the credenza says, “That leg idea is terrible.” It is wise to listen.
SEO Information

