
Hair Care
DIY Pallet Headboard
Jul
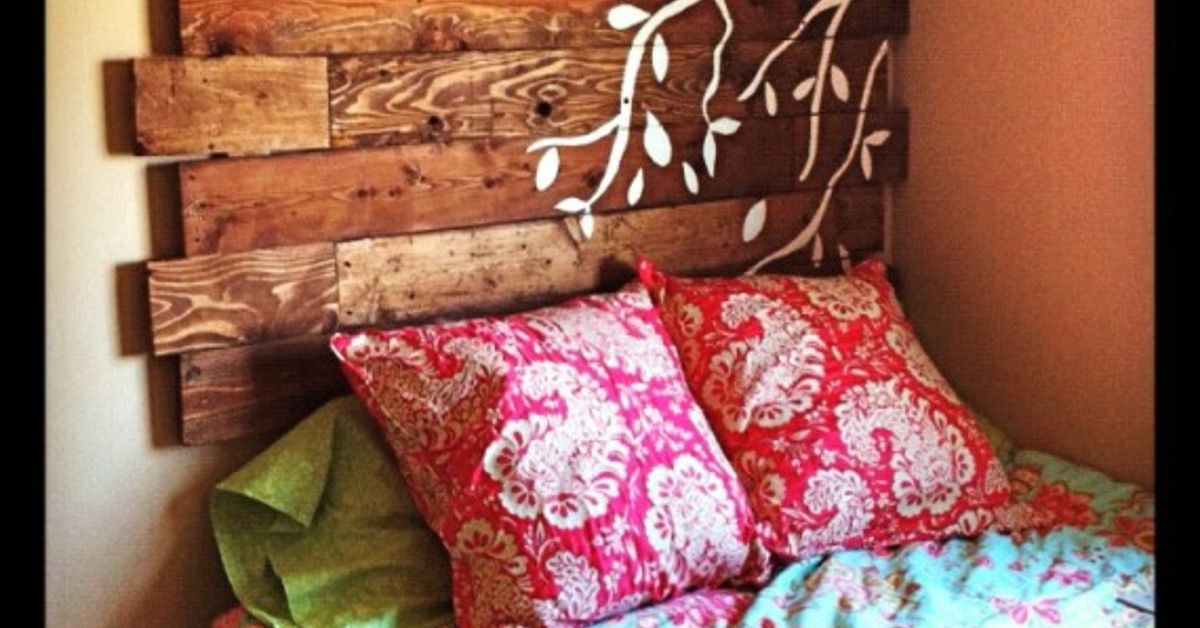
A DIY pallet headboard can turn an ordinary bedroom into a warm, rustic retreat without requiring custom-furniture money or a workshop that looks like a television set. With carefully selected pallet boards, a basic supporting frame, and a little patience, you can create a headboard that looks intentionally weathered rather than accidentally abandoned behind a warehouse.
The project is approachable for beginners, but pallet wood deserves more preparation than fresh lumber from a home-improvement store. Boards may be rough, warped, stained, cracked, or decorated with nails that appear determined to remain there forever. The secret is not simply finding a free pallet. It is choosing safe material, preparing it properly, and building a rigid panel that can be securely attached to the wall or bed frame.
This guide explains how to select pallet wood, calculate the right dimensions, construct the headboard, apply a durable finish, avoid common mistakes, and customize the design for farmhouse, industrial, coastal, bohemian, or modern bedrooms.
Why Build a Pallet Wood Headboard?
A headboard occupies a large visual area, so changing it can alter the personality of the entire bedroom. Pallet boards naturally provide variations in grain, knots, saw marks, nail holes, and color. Fresh lumber can imitate that appearance, but reclaimed wood arrives with a head start and occasionally an entire backstory.
A homemade pallet headboard also offers several practical advantages:
- Affordable materials: Clean pallets may be available inexpensively or free from local businesses.
- Custom dimensions: The width and height can be matched to your mattress, wall, and ceiling.
- Flexible appearance: Boards can be stained, painted, whitewashed, charred, or left natural.
- Beginner-friendly construction: Most designs use straight cuts and basic screw connections.
- Responsible reuse: Salvaging usable lumber keeps it in service instead of sending it directly to the waste stream.
The finished project does not have to resemble a barn door unless that is the goal. Sanded boards arranged with narrow gaps can look clean and contemporary. A chevron pattern feels more polished, while staggered planks create a casual reclaimed-wood accent wall effect.
Safety First: How to Choose Pallet Wood
Not every pallet should become bedroom furniture. Pallets are shipping equipment, and their previous cargo or storage conditions may be unknown. Avoid any pallet with an oily surface, chemical odor, mold, dark spills, excessive moisture, insect damage, or unidentified residue. A suspicious pallet is not a bargain. It is a future conversation with your lungs.
Read the Pallet Markings
International shipping pallets may carry an ISPM 15 treatment mark. Look for the treatment code near the country and producer identification:
- HT: Heat-treated wood. This is generally the preferred marked material for indoor reuse.
- MB: Wood fumigated with methyl bromide. Do not use it for an indoor furniture project.
A heat-treatment stamp does not reveal everything the pallet previously carried, so visual inspection still matters. Skip boards with paint of unknown age, strong odors, unusual discoloration, or evidence of contamination. Never assume that sanding will magically convert questionable wood into clean furniture.
Choose Dry, Solid Boards
Select pallets with relatively straight slats and minimal structural damage. Small nail holes, shallow dents, and surface checking contribute character. Deep rot, active insect tunnels, wide splits, and soft wood do not.
Whenever possible, obtain pallets from a business that can explain their history. Pallets used for dry building materials or packaged household goods may be easier to evaluate than anonymous pallets found beside a dumpster. Ask before taking them; “reclaimed” and “quietly stolen” are not the same decorating style.
Protect Yourself During Preparation
Wear gloves when handling rough boards and safety glasses while pulling nails, cutting, drilling, or sanding. Woodworking creates airborne dust, especially when a power sander is used. Work outdoors or in a well-ventilated area, connect dust collection when available, and use appropriate respiratory protection.
Plan the Size and Design
Measure the actual bed and wall before disassembling anything. A headboard commonly extends a few inches beyond each side of the mattress, but its final width should also account for nearby windows, outlets, nightstands, sconces, and switches.
For example, a queen mattress is approximately 60 inches wide. A finished headboard measuring about 64 to 68 inches wide usually provides a balanced amount of overhang. These numbers are starting points, not sacred woodworking law. Measure your bed frame because upholstery, rails, and bedding can affect the visible proportions.
Choose a Comfortable Height
A finished height of 48 to 60 inches from the floor works in many bedrooms. Taller designs produce a dramatic focal point, while shorter headboards fit rooms with windows or sloped ceilings. Sit against the bed with your pillows arranged normally and mark where the visible wood should begin. There is little benefit in using beautiful reclaimed boards where nobody will ever see them except a lost sock.
Select a Board Pattern
Horizontal planks make the bed appear wider and are the easiest arrangement for beginners. Vertical boards emphasize ceiling height. Diagonal, herringbone, and chevron patterns create more movement but require additional cutting, fitting, and support.
Lay the cleaned boards on the floor before construction. Move lighter and darker pieces around until the color variation looks balanced. This dry layout prevents the classic mistake of attaching every attractive board first and discovering that the remaining corner resembles a wooden barcode.
Tools and Materials
Recommended Tools
- Tape measure
- Pencil and carpenter’s square
- Hammer, pry bar, or pallet dismantling tool
- Locking pliers or nail puller
- Circular saw, miter saw, or jigsaw
- Drill and driver bits
- Random-orbit sander or sanding block
- Stud finder
- Level
- Clamps
- Safety glasses, work gloves, and dust protection
Recommended Materials
- Clean, suitable pallet boards
- Two or three straight 1-by-4 or 1-by-6 support boards
- Wood screws sized for the combined material thickness
- Wood glue, optional
- Wood filler, optional
- 80-, 120-, and 180-grit sandpaper
- Wood stain, paint, whitewash, or clear finish
- Wall-mounting hardware or bed-frame bolts
- Felt pads or rubber bumpers
The number of pallets required depends on slat width, usable yield, and headboard dimensions. Two pallets may provide enough material for a simple queen headboard, but damaged or narrow boards can increase that number. Collect extra wood so you can reject troublesome pieces instead of forcing them into the design through optimism.
How to Build a DIY Pallet Headboard
Step 1: Inspect and Clean the Pallets
Examine each pallet in daylight. Reject contaminated or badly damaged material. Brush away loose dirt, then scrub acceptable wood with warm water and a modest amount of mild detergent. Avoid saturating the boards unnecessarily.
Allow the wood to dry completely in a covered, ventilated location. Depending on humidity and board thickness, this may take several days. Building with damp wood can trap moisture under the finish and encourage later movement, staining, or unpleasant odors.
Step 2: Dismantle the Pallets
Use a pallet tool, pry bar, or reciprocating saw to separate the slats from the stringers. Work gradually near each fastening point. Pulling too aggressively often splits the board ends, converting a six-foot design plan into a collection of rustic coasters.
Remove every nail, staple, and hidden piece of metal. Inspect both faces and edges. A handheld metal detector can be useful because reclaimed boards occasionally conceal broken fasteners beneath the surface. Hidden metal can damage saw blades and create dangerous projectiles.
Step 3: Sort and Trim the Boards
Separate usable boards by thickness, width, color, and condition. Trim cracked ends and cut each slat slightly longer than the final dimension if you plan to square the assembled panel afterward.
For a clean modern design, group boards of similar thickness. For a more rugged appearance, slight variations can remain, but the rear surfaces should sit reasonably flat against the supports. A headboard may look rustic from the front; it should not behave like a potato chip from the back.
Step 4: Sand the Wood
Begin with 80-grit sandpaper to remove splinters, rough fibers, and raised grime. Continue with 120 grit, then use 180 grit if you want a smoother furniture-grade surface. Round over sharp corners and pay particular attention to the upper edge and any surface near pillows or hands.
Do not sand so aggressively that every saw mark and color variation disappears. The goal is safe, touchable woodnot lumber that has forgotten its previous life. Vacuum the boards thoroughly and wipe away remaining dust before finishing.
Step 5: Build the Supporting Frame
Place two straight vertical supports on a flat work surface, positioned several inches inward from the future side edges. Add a third center support for a wide queen- or king-size headboard. Check that all supports are parallel.
The support boards should extend far enough to connect the entire plank field, but their exact length depends on whether the headboard will hang on the wall or stand on legs. If wall mounting is planned, keep the frame compact enough to remain hidden behind the decorative slats.
Step 6: Arrange the Pallet Slats
Place the pallet boards face down across the supports. Recreate the layout you selected earlier, checking grain direction, color distribution, and gaps. Small spacers can maintain consistent separation between boards, although tightly fitted slats also work when the edges are reasonably straight.
Confirm that the assembly is square by measuring diagonally from corner to corner. Equal diagonal measurements indicate a square rectangle. Correct the layout before installing screws; geometry becomes remarkably stubborn once hardware is involved.
Step 7: Fasten the Boards
Drill pilot holes near the ends of dry or narrow pallet slats to reduce splitting. Apply wood glue where the boards contact the supports if desired, then drive screws through the rear supports into the decorative boards. Choose screw lengths that create a strong connection without emerging through the front.
Use at least one screw at each support intersection. Two screws may be appropriate for wide boards. Continue checking the panel for square as you work because slight movement can accumulate across many slats.
Step 8: Square the Edges
Once all boards are secured, mark the final width and cut the side edges straight with a circular saw and guide. Sand the fresh cuts smooth. You may leave the top edge uneven for an organic reclaimed look, but a straight top usually appears more intentional and is easier to clean.
An optional perimeter frame made from fresh pine or matching reclaimed wood can hide uneven board ends. Mitered corners look refined, while square butt joints are easier and fit farmhouse styling.
Step 9: Apply the Finish
Test stain or paint on a leftover piece because pallet boards absorb color unpredictably. One board may turn warm honey brown while its neighbor goes nearly black, apparently out of spite.
Apply thin coats and follow the manufacturer’s ventilation, drying, and recoating directions. For indoor bedroom furniture, a fully cured low-odor clear finish can seal the surface and make dusting easier. Coat the edges and exposed rear areas as well as the front.
Step 10: Mount the Headboard Securely
The safest mounting method depends on the headboard’s weight and construction. A wall-mounted French cleat distributes weight across a wide horizontal area and allows the panel to be removed later. One cleat half attaches to wall studs, while the matching half attaches to the headboard frame.
Another option is fastening long headboard legs to the bed frame using bolts and washers. This method works well when the bed frame provides proper mounting holes and the legs are sufficiently rigid.
Do not rely on a heavy headboard merely leaning against the wall. Locate studs, use hardware rated for the load, verify that the panel is level, and add felt pads where the lower edge touches the wall. After installation, pull gently in several directions to confirm that nothing shifts, rattles, or plans an overnight escape.
Finish Ideas for Different Bedroom Styles
Natural Rustic
Preserve the variation in the boards with a matte clear finish. This approach works well with white bedding, neutral walls, black metal lamps, and woven textiles.
Modern Farmhouse
Apply a medium brown stain, then frame the panel with clean square boards. Pair it with creamy bedding and simple black hardware. Use distressing sparingly; furniture should look aged, not as though it recently lost an argument with a lawn mower.
Coastal Whitewash
Brush on diluted white paint, then wipe away the excess before it dries. The grain should remain visible through the pale finish. Combine the headboard with light blue, sand, or soft gray fabrics.
Industrial
Use darker stain, charcoal paint, or a clear finish over naturally gray boards. Black brackets can be added as decorative accents, provided they do not create sharp edges near the sleeping area.
Color-Blocked
Paint selected boards in muted green, navy, terracotta, or dusty blue while leaving the others natural. Repeat those colors in pillows or artwork so the headboard feels connected to the room rather than like a leftover paint-sample experiment.
Optional Features
A basic pallet headboard can be upgraded with useful details, but every addition should be planned before installation.
- Floating shelves: Attach shallow shelves directly to structural supports, not just thin pallet slats.
- Reading lights: Use listed fixtures and route cords safely away from pinch points and bedding.
- LED backlighting: Mount suitable lighting behind the panel to create a soft wall glow.
- Hidden outlets: Hire a qualified electrician for permanent electrical work.
- Decorative ledge: Add a narrow top shelf for lightweight, nonbreakable objects.
Avoid placing candles, heavy frames, or unsecured glass objects above the pillows. A headboard should improve sleep, not introduce suspense.
Common Pallet Headboard Mistakes
Using Wood With an Unknown or Questionable History
Attractive grain does not compensate for chemical residue, mold, or an unexplained odor. When the history cannot be reasonably evaluated, use new lumber and create a reclaimed appearance with stain and distressing techniques.
Skipping the Drying Period
Freshly washed or outdoor-stored wood may contain considerable moisture. Finishing and assembling it too soon can lead to shrinking, twisting, and uneven joints.
Leaving Splinters and Sharp Edges
A pallet project displayed across the room can remain rough. A headboard sits inches from skin, hair, pillows, and bedding. Sand every accessible surface carefully.
Using Screws That Are Too Long
Measure the thickness of the supports and pallet boards before purchasing screws. A screw point protruding from the front is not a handcrafted accent.
Attaching Hardware Only to Thin Slats
Wall brackets, cleats, shelves, and legs must connect to the structural frame behind the decorative boards. Pallet slats alone may split under concentrated loads.
Ignoring Wall Studs
A large wood headboard can be heavier than it appears. Mounting hardware should be anchored into framing or installed with an appropriate system engineered for the wall type and actual load.
Estimated Cost and Project Time
The cost depends on whether the pallets are free and which finish or mounting system you select. Even when the wood costs nothing, budget for sandpaper, screws, support lumber, finish, cleaning supplies, and mounting hardware. A typical project may range from roughly $40 to more than $150.
Construction can often be completed during a weekend, but drying and finish-curing time may extend the schedule. Plan the project in stages:
- Day one: inspect, dismantle, clean, and dry the boards.
- Day two: cut, sand, arrange, and assemble the panel.
- Day three or later: apply the finish and allow it to cure.
- Final session: mount the completed headboard.
Rushing the finish because bedtime is approaching is an excellent way to make the entire room smell like a hardware aisle. Follow the product’s curing instructions before bringing the headboard indoors.
What Experience Taught Me About Building a Pallet Headboard
The first lesson is that finding pallets takes less time than finding good pallets. The most convenient stack is rarely the best stack. Clean boards from a known source save hours of scrubbing, nail extraction, and second-guessing. Once a pallet has a strange odor or mysterious black stain, no amount of rustic enthusiasm makes it suitable for a bedroom.
The second lesson is to collect more boards than the design appears to require. Some slats will split during dismantling. Others will reveal deep cracks after sanding. A few will twist just enough to create a visible ridge across the finished panel. Having extra material allows you to reject those pieces rather than redesigning the headboard around them.
Dismantling also rewards patience. Prying from one end with maximum force usually destroys the board at the nail. Working gradually from several points preserves far more usable lumber. Cutting through stubborn nails with a reciprocating saw can be faster, but every cut fastener must still be located before the wood meets another blade or sanding disc.
Dry-fitting the complete pattern was another major improvement. During an early attempt, the most dramatic boards were attached first because they looked fantastic. The remaining boards were then uniformly pale, creating one exciting half and one half that looked like unfinished shipping paperwork. Arranging everything on the floor first made it easier to distribute grain, knots, and tones naturally.
Board thickness matters more than it seems. Pallet slats that differ by only a small amount can create shadows and pressure points when mounted side by side. Minor variation adds texture, but severely uneven pieces should be planed, sanded, shimmed, or replaced. The front does not need to be perfectly flat, yet pillows should not catch on raised corners.
I also learned to choose the finish only after testing several scraps. Reclaimed boards can react very differently to the same stain. Soft, weathered areas absorb pigment quickly, while smoother sections remain light. A pre-stain conditioner may help on some softwoods, but testing remains essential. Clear finishes can darken gray wood more than expected, and whitewash often dries less opaque than it appears when wet.
Mounting deserves as much attention as the decorative surface. The headboard may look complete after the final coat dries, but it is not finished until it is stable. A French cleat provides a reassuring connection and makes leveling easier, particularly for a broad panel. Bed-frame mounting can also work, although the legs should be strong enough to resist side-to-side movement.
Leaving a small clearance above the floor simplifies cleaning and prevents the bottom edge from trapping dust. Felt bumpers behind the lower corners stop the headboard from tapping against the wall whenever someone sits down. These details are nearly invisible, but they often determine whether the result feels like furniture or a weekend project that happens to be standing upright.
The most useful design decision was resisting unnecessary additions. Built-in lights, shelves, hidden charging stations, hooks, and decorative metal can all be attractive, but each feature increases weight and complexity. A simple field of well-prepared boards often creates a stronger visual result than a headboard attempting to become an entertainment center.
Finally, pallet wood looks best when its history is edited rather than erased. Sand away splinters and dirt, but preserve selected nail holes, grain changes, and shallow marks. The goal is controlled imperfection. When the boards are clean, securely assembled, comfortably smooth, and thoughtfully arranged, the character feels intentional instead of unfinished.
Conclusion
A DIY pallet headboard combines affordable materials, practical woodworking, and nearly unlimited design flexibility. The best results begin with clean, traceable wood and continue through careful dismantling, thorough sanding, a rigid supporting frame, and secure installation.
Take time to arrange the boards before fastening them, test the finish on scraps, and mount the completed panel to structural framing. Those steps may not produce the most exciting progress photographs, but they separate a lasting piece of bedroom furniture from several boards leaning nervously behind a mattress.
Whether finished with warm stain, coastal whitewash, muted paint, or a simple clear coat, a pallet wood headboard can provide texture and personality that mass-produced furniture often lacks. Build it safely, keep the design proportional to the room, and let the reclaimed wood supply the character.
Note: Use only clean wood that can be reasonably evaluated. Treatment markings do not guarantee that a pallet was never exposed to spills or contaminated cargo. Reject questionable material, control sanding dust, follow all tool and finish instructions, and mount the completed headboard with hardware appropriate for its weight and wall construction.

