
Beauty Unlocked
DIY Inspiration: Sandy Suffield’s Paper Quilts
Jul
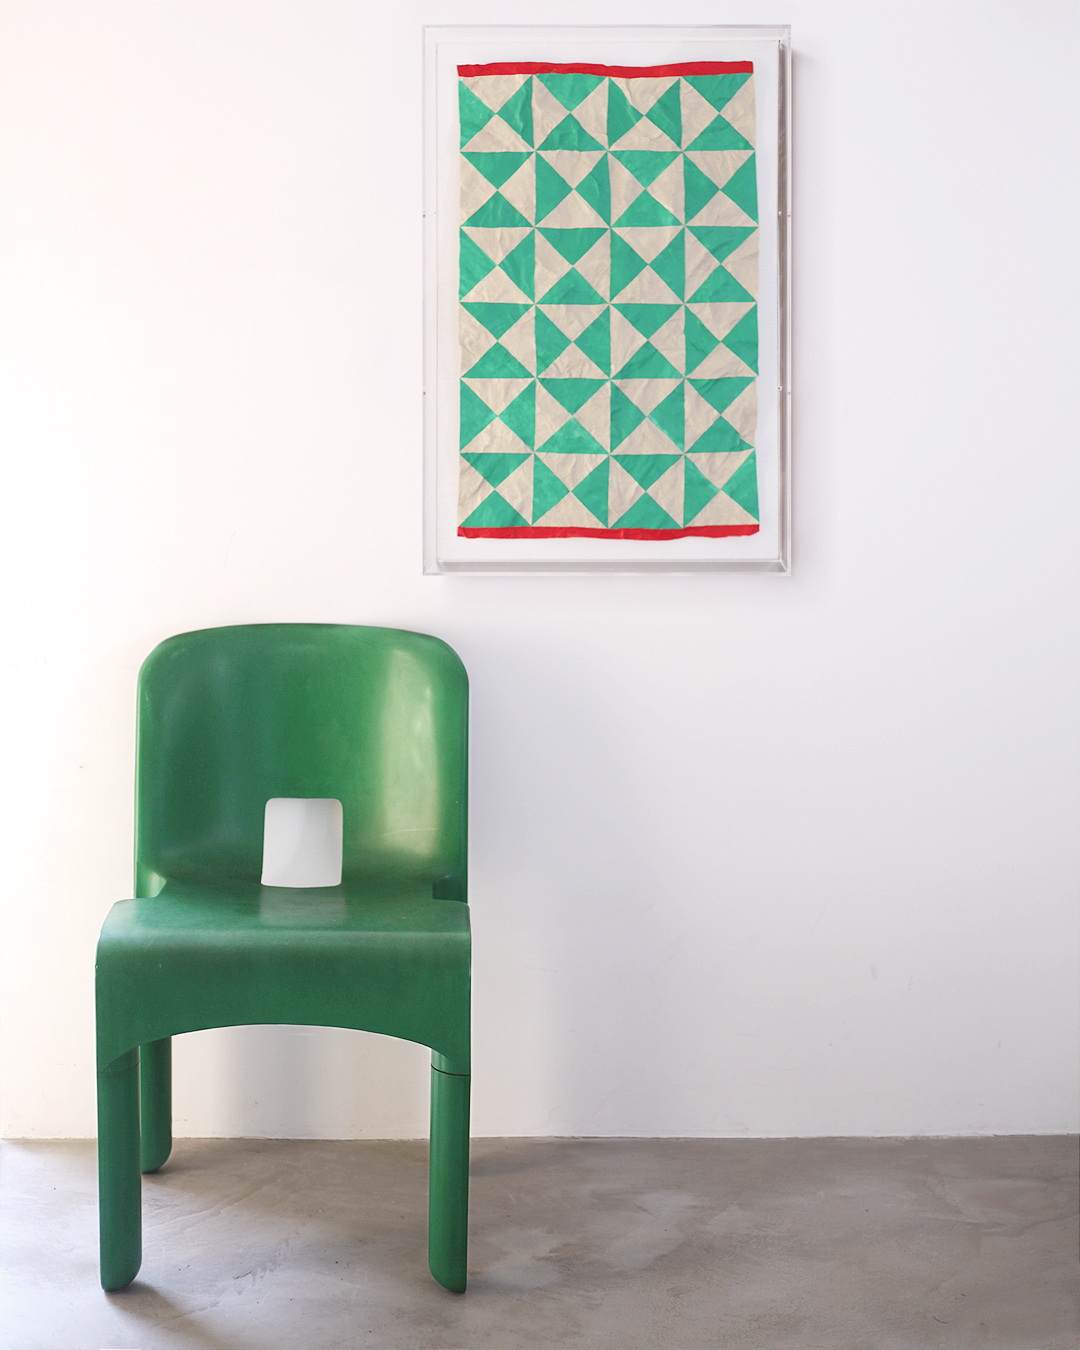
Some DIY projects require power tools, a 14-step tutorial, and a level of confidence usually reserved for people who can pronounce “polyuret’s paper quilts offer a happier route: paint some discarded paper, cut it into shapes, arrange it into a vivid composition, and suddenly your recycling pile has better visual balance than most living rooms.
Inspired by traditional quilt geometry but made entirely from paper, these colorful collage works show how simple materials can become graphic, expressive, and surprisingly sophisticated. They are not meant to replace a hand-stitched quilt, which has its own rich technical and cultural history. Instead, they borrow the visual language of patchworkrepetition, contrast, rhythm, color, and imperfect charmand translate it into accessible DIY wall art.
Why Sandy Suffield’s Paper Quilts Feel So Fresh
Sandy Suffield is a London-based art director and set designer whose paper quilts turn humble reused materials into bold geometric collages. Her process begins with thin packing paper, often saved from deliveries, which she paints before cutting into strips, blocks, and other shapes. Rather than following a rigid sketch, she works freehand and allows color, texture, and intuition to direct the final arrangement. Her influences can be wonderfully ordinary: bird plumage, painted surfaces, old furniture, and even graffiti glimpsed in an underpass.
That freehand approach is part of the magic. A paper quilt can look planned without feeling sterile. It can resemble a traditional patchwork pattern from across the room, then reveal wobbly edges, brushstrokes, creases, and accidental color shifts when you move closer. In other words, it has structure without acting like it owns a clipboard.
Suffield’s graphic-design background is easy to recognize in the balance of her compositions. Some pieces use stripes, brick-like arrangements, and repeated tiles; others nod toward familiar quilt patterns such as tumbling blocks. The result feels both nostalgic and modern: a little bit farmhouse quilt, a little bit gallery wall, and a little bit “I found this amazing paper bag and now it has a future.” /section>
Paper Quilts: A Modern Take on a Very Old Visual Language
Traditional quilts are far more than bedcovers. They preserve family stories, reflect local materials and design trends, mark life events, and pass skills from one generation to another. The Smithsonian’s National Quilt Collection includes more than 500 quilt-related objects and documents centuries of techniques, materials, patterns, and personal histories.
For generations, quiltmaking has also been an act of resourcefulness. Library of Congress collections record how quilters learned from relatives, developed their own methods, and worked from scraps when fabric was limited. The famous quilts of Gee’s Bend, for example, transformed used clothing, feed sacks, and fabric remnants into powerful works of visual expression and cultural survival. A paper quilt does not share the same history or purpose, but it can honor the broader spirit of making something meaningful from what is already on hand.
This is why recycled paper art feels so satisfying. It is not merely about saving money, although free materials are certainly a charming personality trait. It is about noticing color, texture, and possibility in things most people flatten into the recycling bin without a second thought.
How to Make a Paper Quilt Inspired by Sandy Suffield
1. Gather Paper Before You Buy Anything
The best paper quilt supplies are often already living in your home. Look for packing paper, grocery bags, tissue paper, old envelopes, cardboard inserts, magazine pages, used notebooks, wrapping paper, paint test sheets, and scrap paper from previous projects.
Choose papers with different personalities. Thin packing paper offers soft wrinkles and absorbent texture. Grocery bags bring warm kraft-paper color. Tissue paper creates delicate layers. Old notebook pages add unexpected lines and marks. The goal is not to collect every paper item you own until your kitchen resembles a tiny stationery warehouse. Select a handful of materials that work together.
2. Paint Your Own Color Palette
One reason paper quilts feel more artistic than a simple cut-and-paste craft is that the colors are often built by hand. Paint selected papers with acrylic paint, gouache, tempera, watercolor, or leftover house-paint samples. Use broad brushstrokes, dry-brush marks, sponge texture, or thin washes.
Start with three to five dominant colors. For example, try faded coral, dusty blue, mustard yellow, dark plum, and cream. Or build a quieter palette with charcoal, clay, olive, pale peach, and off-white. A limited palette makes the composition feel intentional, even when the individual pieces are cheerful little troublemakers.
Let the paint dry fully before cutting. Wrinkled paper is not a disaster. It can add depth and character. In fact, a little texture is often what keeps a paper quilt from looking like a school geometry worksheet that gained confidence.
3. Pick a Simple Quilt-Inspired Structure
You do not need to recreate a complicated heritage quilt pattern. Start with one of these easy structures:
- Horizontal stripes in uneven widths
- Brick-like rows with staggered rectangles
- Square or rectangular patchwork blocks
- Large triangles arranged into a starburst
- Diamonds or cubes inspired by tumbling blocks
- A grid with one repeated shape in several colors
Tumbling Blocks is especially useful if you like optical illusion. The pattern has long been associated with quiltmaking and is recognizable for its three-dimensional cube effect. You can simplify it by cutting diamonds in three related tones: one light, one medium, and one dark.
4. Cut Shapes Imperfectly on Purpose
Use scissors for a handmade look or a craft knife and ruler for crisper edges. The ideal approach is usually somewhere between “carefully composed” and “I refuse to measure every millimeter because I enjoy peace.”
Create a mix of large and small pieces. If every block is identical, the design may become stiff. If every block is wildly different, the composition may start behaving like a group chat with no moderator. Repetition gives the eye a place to rest, while variation makes the work feel alive.
5. Arrange Everything Before Gluing
Lay your pieces on a backing board, heavy watercolor paper, cardboard, or the back panel from an old frame. Move the shapes around until the colors feel balanced. Step back several times. Turn the work upside down. Take a phone photo and look at it on-screen. This is one of the quickest ways to notice whether one corner is visually too heavy or whether your brightest color is shouting across the room.
A useful rule is to repeat each important color at least three times. For example, place a mustard-yellow piece near the top, another near the center, and a third toward the bottom. This creates rhythm and keeps the composition from looking accidental.
6. Glue With Care, Then Stop Fussing
Use a glue stick, PVA glue, or a thin layer of archival adhesive. Apply only enough glue to secure each piece; too much can buckle thin paper and turn your artwork into a tiny topographical map. Press each shape gently with clean hands or a scrap of paper.
Once every element is attached, let the work dry flat under a light stack of books. Then resist the temptation to “just add one more piece” for the next three hours. Many strong collages are ruined not because they need more, but because the artist panics during the final five minutes.
Design Lessons You Can Borrow From Paper Quilts
Color Is the Main Character
Paper quilts succeed when color has a clear job. Instead of treating every shade equally, choose one color to lead, two colors to support it, and one or two neutrals to keep the whole arrangement grounded. Think of neutrals as the responsible friend who remembers where everyone parked.
For a warm, vintage look, use rust, faded pink, olive, tobacco brown, and cream. For a sharper contemporary look, try cobalt, tomato red, pale lilac, black, and white. For a coastal mood, combine chalky blue, sandy beige, weathered green, and soft gray.
Texture Makes Flat Paper Feel Rich
Paper may be flat, but it does not have to look flat. Use crumpled packing paper, torn edges, brush-painted layers, handwritten scraps, paper with faint folds, and materials with slight color changes. These small irregularities create a surface that feels collected rather than manufactured.
Collage has a long relationship with textile traditions because both rely on layering, overlapping, pattern, and surface. Artists such as Miriam Schapiro used collage alongside references to quilting, embroidery, and other traditionally domestic crafts to challenge the idea that decoration is somehow less serious than fine art.
Leave Room for Quiet Areas
A successful paper quilt does not need every inch to sparkle, shout, stripe, and perform a dance number. Include negative space. Let a few plain areas of the backing show through. The pauses make the bold sections more powerful and help the eye move comfortably across the work.
How to Frame and Preserve Your Paper Quilt
Paper art is more delicate than fabric, so display choices matter. For a casual home project, a thrifted frame can be part of the charm. Sandy Suffield often incorporates found frames, including pieces with unusual colors, creases, and signs of earlier lives.
For a piece you hope to keep for years, use acid-free backing, archival glue, and a frame with a mat or spacer so the artwork does not press directly against the glass. Keep it out of direct sunlight, damp rooms, and extreme temperature swings. Conservators and paper artists regularly recommend those precautions because sunlight, moisture, and unstable conditions can damage paper over time.
A simple black, white, natural wood, or softly painted frame can shift the mood dramatically. Black makes bright colors look punchier. Natural wood adds warmth. A colored frame can turn the whole artwork into a maximalist celebration, which is perfect when subtlety has already left the building.
Common Paper Quilt Mistakesand Better Ways to Fix Them
Mistake: Using too many colors. Fix it by removing two or three shades and repeating the remaining colors more intentionally.
Mistake: Making every shape identical. Fix it by introducing a few slightly larger blocks, uneven strips, or hand-torn elements.
Mistake: Gluing before testing the layout. Fix it by arranging your design dry first and photographing possible versions before committing.
Mistake: Copying an artist too literally. Fix it by borrowing a principle instead of a finished composition. Use your own palette, your own scraps, your own pattern, and your own story.
Mistake: Treating imperfections as failure. Fix it by remembering that hand-painted paper, soft edges, and small shifts in alignment are often the exact details that make collage art feel human.
Hands-On Experience: What Making a Paper Quilt Actually Feels Like
Making a paper quilt is one of those projects that sounds simple until you sit down with a stack of painted scraps and realize that a rectangle can have opinions. At first, the process may feel oddly indecisive. You move a blue strip left. Then right. Then left again, because apparently the strip has entered negotiations. But after a few minutes, something changes: you stop trying to make the “correct” design and start noticing which shapes genuinely belong together.
The experience is calmer than sewing a full quilt but still gives you the satisfying rhythm of patchwork. There is cutting, arranging, layering, stepping back, and returning to the table. You get the visual pleasure of repetition without needing a sewing machine, a rotary cutter, or the ability to keep track of twelve differently sized fabric pieces while your cat sits directly on the pattern.
One of the best parts is the way ordinary paper becomes more interesting after paint is added. A grocery bag can turn into a soft brown tile with uneven brush marks. Packing paper can become a cloudy blue strip that looks almost like dyed fabric. A page from an old notebook can become a pale neutral with faint lines peeking through. These small details make the finished collage feel layered with memory, even when the materials came from something as glamorous as an online order of replacement lightbulbs.
The process also teaches a useful lesson about visual confidence. Most people are comfortable choosing colors for clothing, rooms, or food packaging, but hesitate when asked to make art. Paper quilts lower the stakes. You are not painting a realistic portrait of someone’s grandmother. You are arranging shapes. If a color feels wrong, you move it. If a pattern feels boring, you cut another piece. The materials are forgiving, and the project invites play instead of performance.
It can also become a surprisingly social activity. A few friends can paint papers together, swap scraps, and make individual pieces from a shared color palette. Families can use old maps, copied photos, ticket stubs, handwritten notes, and packaging from meaningful events. Children can make bright, irregular blocks without worrying about perfection, while adults can pretend they are “exploring compositional balance” instead of simply having fun with glue.
For people who enjoy home decor, a paper quilt offers an inexpensive way to make wall art that actually belongs in the room. You can match it to a sofa, pull colors from a rug, echo the stripes in curtains, or create a bold contrast for an otherwise neutral space. Because the project is based on modular pieces, it is easy to make several small works that hang as a group. A trio of mini paper quilts can look polished in a hallway, above a desk, or in that strange corner of the house that has been waiting for purpose since 2019.
Most importantly, the experience rewards attention rather than perfection. It asks you to slow down, look closely at color, and trust small decisions. A paper quilt may begin as scraps, paint, and a few quiet minutes at the table. By the end, it becomes a visual record of choices: the colors you noticed, the shapes you liked, the materials you rescued, and the moment you decided that a crumpled piece of packing paper deserved a better destiny.
Final Thoughts
Sandy Suffield’s paper quilts prove that DIY wall art does not need expensive supplies or intimidating technique to feel original. With recycled paper, a thoughtful color palette, and a willingness to experiment, anyone can create a geometric paper collage that feels personal, playful, and beautifully imperfect. Start with what you already have, trust your eye, and remember: the best paper quilt is not the one that looks exactly like someone else’s. It is the one that could only have been made by you.

