
Beauty Unlocked
How To Line Drawers With Paper & Mod Podge
Jul
Opening a drawer should not feel like discovering the forgotten basement of a haunted mansion. Yet many drawers contain scratched wood, mystery stains, old adhesive, and enough dust to qualify as a small ecosystem. Fortunately, you can transform that gloomy interior with decorative paper, Mod Podge, and one reasonably peaceful afternoon.
Learning how to line drawers with paper and Mod Podge is an inexpensive way to refresh a dresser, nightstand, desk, bathroom vanity, craft cabinet, or kitchen storage unit. The paper adds color and personality, while Mod Podge works as both an adhesive and a protective sealer. Unlike a loose liner that may curl, bunch, or slide around, a properly decoupaged drawer liner stays flat and looks intentionally built into the furniture.
This project is beginner-friendly, but the details matter. Accurate measuring, careful surface preparation, thin coats of adhesive, and patient drying make the difference between a smooth designer-style liner and a wrinkled paper swamp. The following guide covers materials, paper selection, installation, troubleshooting, maintenance, and real-world lessons learned from lining drawers of different sizes and conditions.
Practical principles synthesized from U.S. home-improvement and decoupage guidance.
Why Line Drawers With Paper and Mod Podge?
Drawer liners serve both decorative and practical purposes. They cover cosmetic damage, reduce direct contact between stored items and unfinished wood, and make inexpensive furniture feel more customized. A colorful pattern hidden inside a plain white dresser can also provide a pleasant surprise every time the drawer opens.
It Gives Old Furniture a Fresh Interior
Paint can improve the exterior of a dresser, but opening a beautifully painted drawer and seeing stained plywood inside can ruin the magic rather quickly. Decorative drawer liner paper completes the makeover. It is especially useful for thrift-store furniture, inherited pieces, unfinished drawer boxes, and inexpensive flat-pack cabinets.
It Protects the Drawer Bottom
A sealed paper liner can help shield the drawer from light scratches, dust, cosmetic residue, and everyday wear. It is not a substitute for waterproof vinyl in constantly damp locations, but it works well in bedroom dressers, office desks, craft storage, linen cabinets, and lightly used vanity drawers.
It Keeps the Paper From Sliding
Loose paper liners are easy to replace, but they can shift every time clothing, tools, or office supplies move. Mod Podge bonds the paper to the surface, reducing wrinkles and sliding. This permanent or semi-permanent approach works best when you are comfortable keeping the chosen pattern for several years.
It Uses Materials You May Already Own
Leftover wrapping paper, scrapbook paper, wallpaper scraps, maps, sheet music, and decorative art paper can all become drawer liners. This makes the project a clever way to reuse attractive paper that is too pretty to throw away but has been living in a closet since approximately the invention of closets.
Materials and Tools You Will Need
- Decorative paper, wallpaper, or heavyweight wrapping paper
- Mod Podge Matte, Satin, or Hard Coat
- Foam brush or soft-bristle decoupage brush
- Measuring tape or ruler
- Pencil
- Scissors or a sharp craft knife
- Cutting mat or scrap cardboard
- Plain paper for making a template
- Brayer, wallpaper smoother, or clean plastic card
- Fine-grit sandpaper, approximately 180 to 220 grit
- Vacuum, clean cloth, or dry paintbrush
- Mild dish soap and water
- Small artist brush for corners
- Optional clear acrylic sealer for additional protection
Mod Podge Matte creates a low-sheen appearance, while Satin offers a soft, polished finish. Hard Coat is designed for furniture and frequently handled decorative surfaces, making it a useful choice for drawers that will receive regular use. Whatever formula you select, read its label because drying instructions may vary.
Mod Podge Hard Coat is intended for high-touch furniture surfaces; thin coats and light sanding can improve the finish.
How to Choose the Best Paper for Drawer Liners
The prettiest paper is not automatically the best paper. A delicate tissue-thin sheet may look gorgeous on the craft-store shelf and behave like an emotional pancake once wet adhesive touches it. Consider thickness, finish, pattern scale, and the drawer’s intended use.
Scrapbook Paper
Scrapbook paper is durable, widely available, and easy to cut. It is excellent for small drawers, jewelry boxes, and nightstands. The main limitation is size. A wide dresser drawer may require multiple sheets, so plan the seams carefully or intentionally create a patchwork design.
Wrapping Paper
Heavyweight wrapping paper provides large, continuous patterns and is often inexpensive. Avoid extremely thin gift wrap because moisture from the adhesive can cause tearing, stretching, or wrinkles. Premium matte wrapping paper is generally easier to handle than glossy foil paper.
Wallpaper
Wallpaper scraps are excellent for drawer lining because they are generally thicker and more durable than ordinary wrapping paper. Vinyl wallpaper is particularly easy to wipe clean. However, heavily textured wallpaper can trap dust and may interfere with objects sliding smoothly across the drawer.
Maps, Book Pages, and Sheet Music
Vintage maps, copied book pages, and sheet music create distinctive liners for desks, libraries, and antique-style furniture. Use reproductions rather than irreplaceable originals. Old paper can be brittle, and some printed inks may bleed when wet. Always test a scrap with Mod Podge before committing to the full drawer.
Printed Designs From Home
You can print a custom design, photograph, repeating pattern, or digital illustration. Laser-printed images are usually less likely to smear than fresh inkjet prints. When using an inkjet printer, allow the ink to dry completely and test it with a damp brush. A light clear spray sealer may help protect sensitive ink before decoupage.
For drawers exposed to frequent spills, such as under-sink cabinets or heavily used kitchen storage, consider whether permanent paper is the right material. Waterproof vinyl, EVA, or removable non-adhesive liner may be more practical in wet areas.
Paper liners offer decorative flexibility, while waterproof synthetic liners are generally more suitable for spill-prone areas.
How To Line Drawers With Paper & Mod Podge: Step by Step
Step 1: Remove and Empty the Drawer
Take the drawer completely out of the furniture whenever possible. Remove every object, divider, tray, and stray paper clip. Working with the drawer on a stable table gives you better lighting, easier access to corners, and far less opportunity to glue your head to the dresser.
Inspect the bottom for loose veneer, protruding nails, cracks, splinters, grease, wax, or old adhesive. Repair structural problems before adding the paper. Decorative liner can disguise ugly wood, but it cannot negotiate peace with a loose drawer bottom.
Step 2: Clean the Interior
Vacuum loose dust and debris. Wipe the surface with a cloth lightly dampened with mild soapy water, then wipe it again with a clean damp cloth. Avoid soaking unfinished wood. Let the drawer dry completely before sanding or applying Mod Podge.
If the furniture has polish, wax, oily residue, or a questionable previous finish, clean it with a product appropriate for that surface. Adhesive bonds poorly to grease and furniture polish. Test cleaning products in an inconspicuous area, especially on antiques or valuable furniture.
Step 3: Lightly Sand Rough Surfaces
Use fine-grit sandpaper to smooth splinters, raised wood fibers, dried paint drips, or uneven patches. You do not need to remove every trace of the existing finish unless it is peeling or unstable. The goal is a clean, flat foundation.
After sanding, vacuum thoroughly and remove all remaining dust with a dry paintbrush or lint-free cloth. Tiny dust particles may seem harmless now, but under paper they can become visible bumps with the dramatic presence of miniature speed humps.
Proper wood-finishing preparation includes smoothing the surface and removing sanding residue before applying a finish.
Step 4: Make a Paper Template
Measure the drawer’s interior width and depth at several points. Old drawers are not always perfectly square, and even new drawers may vary slightly from front to back. A paper template is more reliable than trusting a single measurement.
Place plain craft paper, newspaper, or taped printer paper inside the drawer. Press it gently into the corners and mark the edges with a pencil. Cut the template, place it back in the drawer, and trim until it lies flat without curling up the sides.
Aim for a tiny gap around the perimeter rather than an overly tight fit. Paper can expand slightly when dampened by decoupage medium. A gap of approximately 1/16 inch is usually less noticeable than a buckled edge.
Step 5: Cut the Decorative Paper
Place the template on the back of the decorative paper. Pay attention to the direction of the pattern. Florals, stripes, text, maps, and animals look better when oriented intentionally rather than sideways, unless sideways flamingos are part of your artistic vision.
Trace around the template and cut carefully. Use scissors for ordinary paper or a craft knife and metal ruler for crisp, straight edges. Place the cut liner inside the drawer for a dry fit. Trim gradually until it rests flat.
When several sheets are needed, decide where seams will fall before applying adhesive. Match repeating patterns when possible. A slight overlap is easier to hide than a visible gap, but a bulky overlap may catch on stored items. For thick paper, a precisely aligned butt seam usually looks cleaner.
Step 6: Test the Paper and Adhesive
Brush Mod Podge onto a scrap of the same paper. Check whether the colors bleed, the coating becomes cloudy, or the paper wrinkles excessively. Also test adhesion on a hidden section of the drawer if the existing finish is glossy or unfamiliar.
This small experiment can save an entire sheet of expensive paper and several minutes of staring silently at a ruined drawer.
Step 7: Apply a Thin, Even Layer of Mod Podge
Use a foam brush or soft decoupage brush to spread a thin, even coat across the drawer bottom. Work all the way to the edges, but do not allow thick puddles to collect in corners. Excess adhesive increases drying time and can make lightweight paper wrinkle.
For a large drawer, work in manageable sections. Coat approximately one-third of the bottom, position that part of the paper, and continue across the surface. This gives you more control than covering the entire drawer and then attempting to wrestle a large sticky sheet into place.
Step 8: Position and Smooth the Paper
Lower the paper carefully, starting at one edge or at the back of the drawer. Do not drop the entire sheet onto the adhesive at once. As you lower it, smooth outward using a brayer, wallpaper tool, or the edge of a clean plastic card wrapped in a soft cloth.
Push trapped air toward the nearest edge. Use light, steady pressure. Aggressive scraping can tear damp paper or damage printed patterns. If the paper is still movable, lift a problem area gently and lay it down again. Once thin paper becomes saturated, repeated repositioning usually makes matters worse.
Wipe away adhesive that squeezes from the edges. Examine the corners closely and press them down with a small clean brush.
Step 9: Let the Base Layer Dry
Allow the paper to dry before applying a topcoat. The surface may feel dry fairly quickly, but moisture can remain beneath the sheet. Drying time depends on paper thickness, adhesive thickness, temperature, and humidity.
Do not panic over minor wrinkles immediately after installation. Some flatten as the moisture evaporates. Touching, pressing, and repeatedly inspecting them every 45 seconds may introduce new damage. Give the project some privacy.
Step 10: Seal the Top
Once the paper is firmly bonded, apply a thin coat of Mod Podge over the entire liner. Brush in one direction and avoid repeatedly passing over areas that have begun to set. Seal the exposed paper edges carefully because these areas receive the most wear.
For additional durability, apply two or three thin topcoats rather than one heavy coat. Let each layer dry clear before adding the next. With Hard Coat, very light sanding between fully dry coats can reduce brush marks and dust bumps. Remove all sanding residue before recoating.
Step 11: Allow the Finish to Cure
Mod Podge may dry to the touch in roughly 15 to 20 minutes under favorable conditions, but drying and curing are different processes. Plaid states that the finish may require approximately 28 days to cure fully. You do not necessarily need to leave the drawer empty for a month, but avoid heavy objects, wet items, abrasive organizers, or aggressive cleaning while the finish is still developing hardness.
For practical use, leave the drawer open overnight or longer before reinstalling it. Wait several days before loading it heavily. Humid weather, thick paper, and generous adhesive layers may require additional time.
Official Mod Podge guidance distinguishes touch-drying from a full cure of approximately 28 days.
How to Prevent Bubbles and Wrinkles
Bubbles usually result from trapped air, uneven adhesive, excessive Mod Podge, or paper that was positioned too quickly. Wrinkles often occur when thin paper absorbs moisture unevenly.
- Choose medium-weight paper for your first project.
- Apply a thin, consistent adhesive layer.
- Lower the paper gradually instead of dropping it flat.
- Smooth from the center toward the edges.
- Use a brayer for even pressure.
- Work in smaller sections on wide drawers.
- Test fragile or inkjet-printed paper first.
- Do not apply the topcoat until the base layer is secure.
A small bubble discovered while the adhesive is wet may be pushed toward the edge. If a bubble remains after drying, pierce it carefully with a fine needle, introduce a tiny amount of Mod Podge beneath the paper, press it flat, and place wax paper with a lightweight book on top until dry.
Common Drawer-Lining Mistakes
Skipping Surface Preparation
Dust, wax, and peeling finishes prevent a strong bond. Cleaning and light sanding are not glamorous, but neither is watching your beautiful liner detach like an old sticker.
Cutting the Paper Too Large
A tight liner may buckle when damp. Dry-fit the paper and trim it before opening the Mod Podge. Decorative paper should lie naturally flat without being forced into the corners.
Using Too Much Adhesive
A thick layer does not create a stronger result. It creates a wetter result. Puddled Mod Podge can soak paper, extend drying time, and produce visible ridges.
Rushing the Topcoat
Brushing sealer over paper that has not bonded fully may move the sheet, reopen seams, or encourage bubbles. Let the base layer dry first.
Loading the Drawer Too Soon
Hard objects can leave impressions in a finish that feels dry but has not cured. Give the liner time before replacing heavy tools, metal organizers, cosmetics, or stacks of books.
Using Permanent Decoupage on Valuable Furniture
Mod Podge is not the right choice for every piece. For museum-quality antiques, valuable family furniture, rentals, or surfaces you may want to restore later, use a removable liner cut to fit without glue. Test before altering any finish whose history or value is uncertain.
Cleaning and Maintaining Paper-Lined Drawers
Dust the liner with a dry microfiber cloth, handheld vacuum, or soft brush. For light marks, use a barely damp cloth and dry the surface promptly. Avoid soaking the liner, using abrasive scrubbers, or allowing leaking products to remain inside the drawer.
Add trays beneath makeup, ink bottles, oils, cleaning products, or toiletries. A sealed paper liner is durable enough for normal use, but it is not a swimming pool. In high-moisture drawers, removable waterproof mats can be placed over the decorative paper for additional protection.
Creative Drawer Liner Ideas
- Botanical wallpaper inside a vintage green dresser
- Black-and-white geometric paper in a modern desk
- Maps inside a travel-themed nightstand
- Comic-book reproductions in a child’s storage cabinet
- Sheet music inside a piano bench or music cabinet
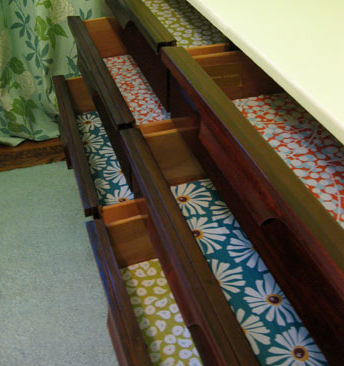
- Coordinating floral patterns in mismatched dresser drawers
- Marble-print paper inside a bathroom vanity
- Polka dots or stripes inside a craft-room cabinet
- Custom printed family photos inside a keepsake drawer
You can line only the drawer bottom for a clean, simple appearance or continue the paper partway up the sides. Lining the sides creates more visual impact but requires additional measuring and more careful seam placement.
My Experience Lining Drawers With Paper and Mod Podge
The first drawer I lined taught me that confidence is not a substitute for measuring. I measured the width at the front, assumed the drawer was perfectly square, and cut a beautiful piece of botanical wrapping paper. The back of the drawer was slightly narrower. My carefully cut liner entered confidently, reached the final two inches, and stopped like a sofa stuck in a stairwell.
I tried trimming it inside the drawer with a craft knife. That worked, but it produced a slightly uneven edge and unnecessary stress. Since then, I always make a plain paper template first. The template takes perhaps five extra minutes and prevents wasting decorative paper. It is particularly useful with old dressers, whose drawers often have charming personalities and questionable geometry.
My second major lesson involved adhesive quantity. On an early project, I assumed more Mod Podge meant more durability. I applied a luxurious layer thick enough to support marine life. The thin wrapping paper immediately absorbed the moisture and developed wrinkles across the center. Some wrinkles flattened as the liner dried, but several remained visible.
On the next drawer, I used a foam brush to apply a much thinner coat and worked in sections. I positioned the back edge first, lowered the paper gradually, and rolled it with a small brayer. The result was dramatically smoother. The process also felt calmer because I was controlling a few inches at a time rather than negotiating with one large sticky sheet.
Paper choice made an equally noticeable difference. Cheap glossy wrapping paper looked attractive but tore easily near the corners. Medium-weight matte gift wrap performed much better. Wallpaper was the easiest material to handle because it stayed stable while being positioned. Scrapbook paper produced the crispest finish in small drawers, although multiple sheets were needed for wider furniture.
I also learned to inspect printed paper before sealing it. One inkjet design looked perfectly dry until the wet brush passed over it. The dark blue lines softened and smeared, creating an accidental watercolor effect that would have been lovely had I not wanted sharp geometry. Testing a small offcut now belongs on my nonnegotiable checklist.
Drying requires more patience than the active work. A drawer may look finished after an hour, but loading it too soon can leave marks in the topcoat. I once placed a plastic organizer inside the same evening. When I removed it the next morning, faint outlines of its feet remained in the finish. They were not disastrous, but they were permanent enough to become educational.
Now I leave lined drawers open overnight and wait several days before adding heavy items. For frequently used furniture, I apply multiple thin coats of Hard Coat Mod Podge, allowing each one to dry fully. Thin coats look smoother and are easier to control than one thick protective layer.
Another practical discovery is that perfection matters less once the drawer is in use. A narrow gap at the back edge disappears beneath clothing or organizers. A tiny seam is rarely noticeable. What people do notice is the overall transformation: an old, dull drawer suddenly feels clean, intentional, and personal.
The most satisfying projects have been the inexpensive ones. A small amount of leftover wallpaper turned an ordinary thrift-store nightstand into something that felt custom-made. The outside remained simple, but the patterned interior added character every time the drawer opened. That hidden detail is the reason I continue using this technique. It delivers the pleasure of a furniture makeover without requiring advanced tools, a large budget, or a workshop that appears on television.
Conclusion
Lining drawers with paper and Mod Podge is a simple DIY furniture upgrade with a surprisingly polished result. The essential steps are straightforward: clean and smooth the drawer, create an accurate template, choose durable paper, apply a thin layer of Mod Podge, smooth carefully, seal the surface, and allow adequate drying time.
The project is forgiving enough for beginners but rewards patience. Measure twice, test the paper, use less adhesive than your enthusiastic inner crafter suggests, and resist loading the drawer immediately. With those habits, even a scratched or unfinished drawer can become a colorful, protected, and thoughtfully designed part of the furniture.

