
Skincare
Jolly Wrencher SAO, And How KiCad 6 Made It Easy
Jul
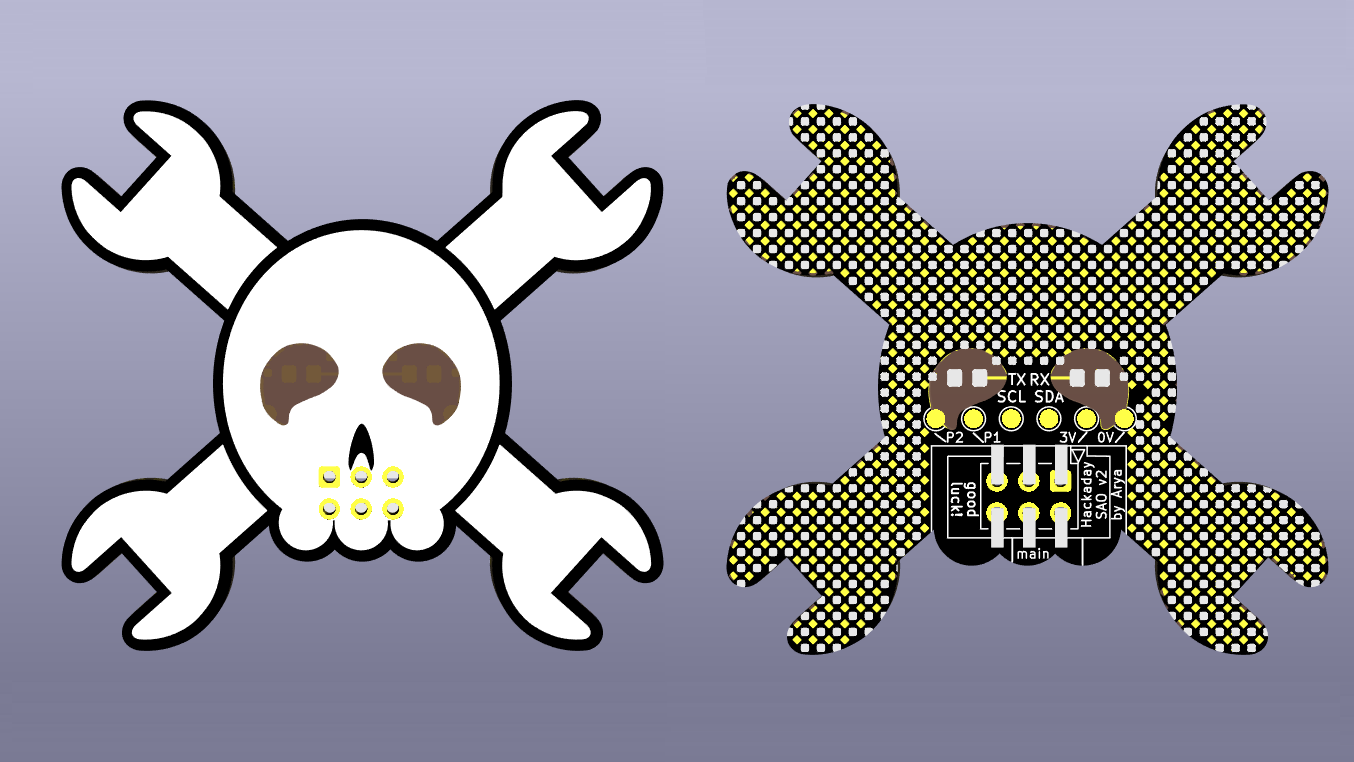
If you have ever looked at a conference badge and thought, “Nice, but what this really needs is a tiny skull made of circuit board,” then welcome home. The Jolly Wrencher SAO is one of those gloriously specific hardware projects that somehow manages to be practical, decorative, and a little bit ridiculous in the best possible way. It is badge culture in miniature: a small PCB add-on, shaped like Hackaday’s famous skull-and-crossed-wrenches logo, designed to plug into a host badge and instantly raise its cool factor by at least 37%.
But the real story is not just the shape. It is the timing. The Jolly Wrencher SAO landed at a moment when KiCad 6 had made several badge-design tricks dramatically easier. Suddenly, importing artwork, shaping board outlines, mixing function with flair, and turning a vector drawing into a real board felt less like a late-night wrestling match with software and more like an honest-to-goodness workflow. For makers, hackers, and badge obsessives, that was a pretty big deal.
So let’s talk about what the Jolly Wrencher SAO actually is, why it matters in the world of badgelife, and how KiCad 6 helped turn a clever graphic into a very real, very buildable little board.
What Is a Jolly Wrencher SAO?
The Jolly Wrencher is Hackaday’s logo: a skull with crossed wrenches, equal parts pirate flag and workshop mascot. Turning that symbol into an SAO was a natural move, because SAOs are basically the collectible enamel pins of the electronics world, except they can blink, talk over I2C, and occasionally tempt you into ordering “just one more board” at 1:14 a.m.
SAO stands for a small add-on badge standard used in conference badge culture. In practice, it means a mini PCB that plugs into a larger badge through a simple header. That simplicity is the whole magic trick. Instead of every badge using its own weird connector and private ecosystem, the SAO format gives creators a shared playground. One badge can host art or gadgets made by many different people, which is why the SAO scene feels less like a product catalog and more like a neighborhood block party with solder fumes.
The standard, minus the chaos
The original SAO idea became popular because it was easy to implement. A small header, 3.3V power, ground, and I2C lines were enough to let badge makers create compatible add-ons without building an entire electronic empire from scratch. Later versions expanded the idea with a 2×3, 0.1-inch connector and extra pins, giving designers more flexibility without making the format obnoxiously complicated.
That “easy enough to actually use” philosophy is exactly why the Jolly Wrencher SAO works so well as a case study. It is not trying to be a whole computer. It is a compact board that blends visual identity, prototyping space, and a little LED theatrics into a format that plays nicely with the wider badge ecosystem.
Why the Jolly Wrencher Design Is More Than a Funny Shape
On paper, a logo-shaped board might sound like pure ornament. In reality, the Jolly Wrencher SAO is a neat example of how the best badge projects combine style and function. The board was designed with a practical prototyping area, transparent eye sections for LED shine-through effects, and the kind of physical layout that invites experimentation instead of intimidation.
That matters because good badge design is rarely about cramming in the most features. It is about making something people want to wear, show off, and tinker with. A board that looks cool but is impossible to modify becomes shelf art. A board that is functional but visually bland gets ignored in a sea of wilder designs. The Jolly Wrencher SAO threads the needle. It looks like a piece of badge culture, but it also behaves like useful hardware.
In other words, it is not just a tiny pirate skull. It is a tiny pirate skull with a job.
How KiCad 6 Changed the Game
Here is the part where the software enters like the surprisingly competent sidekick in a heist movie. KiCad had already earned respect as a free, open source PCB design tool, but KiCad 6 made several tasks much smoother for the kind of art-heavy, shape-driven work that SAOs often require.
1. Native SVG import made badge art feel almost suspiciously easy
The biggest hero feature for this project was native SVG import into the PCB workflow. That sounds like a small checkbox improvement until you remember how annoying graphic import used to be. Before that, getting artwork onto a PCB often involved conversion utilities, awkward bitmap workflows, external plugins, or enough fiddling to make you briefly consider woodworking instead.
With KiCad 6, vector graphics could be imported directly onto layers such as silkscreen, copper, mask, or Edge.Cuts. That is a huge quality-of-life improvement for badge art. If your design already exists as a clean SVG, you can bring it into the board editor without turning the process into a scavenger hunt through half-forgotten utilities and forum posts from 2016.
For the Jolly Wrencher SAO, that meant the logo could move from idea to board graphic with far less drama. And in hardware design, less drama is usually an excellent sign.
2. Board outlines became easier to build from artwork
One of the clever things about the Jolly Wrencher project is that the graphic was not just decoration. The logo itself informed the board shape. Using an SVG and a vector editor, the outline could be adjusted, combined, and then imported onto the Edge.Cuts layer. That turns a graphic concept into a manufacturable board outline without forcing the designer to redraw everything manually inside the PCB tool.
For artistic boards, that is enormous. Instead of starting with a boring rectangle and hoping to make it cute later, you can let the art define the physical object from the beginning. That is how you get boards that feel intentional instead of merely decorated.
3. The PCB editor in KiCad 6 became friendlier for visual work
KiCad 6 also brought broader improvements that helped even when you were not importing skulls and wrenches onto fiberglass. The PCB editor got a major usability upgrade, including better selection behavior, layer visibility controls, opacity control, object grouping, and a more modern overall interface. Those features may not sound glamorous, but they matter when you are stacking artwork, copper, solder mask, keepouts, text, and functional footprints into one small badge.
Art-heavy designs are visual puzzles. Being able to see what is going on without squinting at a spaghetti bowl of layers is a gift. When software gives you better control over what you can select, hide, dim, or isolate, it saves time and lowers the chance of a silly mistake. That is the kind of improvement you do not brag about at parties, but it absolutely helps you finish the board before sunrise.
4. DRC and custom rules made small-board confidence easier to earn
KiCad 6 also expanded design rule checking and added a more capable custom rules system. That is important for SAOs because tiny boards have a habit of tempting designers into tight spacing, odd clearances, artistic copper decisions, and other wonderfully creative ways to annoy a board house.
When you are building a small board with decorative geometry, mask tricks, LEDs, and a connector that actually has to work, design rules stop being boring bureaucracy and start being the grown-up in the room. A tool that makes those checks easier to manage helps you move faster without being reckless.
5. Functional art became easier to prototype
KiCad 6 did not just make logo import easier. It also made it easier to think of PCB layers as design materials. Copper is not only electrical. Mask openings are not only protective. Silkscreen is not only text. In badge design, every layer is part of the visual palette. That mindset shows up across the broader maker community as more designers treat PCB fabrication like a medium for art, jewelry, wearables, and interactive objects.
The Jolly Wrencher SAO is a perfect example of this hybrid approach. The transparent eye sections are not just a cute flourish; they are a reminder that PCB design can behave a little like graphic design when the tools stop fighting you.
Inside the Board: Small Features, Big Charm
One of the nicest touches in the Jolly Wrencher SAO is that it includes a prototyping area with 1.27 mm pitch pads. That makes the board more than a decorative accessory. It gives builders space for passive parts, small ICs, and little experiments. Interspersed ground-connected pads also make quick bodges easier, which is exactly the kind of real-world convenience badge people appreciate when a project jumps from “that looks cool” to “let me try something weird on the hotel desk.”
Then there are the eyes. Transparent eye regions with LED footprints behind them take advantage of the PCB as a visual object, not just an electrical one. It is a small detail, but it transforms the board from nice-shaped PCB into character. Suddenly the badge has a face, and faces win every time.
That balance between utility and delight is why the project stands out. It is not complicated for the sake of complexity. Every added trick either improves the build, improves the look, or improves the fun.
A Practical Workflow for Designing a Similar SAO
If you wanted to design your own SAO in the spirit of the Jolly Wrencher, the workflow is refreshingly sensible.
Start with vector art
Use a vector editor to refine the graphic, clean up paths, simplify shapes, and prepare both the visible artwork and the board contour. This gives you a flexible source file that can feed multiple PCB layers.
Import art intentionally
Do not dump everything onto silkscreen and call it a day. Decide what belongs on silkscreen, what should define the outline, what might become mask openings, and whether any shapes could become copper or keepouts. The better your layer thinking, the better your result.
Keep the connector sacred
Badge art is fun. A nonfunctional connector is less fun. Make sure the SAO header placement, orientation, and clearances stay consistent with the standard you are targeting. This is the part where creativity politely steps aside and lets compatibility do its job.
Use DRC like a friend, not a punishment
Run design checks early and often. Small boards get cramped fast, and artistic decisions can accidentally create fabrication headaches. Let the software catch problems before the board house turns them into expensive life lessons.
Preview the board as an object
Use the 3D viewer and visual tools to see whether the design reads well at actual size. A board can look amazing at zoom level 9000 and underwhelming once it shrinks to badge scale. Tiny hardware has a ruthless way of telling the truth.
Why This Project Still Resonates
The Jolly Wrencher SAO resonates because it captures a turning point. It shows what happens when a beloved open source design tool matures enough to support the playful side of electronics without forcing users into awkward workarounds. It also shows that badge culture thrives when tools are accessible. The easier it is to go from art file to real board, the more people will try, and the more delightful weirdness the community gets in return.
That is the real story here. KiCad 6 did not magically invent creativity. It simply removed enough friction that creativity could stop spending half its energy on escape-room puzzles and get back to making charming little boards.
Extended Experience: What the Workflow Feels Like in Real Life
The real experience of building something like the Jolly Wrencher SAO is a mix of delight, tiny frustrations, small victories, and one moment where you absolutely zoom in far enough to see individual pixels and wonder if you have become a goblin. That is normal. Badge work does that to people.
At first, the process feels almost too easy. You import the SVG, drop it on the silkscreen, and there it is: a recognizable design sitting on the board like it belongs there. If you have ever used older PCB-art workflows, that moment feels borderline suspicious. You start thinking, “Wait, that worked? No converter script? No weird footprint detour? No ritual sacrifice to the plugin gods?” KiCad 6 changed that emotional rhythm. It made early progress feel immediate, and that matters because fast visual feedback is what keeps creative momentum alive.
Then the second phase begins, which is where all makers rediscover that “simple” projects are mostly made of details. The board is too big. Or too sharp. Or the cool shape is now interfering with the connector. Or the eyes look fantastic on screen but will not actually glow the way you imagined unless you rethink the mask openings and the LED placement. This is where the project becomes fun in a more serious way. You are no longer just decorating a PCB; you are negotiating between art, mechanics, fabrication, and electrical reality.
That negotiation is the real badge-design experience. You tweak the outline. You scale the art. You round a corner that looked dramatic at first and dangerous five minutes later. You move pads by what feels like an insultingly small amount, and somehow it changes everything. A board that looked cramped starts breathing. A board that looked decorative starts feeling usable.
And then there is the prototyping mindset. One of the most satisfying parts of a design like this is realizing it can still be hacked after it is built. That little protospace changes the personality of the board. Suddenly it is not just a finished object; it is an invitation. Someone can add a sensor, bodge on a tiny module, route in a blinking effect, or turn the whole thing into a conversation starter with actual circuitry attached. That kind of possibility is what gives badge culture its charm. The best boards do not end with the designer. They begin there.
Finally comes the physical payoff. When boards arrive from fabrication, every SAO feels a little like opening treasure, even if the treasure is mostly FR4 and questionable time management. Holding a shape-driven board in your hand is different from seeing it on a monitor. The proportions become real. The shine-through areas either sing or teach you humility. The connector either clicks into a host badge beautifully or reminds you why standards exist. And if the board works, lights up, and makes someone grin, the whole process suddenly feels wildly worth it.
That is why a project like the Jolly Wrencher SAO sticks in people’s minds. It is not only a neat design. It captures the whole emotional arc of making modern PCB art: idea, import, tweak, doubt, fix, fabricate, admire, and then immediately start thinking about the next one.
Conclusion
The Jolly Wrencher SAO is a tiny board with a big lesson. Good tools do not replace creativity; they make it easier to use. KiCad 6 helped take badge design from “possible with enough patience” to “pleasant enough to do for fun,” and that shift matters. Native SVG import, better editor controls, stronger rule systems, and smoother visual workflows all made it easier to turn a graphic idea into a board that was both stylish and useful.
That is why this little skull-and-wrenches badge add-on matters. It is not just an SAO. It is proof that when PCB tools become friendlier, makers get bolder, boards get weirder, and the world ends up with more delightful hardware. Frankly, that sounds like progress.
SEO Metadata

