Hair Care
Low-Cost Head Mounted Display From FPV Gear
Jun
Building a low-cost head mounted display from FPV gear sounds like the kind of project that begins with “I found this in a drawer” and ends with someone proudly wearing a tiny television on their face. And honestly? That is part of the charm. While polished VR headsets, augmented reality glasses, and premium FPV goggles can cost serious money, the maker community has always had a habit of asking one dangerous question: “Can I do this cheaper with drone parts?”
The answer is yes. A practical DIY head mounted display, or HMD, can be made with affordable FPV goggles, a small LCD screen, HDMI or composite video input, a battery pack, and a bit of mechanical patience. It will not replace a Meta Quest, Apple Vision Pro, or professional AR headset. It will not make you look like a sleek cyberpunk hero either. You may look more like a raccoon who discovered electronics. But for tinkering, portable computing, retro gaming, drone video monitoring, Raspberry Pi projects, and cyberdeck builds, this budget approach is surprisingly useful.
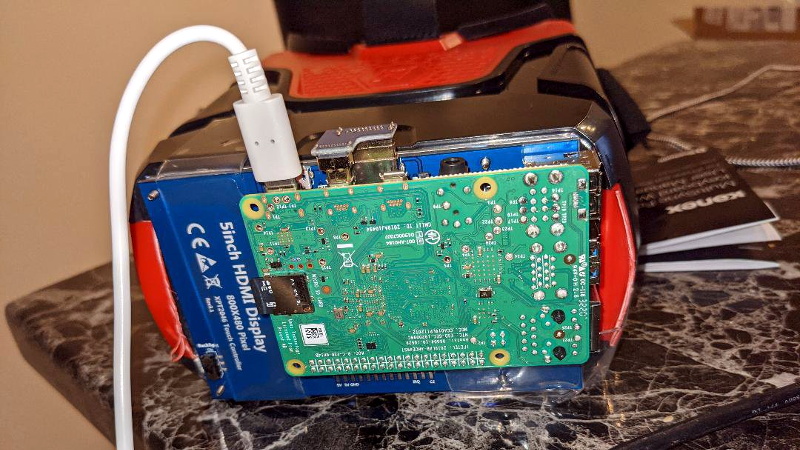
The idea gained attention in the hardware hacking world when builders experimented with mounting a small 5-inch display, often around 800×480 resolution, inside or in front of FPV-style goggles. Some versions connect to a Raspberry Pi, while others accept HDMI from a laptop, single-board computer, camera system, or game console. Add headphones and a compact Bluetooth keyboard, and suddenly you have a wearable computing setup for the price of a dinner that did not involve appetizers.
What Is a Low-Cost FPV Head Mounted Display?
A low-cost FPV head mounted display is a DIY wearable screen made from components normally used in first-person-view drone flying. FPV pilots use goggles or monitors to see live video transmitted from a drone camera. Those same goggles, screens, receivers, optics, and power systems can be repurposed into a head-mounted monitor for general use.
At its simplest, the project includes three core parts: something to hold the display near your eyes, a small screen that accepts video input, and a power source. Many builders use “box-style” FPV goggles because they already provide a face-mounted enclosure and lens system. These goggles are bulkier than slim binocular FPV goggles, but they are cheaper, easier to modify, and more forgiving for people with different interpupillary distances.
The result is not true virtual reality. There is usually no positional tracking, no stereoscopic 3D, no hand tracking, and no room-scale movement. Instead, think of it as a private wearable monitor. It puts a screen in front of your eyes so you can view video, operate a Raspberry Pi desktop, monitor a camera feed, play retro games, or use a command-line cyberdeck without carrying a traditional monitor.
Why FPV Gear Works So Well for DIY HMD Projects
FPV hardware is practically made for hackers. Drone pilots need lightweight screens, low-latency video, battery operation, compact enclosures, and durable connectors. Those needs overlap nicely with DIY wearable display projects. Even better, the FPV hobby has created a huge ecosystem of parts, from cheap analog goggles to high-end digital systems with OLED microdisplays.
For a budget head mounted display, analog and HDMI-compatible gear are the most interesting. Analog FPV systems are inexpensive and simple, but image quality is limited. HDMI screens cost a little more but are much more useful for modern devices such as Raspberry Pi boards, mini PCs, cameras, and game consoles. A 5-inch HDMI LCD panel can turn a pile of maker parts into a wearable workstation.
Many FPV goggles also solve a problem that DIY builders often underestimate: optics. Holding a screen a few inches from your eyes is not comfortable or useful unless the display is focused correctly. Box goggles typically include a lens that makes the screen viewable at close range. That lens is not magic, but it saves the builder from having to become an amateur optometrist with a hot glue gun.
Main Components Needed
1. FPV Goggles or a Face-Mounted Enclosure
The easiest starting point is a cheap pair of box-style FPV goggles. These goggles are usually designed around one larger screen rather than two tiny displays. That makes them easier to adapt for general video input. Some budget goggles already include a screen and analog receiver. Others can be gutted and rebuilt around a separate HDMI display.
Comfort matters more than many beginners expect. A headset that feels fine for five minutes can feel like a brick taped to your forehead after thirty. Look for adjustable straps, foam padding, ventilation, and enough internal space for the display and cables. If you wear glasses, box goggles are often more forgiving than compact binocular goggles.
2. A Small LCD or HDMI Display
A common choice is a 5-inch TFT LCD with 800×480 resolution. That resolution sounds modest compared with modern phones, but for terminal work, simple desktop interfaces, camera monitoring, and retro games, it can be enough. For sharper text, a 5-inch or 7-inch 720p screen is better, though it may increase cost, weight, and power consumption.
HDMI input is the most flexible option. It lets the display work with a Raspberry Pi, mini PC, laptop adapter, media player, or camera system. Composite video can still be useful for old-school FPV gear and retro devices, but HDMI is the better choice for most builders today.
3. A Video Source
A Raspberry Pi is one of the most popular sources because it is small, affordable, and well-supported. A Pi can run Linux, display a desktop, play media, operate a terminal, host software-defined radio tools, or become the heart of a cyberdeck. Some builders mount the Pi on the rear of the headset to balance the display weight on the front.
Other possible sources include a laptop, Android device with HDMI output, mini PC, action camera, HDMI camera, game console, or digital FPV receiver. The best source depends on the mission. For drone video, latency matters. For coding, text sharpness matters. For movies, comfort matters. For looking cool in public, well, perhaps reconsider the public part.
4. Power System
Most DIY HMD setups use USB power banks, lithium polymer batteries, or dedicated DC battery packs. The screen, Raspberry Pi, receiver, and fans may all have different voltage needs, so planning power distribution is important. A clean 5V USB setup is usually simpler than mixing multiple voltages.
Battery placement also affects comfort. Mounting a power bank at the back of the head strap can counterbalance a front-heavy display. This is one of those tiny design choices that separates “surprisingly wearable” from “why does my nose hate me?”
5. Audio, Input, and Controls
Headphones or earbuds make the experience more immersive, especially for media playback or remote camera work. For computing, a Bluetooth keyboard with a touchpad is a natural companion. Some builders add handheld controllers, mini trackballs, air mice, or wearable keyboards. The goal is simple: avoid needing a full desk while using a display strapped to your face.
Analog vs. Digital FPV for a DIY Display
Analog FPV is cheap, widely available, and known for low latency. It is excellent for drone flying because the image degrades gradually instead of freezing suddenly. However, analog video is not ideal for reading text or working in a desktop environment. It can look fuzzy, noisy, and nostalgic in the “found footage from a haunted convenience store” sense.
Digital FPV systems offer better image quality and higher resolutions. Modern digital goggles can include 1080p microdisplays, HDMI inputs, DVR functions, adjustable focus, and wide fields of view. The tradeoff is cost. Once the goggles cost several hundred dollars, the project becomes less “low-cost HMD” and more “I accidentally bought another headset.”
For a true budget project, a simple HDMI LCD inside box goggles often provides the best balance. It avoids the limitations of analog video while staying much cheaper than premium FPV goggles. If you already own digital goggles with HDMI input, using them as a head-mounted monitor can be excellent, but buying them only for this purpose may defeat the low-cost goal.
Expected Cost: How Cheap Can It Really Be?
The classic ultra-budget version can be built for around $30 to $60 if you already have some parts. A small screen, inexpensive goggles, cables, and basic mounting hardware can stay within that range. If you add a Raspberry Pi, battery pack, Bluetooth keyboard, better straps, cooling, and a nicer enclosure, the price can rise to $100 to $200.
That is still inexpensive compared with commercial VR and AR hardware, but expectations matter. A low-cost FPV head mounted display is not about luxury. It is about function, experimentation, and learning. The lower price also makes it less scary to modify. Drilling into a $20 goggle shell feels adventurous. Drilling into a $600 headset feels like a financial crime scene.
Practical Uses for a DIY FPV Head Mounted Display
Portable Raspberry Pi Computer
One of the most appealing uses is a wearable Raspberry Pi workstation. With a Pi mounted to the headset or carried in a pocket, the HMD becomes a private display for Linux tasks. It can handle writing, coding, terminal work, network diagnostics, retro emulation, and lightweight browsing. Pair it with a folding Bluetooth keyboard and you have a cyberdeck that looks ridiculous in the best possible way.
Drone and Camera Monitoring
Because the project comes from FPV culture, drone monitoring is a natural fit. A headset can display live camera feeds from drones, robots, RC vehicles, or inspection cameras. For actual drone flying in the United States, pilots still need to follow FAA rules, including visual line-of-sight requirements. When using FPV goggles, that typically means using a visual observer who can watch the aircraft directly.
Retro Gaming and Media Playback
A small HDMI display can connect to retro consoles, mini emulation boxes, or portable media devices. The experience is private, compact, and delightfully strange. The resolution may not impress a home theater enthusiast, but old games and low-resolution content often look right at home on a small screen.
Field Diagnostics and Maker Projects
For makers, a wearable display can be useful in cramped spaces. Imagine checking a camera feed inside a robot, monitoring a server console, viewing a microscope camera, or debugging a device while keeping both hands free. Add a small keyboard or controller, and the HMD becomes a field tool rather than just a novelty.
Design Challenges Builders Should Expect
Focus and Eye Comfort
The display must sit at the right distance behind the lens. If the screen is too close, too far, tilted, or poorly centered, eye strain arrives quickly. This is why box goggles are so helpful: they already include a lens and housing designed for close viewing. Even so, expect some trial and error.
Weight Distribution
A screen, cables, Pi board, and battery can become heavy. The best designs balance weight between the front and back of the head. Use lightweight cables, secure strain relief, and avoid dangling adapters. Nothing ruins the futuristic mood like an HDMI cable tugging the headset sideways like a tiny electronic fishing line.
Heat and Ventilation
Screens and single-board computers generate heat. Inside a closed headset, that heat can become uncomfortable. Vent holes, small fans, and careful spacing help. Fogging can also be a problem, especially during long sessions. Commercial FPV goggles often include anti-fog ventilation for a reason.
Text Readability
Not every low-resolution screen is comfortable for reading. A terminal with large fonts works better than a crowded desktop. Dark themes, increased font size, simplified window layouts, and full-screen apps can make the setup far more usable.
How to Improve the Build Without Spending Much
Start with comfort. Better foam padding, an improved head strap, and rear counterweighting can transform the experience. Next, clean up the cabling. Short HDMI cables, right-angle adapters, and secure mounts reduce strain and make the headset feel less like a prototype escaping from a drawer.
Software tweaks also matter. On Raspberry Pi, adjust display scaling, increase terminal fonts, use lightweight desktop environments, and map keyboard shortcuts for common actions. If you are using the HMD for writing or coding, full-screen text editors are easier on the eyes than cluttered multi-window layouts.
For a more polished build, consider 3D printing a custom bracket for the display. This allows better alignment, ventilation, and serviceability. Hot glue works, of course, because hot glue is the duct tape of the electronics kingdom. But a printed mount makes future repairs less dramatic.
Low-Cost HMD vs. Commercial VR Headset
A DIY FPV head mounted display and a commercial VR headset are not really competitors. A VR headset tracks your head, renders immersive environments, and often includes controllers, cameras, sensors, and a software ecosystem. A low-cost FPV HMD is closer to a wearable external monitor.
That difference is not a weakness. It is the point. A budget HMD is open-ended. It can connect to odd devices, run simple software, be repaired easily, and teach the builder about optics, video signals, ergonomics, power systems, and embedded computing. Commercial headsets are polished products. DIY HMDs are learning machines with straps.
Who Should Build One?
This project is perfect for Raspberry Pi fans, FPV hobbyists, cyberdeck builders, electronics students, retro gaming enthusiasts, and anyone who enjoys practical tinkering. It is also a good weekend project for learning about HDMI displays, battery power, wearable design, and low-cost prototyping.
It is not ideal for people who want plug-and-play perfection. If you need sharp text, long-session comfort, polished software, and a warranty department that does not involve your own screwdriver, a commercial display or headset may be better. But if your idea of fun includes testing three adapters to discover which one was lying about compatibility, welcome home.
Experience Section: What Using a Low-Cost FPV HMD Actually Feels Like
The first experience with a low-cost head mounted display from FPV gear is usually a mix of excitement, comedy, and immediate ergonomics education. The moment the screen lights up inside the goggles, the project feels like a tiny victory. Suddenly a Raspberry Pi desktop, camera feed, or retro game is floating in front of your eyes. It is not perfect, but it is yours, and that counts for a lot in DIY electronics.
The first thing most builders notice is scale. A 5-inch screen viewed through FPV optics can feel larger than expected, almost like sitting close to a small monitor. For terminal work, it can be surprisingly usable once the font size is increased. White text on a black background looks crisp enough for commands, notes, and lightweight coding. A crowded web page, however, may remind you that resolution still matters. Tiny menus and dense text are where budget displays begin waving a small white flag.
Comfort becomes the next lesson. A headset that looks lightweight on the bench can feel very different on your face. If the display is mounted too far forward, the goggles pull down on your nose. If the battery hangs from one side, the headset slowly rotates like it has developed an opinion. The best fix is counterbalancing. Placing the battery or Raspberry Pi at the back of the head strap can make the whole device feel more stable. It is a simple change, but it can double the amount of time you actually want to wear the thing.
Heat is another real-world factor. After fifteen or twenty minutes, enclosed electronics can warm the air inside the goggles. A few ventilation holes or a tiny fan can make a big difference. Without airflow, fogging may appear, especially in a warm room. Nothing says “future of computing” like pausing your cyberdeck session to wipe condensation off a lens.
The input method shapes the experience more than expected. A Bluetooth keyboard with an integrated touchpad is the most practical option for general computing. For retro games, a small controller feels natural. For camera monitoring, almost no input is needed once everything is running. Voice control sounds futuristic, but in practice, keyboard shortcuts are faster and less likely to make nearby people wonder why you are telling your goggles to open a terminal.
The most enjoyable use is focused work. A low-cost HMD is not great for multitasking, but it is excellent for single-purpose tasks: writing in a full-screen editor, watching a live camera feed, checking telemetry, playing an old game, or running diagnostics. The enclosed view reduces distractions. You are inside the task, even if “inside” is technically a foam box with a display panel.
After using one for a while, the biggest takeaway is that cheap does not mean useless. The project teaches practical tradeoffs in a way spec sheets never do. Resolution, latency, optics, balance, heat, battery life, and cable management all become real. A low-cost FPV head mounted display is not the future of consumer computing, but it is a fantastic doorway into wearable hardware. It proves that immersive displays do not have to begin with a corporate launch event, a glossy keynote, and a price tag that makes your wallet hide under the couch.
Conclusion
A low-cost head mounted display from FPV gear is one of those projects that perfectly captures the maker spirit: affordable, imperfect, educational, and genuinely useful. By combining FPV goggles, a small HDMI or analog display, a battery pack, and a video source like a Raspberry Pi, builders can create a wearable monitor for a fraction of the cost of commercial headsets.
The project works best when expectations are realistic. It will not deliver premium VR, ultra-sharp AR, or all-day comfort. What it does deliver is a flexible platform for experimenting with wearable computing, drone video, cyberdeck design, retro gaming, and field diagnostics. With careful attention to comfort, focus, power, and cable management, a budget FPV HMD can become more than a novelty. It can become a genuinely handy tool.
For makers who love learning by building, this is the good stuff. It is cheap enough to experiment with, open enough to modify, and weird enough to make the project memorable. In a world where technology often arrives sealed, locked, and subscription-flavored, a homemade FPV head mounted display is refreshingly hands-on. It may not look elegant, but it works. And sometimes, that is the most beautiful sentence in hardware hacking.
Note: This article synthesizes real-world information from FPV drone hardware practices, maker projects, Raspberry Pi display use cases, FAA recreational drone guidance, and current FPV goggle specifications. It is written as original editorial content for web publication.
