Beauty Tools & Accessories
How to Dethatch a Lawn for Healthier Grass
Jun
A healthy lawn should feel springy under your feet, not like you are walking across an old sofa cushion that has been living in the garage since 1998. If your grass looks tired, dries out quickly, resists water, or feels oddly spongy, your lawn may be dealing with too much thatch. The good news? Learning how to dethatch a lawn is not complicated. The slightly less glamorous news? It involves raking, hauling, sweating, and possibly questioning why grass has so many opinions.
Dethatching a lawn removes the thick layer of dead and living organic material that builds up between the green grass blades and the soil surface. A thin layer is normal and even helpful, but when thatch becomes too thick, it can block water, air, nutrients, and fertilizer from reaching the roots. In other words, your lawn may be starving while sitting directly on top of dinner.
This guide explains what thatch is, when dethatching is necessary, which tools to use, how to dethatch step by step, and how to keep your grass healthier afterward. Whether your lawn is small enough for a manual thatch rake or large enough to justify renting a power rake, the goal is the same: better airflow, stronger roots, improved water movement, and grass that looks less like a patchy mystery and more like something you would proudly walk barefoot across.
What Is Lawn Thatch?
Lawn thatch is a layer of partially decomposed stems, roots, crowns, stolons, and rhizomes that sits between the green grass blades and the soil. It is not simply grass clippings, despite what many homeowners have been told by a neighbor who owns three mowers and speaks with great confidence. Grass clippings usually break down quickly when lawns are mowed correctly. Thatch forms from tougher plant parts that decompose more slowly.
A little thatch is not a villain. A thin layer, generally under one-half inch, can help protect the soil, reduce water evaporation, cushion foot traffic, and moderate temperature swings. The problem begins when the layer gets too thick. Excessive thatch acts like a stubborn doormat over the soil, blocking moisture and nutrients from moving down into the root zone.
Why Dethatching Matters for Healthier Grass
Dethatching matters because roots need access to oxygen, water, and nutrients. When too much thatch accumulates, lawn roots may begin growing into the thatch layer instead of the soil. That sounds harmless until a hot, dry week arrives and the thatch dries out like toast. Roots trapped in that dry layer struggle, and the lawn can turn brown even when you are watering.
Thick thatch can also create an inviting home for insects and disease organisms. It may reduce the effectiveness of fertilizers and lawn treatments because products sit above the soil instead of reaching the root zone. In some lawns, water runs off instead of soaking in, which means you pay for irrigation and still get thirsty grass. That is a very annoying subscription plan.
Signs Your Lawn May Need Dethatching
Your lawn may need dethatching if it feels unusually spongy when you walk on it, dries out quickly after watering, has shallow roots, looks thin despite regular care, or shows brown patches that do not respond well to normal irrigation and fertilizing. Another clue is water pooling or running off instead of soaking into the lawn.
The best way to know for sure is to measure the thatch layer. Use a garden trowel or knife to cut out a small wedge of turf about three inches deep. Look at the side profile. You should see green grass on top, a brown spongy layer beneath it, and soil below that. If the brown thatch layer is more than one-half inch thick, dethatching is usually worth considering.
When Is the Best Time to Dethatch a Lawn?
The best time to dethatch a lawn is when the grass is actively growing and has enough time to recover. Dethatching is stressful. It pulls up debris, tears at the turf, and can make your lawn look temporarily rough, like it lost a wrestling match with a garden tool. Active growth helps the grass bounce back quickly.
Best Timing for Cool-Season Grasses
Cool-season grasses include Kentucky bluegrass, tall fescue, fine fescue, and perennial ryegrass. These grasses grow most actively in spring and fall. For most cool-season lawns, early fall is often the best time to dethatch because temperatures are cooler, rainfall is usually more reliable, and weeds are less aggressive than in spring. Late summer into early fall also gives you a good opportunity to overseed thin areas after dethatching.
Spring can work if the lawn is actively growing and not under stress, but avoid dethatching too early when the grass is still waking up. Also be careful with spring pre-emergent weed control. Dethatching after applying a crabgrass preventer may disturb the protective barrier, and overseeding may not work well with many pre-emergent herbicides.
Best Timing for Warm-Season Grasses
Warm-season grasses include bermudagrass, zoysiagrass, St. Augustinegrass, and centipedegrass. These grasses grow most actively from late spring through summer. The best time to dethatch warm-season grass is typically late spring to early summer, after the lawn has fully greened up and is growing vigorously.
Do not dethatch warm-season grass while it is dormant or just beginning to green up. The lawn needs energy to recover. Dethatching too early is like asking someone to run a marathon immediately after waking up from a nap.
When Not to Dethatch
Avoid dethatching during drought, extreme heat, freezing weather, or dormancy. Do not dethatch a lawn that is already severely stressed by disease, insects, or lack of water. If the grass is barely hanging on, dethatching can make the situation worse. Fix the underlying issue first, then dethatch when the lawn is strong enough to recover.
Tools You Can Use to Dethatch a Lawn
The right dethatching tool depends on your lawn size, grass type, thatch thickness, budget, and personal tolerance for physical labor. Some people enjoy manual raking. Others would rather negotiate with a raccoon than rake an entire yard by hand. Choose accordingly.
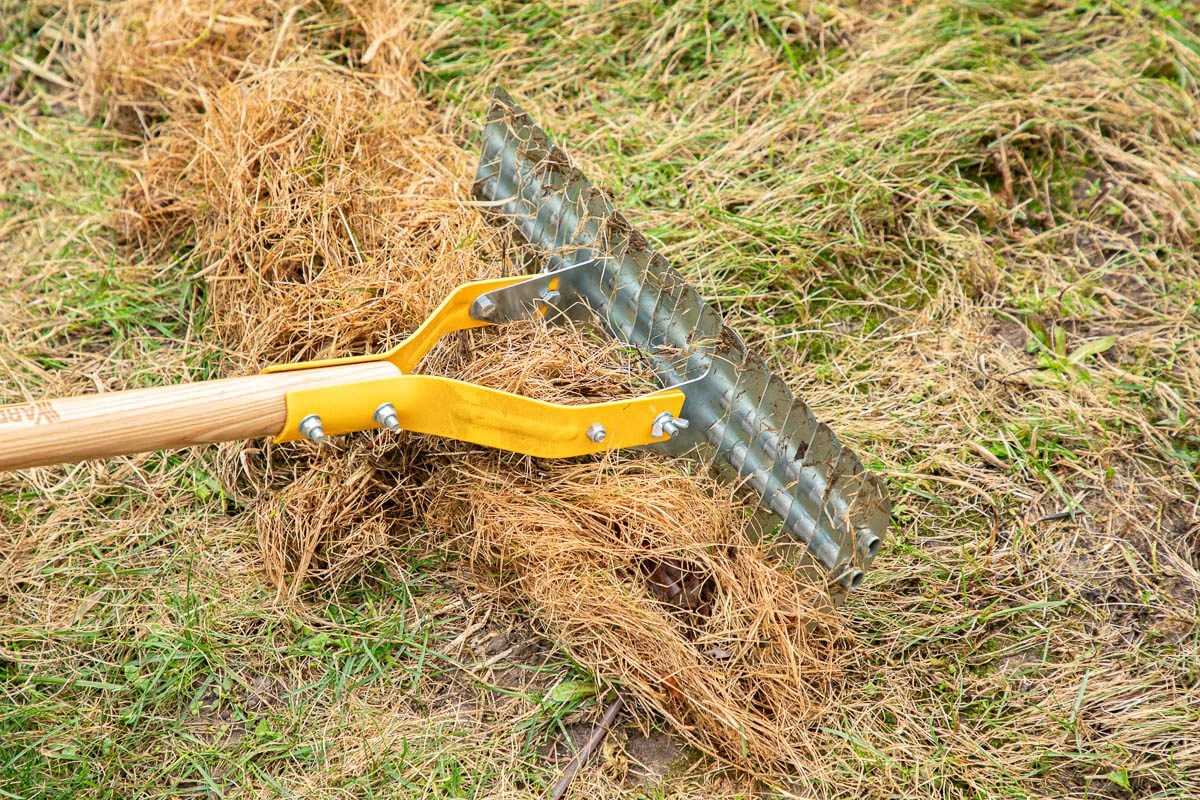
Manual Thatch Rake
A manual thatch rake has sharp, curved blades designed to dig into the turf and pull up thatch. It works well for small lawns, narrow areas, and spot treatments. It is inexpensive and effective, but it requires effort. If your lawn is larger than a small front yard, a manual rake may turn dethatching into a full-body workout with bonus blisters.
Power Rake or Dethatcher
A power rake, sometimes called a dethatcher, uses rotating tines to pull thatch up to the surface. It is useful for medium to large lawns with moderate thatch buildup. Power rakes are commonly available at equipment rental centers and can save hours compared with manual raking.
Power rakes can be rough on grass, especially if set too low. The goal is to lift thatch, not excavate your yard like an enthusiastic archaeologist. Always start with a conservative setting and adjust as needed.
Vertical Mower or Verticutter
A vertical mower, or verticutter, has vertical blades that cut through the thatch layer and sometimes slightly into the soil. It is more aggressive than a light dethatcher and can be useful for heavy thatch or lawn renovation projects. It may also create grooves that improve seed-to-soil contact when overseeding.
Because verticutting can be intense, it should be done carefully and at the right time of year. For some lawns, hiring a professional may be the smarter option, especially if the thatch layer is very thick or the grass type requires careful blade spacing.
Core Aerator
Core aeration is not exactly the same as dethatching, but it can help reduce thatch over time while also relieving soil compaction. A core aerator removes small plugs of soil and thatch from the lawn. As the cores break down, soil microbes mix with organic material and help decompose thatch naturally.
For compacted lawns, core aeration may be more beneficial than dethatching alone. If your lawn has both thick thatch and compacted soil, aerating before or after dethatching can improve recovery and long-term grass health.
How to Dethatch a Lawn Step by Step
Dethatching is not difficult, but it works best when you prepare properly. Follow these steps to avoid unnecessary lawn damage and give your grass the best chance to recover quickly.
Step 1: Measure the Thatch Layer
Before you rent equipment or attack the lawn with a rake, measure the thatch. Cut a small plug or wedge from the lawn and inspect the side. If the thatch layer is less than one-half inch thick, you probably do not need to dethatch. In that case, focus on mowing, watering, fertilizing, and aerating correctly.
If the thatch layer is over one-half inch, dethatching may help. If it is more than one inch thick, do not try to remove everything in one brutal session. Removing a very thick layer all at once can badly damage the turf. Plan to reduce it gradually over more than one season if needed.
Step 2: Mow the Lawn Slightly Lower Than Usual
Mow the lawn a little shorter than normal before dethatching. This helps the rake or machine reach the thatch layer more easily. Do not scalp the lawn down to dirt. Cutting too low can stress the grass before the real work even begins.
Bag or remove the clippings if they are heavy. You want the dethatching tool to reach the thatch, not fight through a fresh blanket of clippings.
Step 3: Water Lightly Before Dethatching
The soil should be slightly moist, not soggy. Light moisture helps the dethatching equipment work through the turf without bouncing across a rock-hard surface. However, dethatching wet soil can tear the lawn and create a muddy mess. Aim for “soft enough to work” rather than “swamp with grass accessories.”
Step 4: Mark Sprinklers and Shallow Irrigation Lines
Before using a power rake or vertical mower, mark sprinkler heads, irrigation boxes, shallow cables, and any hidden obstacles. Dethatching machines are not sentimental. If they hit something, they may damage it quickly and loudly.
Step 5: Dethatch in One Direction
Start with one pass across the lawn. If using a manual rake, pull the rake through the grass to lift the thatch to the surface. If using a machine, follow the rental instructions and keep a steady pace. Avoid lingering in one spot because that can dig too deeply and damage the turf.
After the first pass, inspect the lawn. You should see loosened brown debris on the surface. If almost nothing comes up, the setting may be too high. If the machine is ripping out living grass aggressively, it may be too low.
Step 6: Make a Second Pass if Needed
For moderate thatch, a second pass at a perpendicular angle may be useful. This helps lift material missed during the first pass. However, do not automatically make multiple aggressive passes. More is not always better. Your lawn is a living plant community, not a carpet you are trying to deep-clean before guests arrive.
Step 7: Rake and Remove the Debris
After dethatching, rake up the loosened material. There may be a shocking amount. Many homeowners discover that their lawn has been secretly storing enough brown fluff to stuff a small sofa. Remove the debris from the lawn so it does not settle back down and smother the grass.
Healthy thatch debris can often be composted, but avoid composting material that may contain disease, weed seeds, or herbicide residues. If in doubt, dispose of it according to local yard waste guidelines.
Step 8: Water, Fertilize, and Overseed as Needed
After dethatching, water the lawn deeply enough to help it recover. If the season is right, apply fertilizer based on soil test recommendations. Avoid dumping on extra nitrogen just because the lawn looks roughed up. Overfertilizing can contribute to future thatch buildup.
Dethatching often exposes thin areas, making it a good time to overseed cool-season lawns in early fall. Seed-to-soil contact is essential, so rake bare spots lightly, apply the right seed for your region, and keep the seedbed consistently moist until germination.
Dethatching vs. Aerating: What Is the Difference?
Dethatching removes or loosens the organic layer above the soil. Aerating removes plugs from the soil and thatch layer to improve air, water, and root movement. Both can improve lawn health, but they solve slightly different problems.
If your lawn has a thick thatch layer but the soil is not compacted, dethatching may be enough. If your lawn is compacted, drains poorly, or sees heavy foot traffic, core aeration may be more important. Many lawns benefit from both, especially when renovating thin turf.
Core aeration is often less destructive than aggressive power raking and offers the added benefit of reducing compaction. Over time, regular aeration can help manage thatch naturally by bringing soil microorganisms into contact with organic material.
Common Dethatching Mistakes to Avoid
Dethatching When It Is Not Needed
Do not dethatch just because it is on a spring lawn-care checklist. If the thatch layer is not too thick, unnecessary dethatching can injure healthy turf. Measure first. Your lawn will appreciate the due diligence, even if it does not send a thank-you card.
Using the Machine Too Aggressively
Setting a power rake or verticutter too low can tear out living grass and leave the lawn thin. Begin with a higher setting and adjust gradually. The goal is to remove excess thatch, not peel the lawn like an orange.
Dethatching During Heat or Drought
Dethatching during stressful weather can cause serious damage. Wait until the grass is actively growing and temperatures are moderate. If the lawn is drought-stressed, water and recovery should come before dethatching.
Skipping Cleanup
Leaving loosened thatch on the lawn defeats the purpose. Rake it up thoroughly. This step is not glamorous, but it is essential. Consider it the lawn-care version of washing dishes after cooking: nobody cheers, but everything works better afterward.
Ignoring the Cause of Thatch
If you dethatch but continue overwatering, overfertilizing, mowing too short, or neglecting soil health, the thatch will likely return. Dethatching fixes the buildup. Good lawn care fixes the pattern that caused the buildup.
How to Prevent Thatch from Coming Back
The best thatch management plan is prevention. Once your lawn has recovered, focus on habits that support healthy decomposition and strong root growth.
Mow at the Right Height
Mowing too short weakens grass and can encourage shallow roots. Follow recommended mowing heights for your grass type, and never remove more than one-third of the grass blade at a time. Frequent mowing at the correct height is better than occasional mowing that turns your mower into a hay baler.
Water Deeply but Infrequently
Shallow, frequent watering encourages shallow roots and can contribute to thatch problems. Most established lawns do better with deep, less frequent watering that moistens the root zone. Water early in the morning to reduce evaporation and disease pressure.
Fertilize Based on Soil Testing
Too much nitrogen can push rapid top growth and contribute to thatch buildup, especially in grasses that naturally produce more stems and rhizomes. A soil test helps you apply what the lawn actually needs instead of guessing with a spreader and optimism.
Core Aerate Compacted Soil
Compacted soil slows root growth and reduces air and water movement. Core aeration improves soil conditions and helps natural thatch decomposition. Lawns with heavy clay soil, frequent foot traffic, or poor drainage may benefit from regular aeration.
Choose the Right Grass for Your Region
Some grasses produce more thatch than others. Bermudagrass, zoysiagrass, Kentucky bluegrass, and creeping red fescue can build thatch more readily than tall fescue or perennial ryegrass. Choosing a grass suited to your climate, soil, sun exposure, and maintenance level makes long-term lawn care easier.
Experience-Based Tips for Dethatching a Lawn
Anyone can read the instructions on a dethatcher rental tag, but real lawn work has a way of adding personality. The machine vibrates, the debris pile triples in size, and suddenly the “quick Saturday project” becomes an event with snacks, water breaks, and a sincere respect for turf professionals. Here are practical experience-based tips that make dethatching smoother, cleaner, and less likely to end with you staring at the lawn in regret.
First, do not underestimate the cleanup. The actual dethatching pass may take less time than raking and hauling the debris afterward. Even a modest lawn can produce bags and bags of brown material. Have leaf bags, a tarp, a wheelbarrow, or a lawn sweeper ready before you start. A tarp is especially useful because you can rake debris onto it and drag it to the compost pile or curb. Without a plan, you may end up with thatch tumbleweeds rolling around the yard like a low-budget Western.
Second, test a small area before committing to the whole lawn. Choose a less visible corner and make one pass with your rake or machine. Check how much thatch comes up and how the grass responds. This quick test helps you adjust the blade depth or tine setting. It also prevents the classic beginner mistake of setting the machine too low and creating a dramatic dirt stripe across the front yard where everyone walking a dog can admire it.
Third, sharpen your timing around weather. Dethatching before a stretch of mild temperatures and light rain is ideal. Dethatching before a heat wave is asking your lawn to recover while sitting under a broiler. If the forecast shows several hot, dry days, postpone the project. Your future self will be grateful, and your grass will not look like it filed a complaint.
Fourth, combine dethatching with overseeding only when the season supports seed germination. For cool-season lawns, early fall is often perfect because soil is still warm, air temperatures are cooler, and new seedlings have time to establish before winter. Spread seed after debris cleanup, make sure it contacts the soil, and keep the surface consistently moist. Do not let new seed dry out during germination. Baby grass is adorable, but it is also needy.
Fifth, be patient with the lawn’s appearance after dethatching. A freshly dethatched lawn can look worse before it looks better. This is normal. You have just pulled out a layer of dead material and roughed up the turf. With proper watering, sensible fertilizing, and good weather, the grass should begin filling in. Avoid heavy foot traffic for a little while, and do not mow until the grass has had a chance to stand back up and resume active growth.
Finally, treat dethatching as part of a lawn-health system, not a yearly ritual performed out of guilt. Many lawns do not need dethatching every year. Some need aeration more than dethatching. Some need better watering habits. Some need less fertilizer, taller mowing, improved drainage, or a grass variety that actually likes the site. The healthiest lawns come from observation, not autopilot. Measure the thatch, understand your grass type, and choose the least disruptive fix that solves the problem.
Conclusion
Dethatching a lawn can be one of the most effective ways to restore healthier grass when excess thatch is blocking water, air, and nutrients from reaching the soil. The key is knowing when it is truly needed. Measure the thatch layer first, dethatch only when buildup is more than about one-half inch, and work during the active growing season so the lawn can recover quickly.
For small lawns, a manual thatch rake may be enough. For larger lawns, a power rake, dethatcher, or vertical mower can make the job more efficient. After dethatching, always remove the debris, water properly, and consider overseeding thin areas if the timing is right. To keep thatch from returning, mow at the right height, water deeply but less often, fertilize based on soil needs, and core aerate compacted areas.
A beautiful lawn is not about doing every lawn-care task every year. It is about doing the right task at the right time. Dethatching is powerful when your lawn needs it and unnecessary when it does not. Measure first, work carefully, and your grass will have a much better chance to grow thicker, greener, and healthier without feeling like it is trapped under a scratchy brown blanket.
