Hair Care
How to Build a Trebuchet (1 Meter Scale)
Jun
Building a 1 meter scale trebuchet is one of those projects that makes physics stop acting like a sleepy textbook and start behaving like a tiny medieval drama queen. A weight drops, an arm swings, a sling snaps forward, and suddenly a foam ball is sailing across the yard like it has urgent royal business. That is the charm of a trebuchet: it is simple enough to build with common workshop materials, but clever enough to teach leverage, gravity, energy transfer, projectile motion, and the engineering design process in one noisy little package.
This guide shows you how to build a safe classroom-style trebuchet about 1 meter tall. The goal is not to create a dangerous launcher. The goal is to make a sturdy, adjustable STEM model that can toss lightweight projectiles such as foam balls, rolled paper balls, or marshmallows in a controlled testing area. No rocks, metal objects, glass, hard clay, or “I found this in the garage and it looks launchable” projectiles. Your trebuchet should be fun, not a local news segment.
What Is a Trebuchet?
A trebuchet is a gravity-powered throwing machine that uses a long arm on a pivot. One end carries a counterweight, and the other end carries a sling or pouch for the projectile. When the counterweight drops, the long arm rises quickly and pulls the sling forward. At the right moment, the sling releases the projectile into the air.
The classic counterweight trebuchet is a first-class lever because the pivot sits between the counterweight and the projectile. The short arm holds the counterweight; the long arm moves faster and farther. That uneven arm length is the secret sauce. It turns a slow, heavy drop into a fast sweeping motion. Add a sling, and the projectile gets an extra whip-like boost at the end of the throw.
Safety First: Build a Model, Not a Menace
Before cutting wood or testing launches, set some rules. Wear safety glasses when cutting, drilling, sanding, or testing. Keep fingers away from the swinging arm and counterweight. Test only outdoors or in a gym-sized open space. Create a launch lane with nobody in front, beside, or behind the trebuchet. Use lightweight projectiles only. If your model begins creaking, twisting, or wobbling, stop testing and reinforce the frame.
For this 1 meter scale version, keep the counterweight modest. A safe starting range is 1 to 2 kilograms, using sandbags, water bottles, or a small bucket of washers secured with a lid. More weight is not automatically better. In fact, too much counterweight can bend the axle, crack the frame, and turn your elegant physics project into kindling with opinions.
Tools and Materials
Recommended Materials
- Two 1 x 3 inch boards, 8 feet long, for the main frame and base
- One 1 x 2 inch board, 8 feet long, for braces and the throwing arm
- One wooden dowel or metal rod, about 10 to 12 mm diameter, for the axle
- Small plywood scraps for gussets and counterweight support
- Wood screws, 1 to 1.5 inches long
- Wood glue
- Two eye screws or small hooks
- Strong cord, paracord, or braided nylon string
- Small fabric pouch for the sling
- Bucket, bottle, or fabric bag for the counterweight
- Foam balls, marshmallows, or rolled paper balls for projectiles
Recommended Tools
- Measuring tape or meter stick
- Pencil and square
- Hand saw or miter saw
- Drill and drill bits
- Screwdriver or driver bit
- Sandpaper
- Safety glasses
- Clamps, if available
Suggested Dimensions for a 1 Meter Trebuchet
The following dimensions create a stable educational model. You can adjust them after testing, but this layout gives beginners a reliable starting point.
- Overall height: about 100 cm
- Base length: 90 cm
- Base width: 45 cm
- A-frame height: 85 to 95 cm
- Axle height: about 75 cm
- Throwing arm length: 95 to 105 cm
- Arm ratio: about 3:1 or 4:1, long side to short side
- Short arm: 20 to 25 cm
- Long arm: 75 to 85 cm
- Sling length: 55 to 75 cm for early testing
- Counterweight: start with 1 kg, then test carefully up to 2 kg
A 4:1 arm ratio usually gives a lively throw without making the frame too stressed. If the short end is 22 cm and the long end is 88 cm, you have a practical ratio for a 1 meter scale trebuchet.
Step 1: Build the Base
Cut two base rails to 90 cm and two crosspieces to 45 cm. Arrange them into a rectangle. Apply wood glue at the corners, clamp if possible, and fasten with screws. This rectangle is the foundation, so do not rush it. A crooked base makes the trebuchet lean, wobble, and generally behave like a shopping cart with one bad wheel.
Add a third crosspiece across the middle of the base. This gives the A-frame supports something solid to attach to and reduces twisting during launch. If you plan to test outdoors on grass, you can also add small plywood feet under the corners to keep the frame level.
Step 2: Make Two A-Frame Supports
Cut four angled legs, each about 90 cm long. These will form two tall triangles, one on each side of the base. Place two legs on a flat surface so they meet near the top like a capital letter A. The bottom ends should sit about 45 cm apart, matching the width of the base.
Mark the axle position about 75 cm above the base. Drill matching holes through both A-frame tops for the axle. The holes should be level and aligned. If the axle is crooked, the throwing arm will rub, bind, and steal energy from the launch.
Attach each A-frame to the base with screws and glue. Then add diagonal braces from the legs down to the base. Triangles are your best friends in this project. Squares wobble. Triangles stand firm and quietly judge squares for their poor life choices.
Step 3: Build the Throwing Arm
Cut the throwing arm to about 100 cm. Mark the pivot point so the short end is around 22 cm and the long end is around 78 cm. Drill a clean axle hole at that mark. The arm should rotate freely around the axle without too much side-to-side slop.
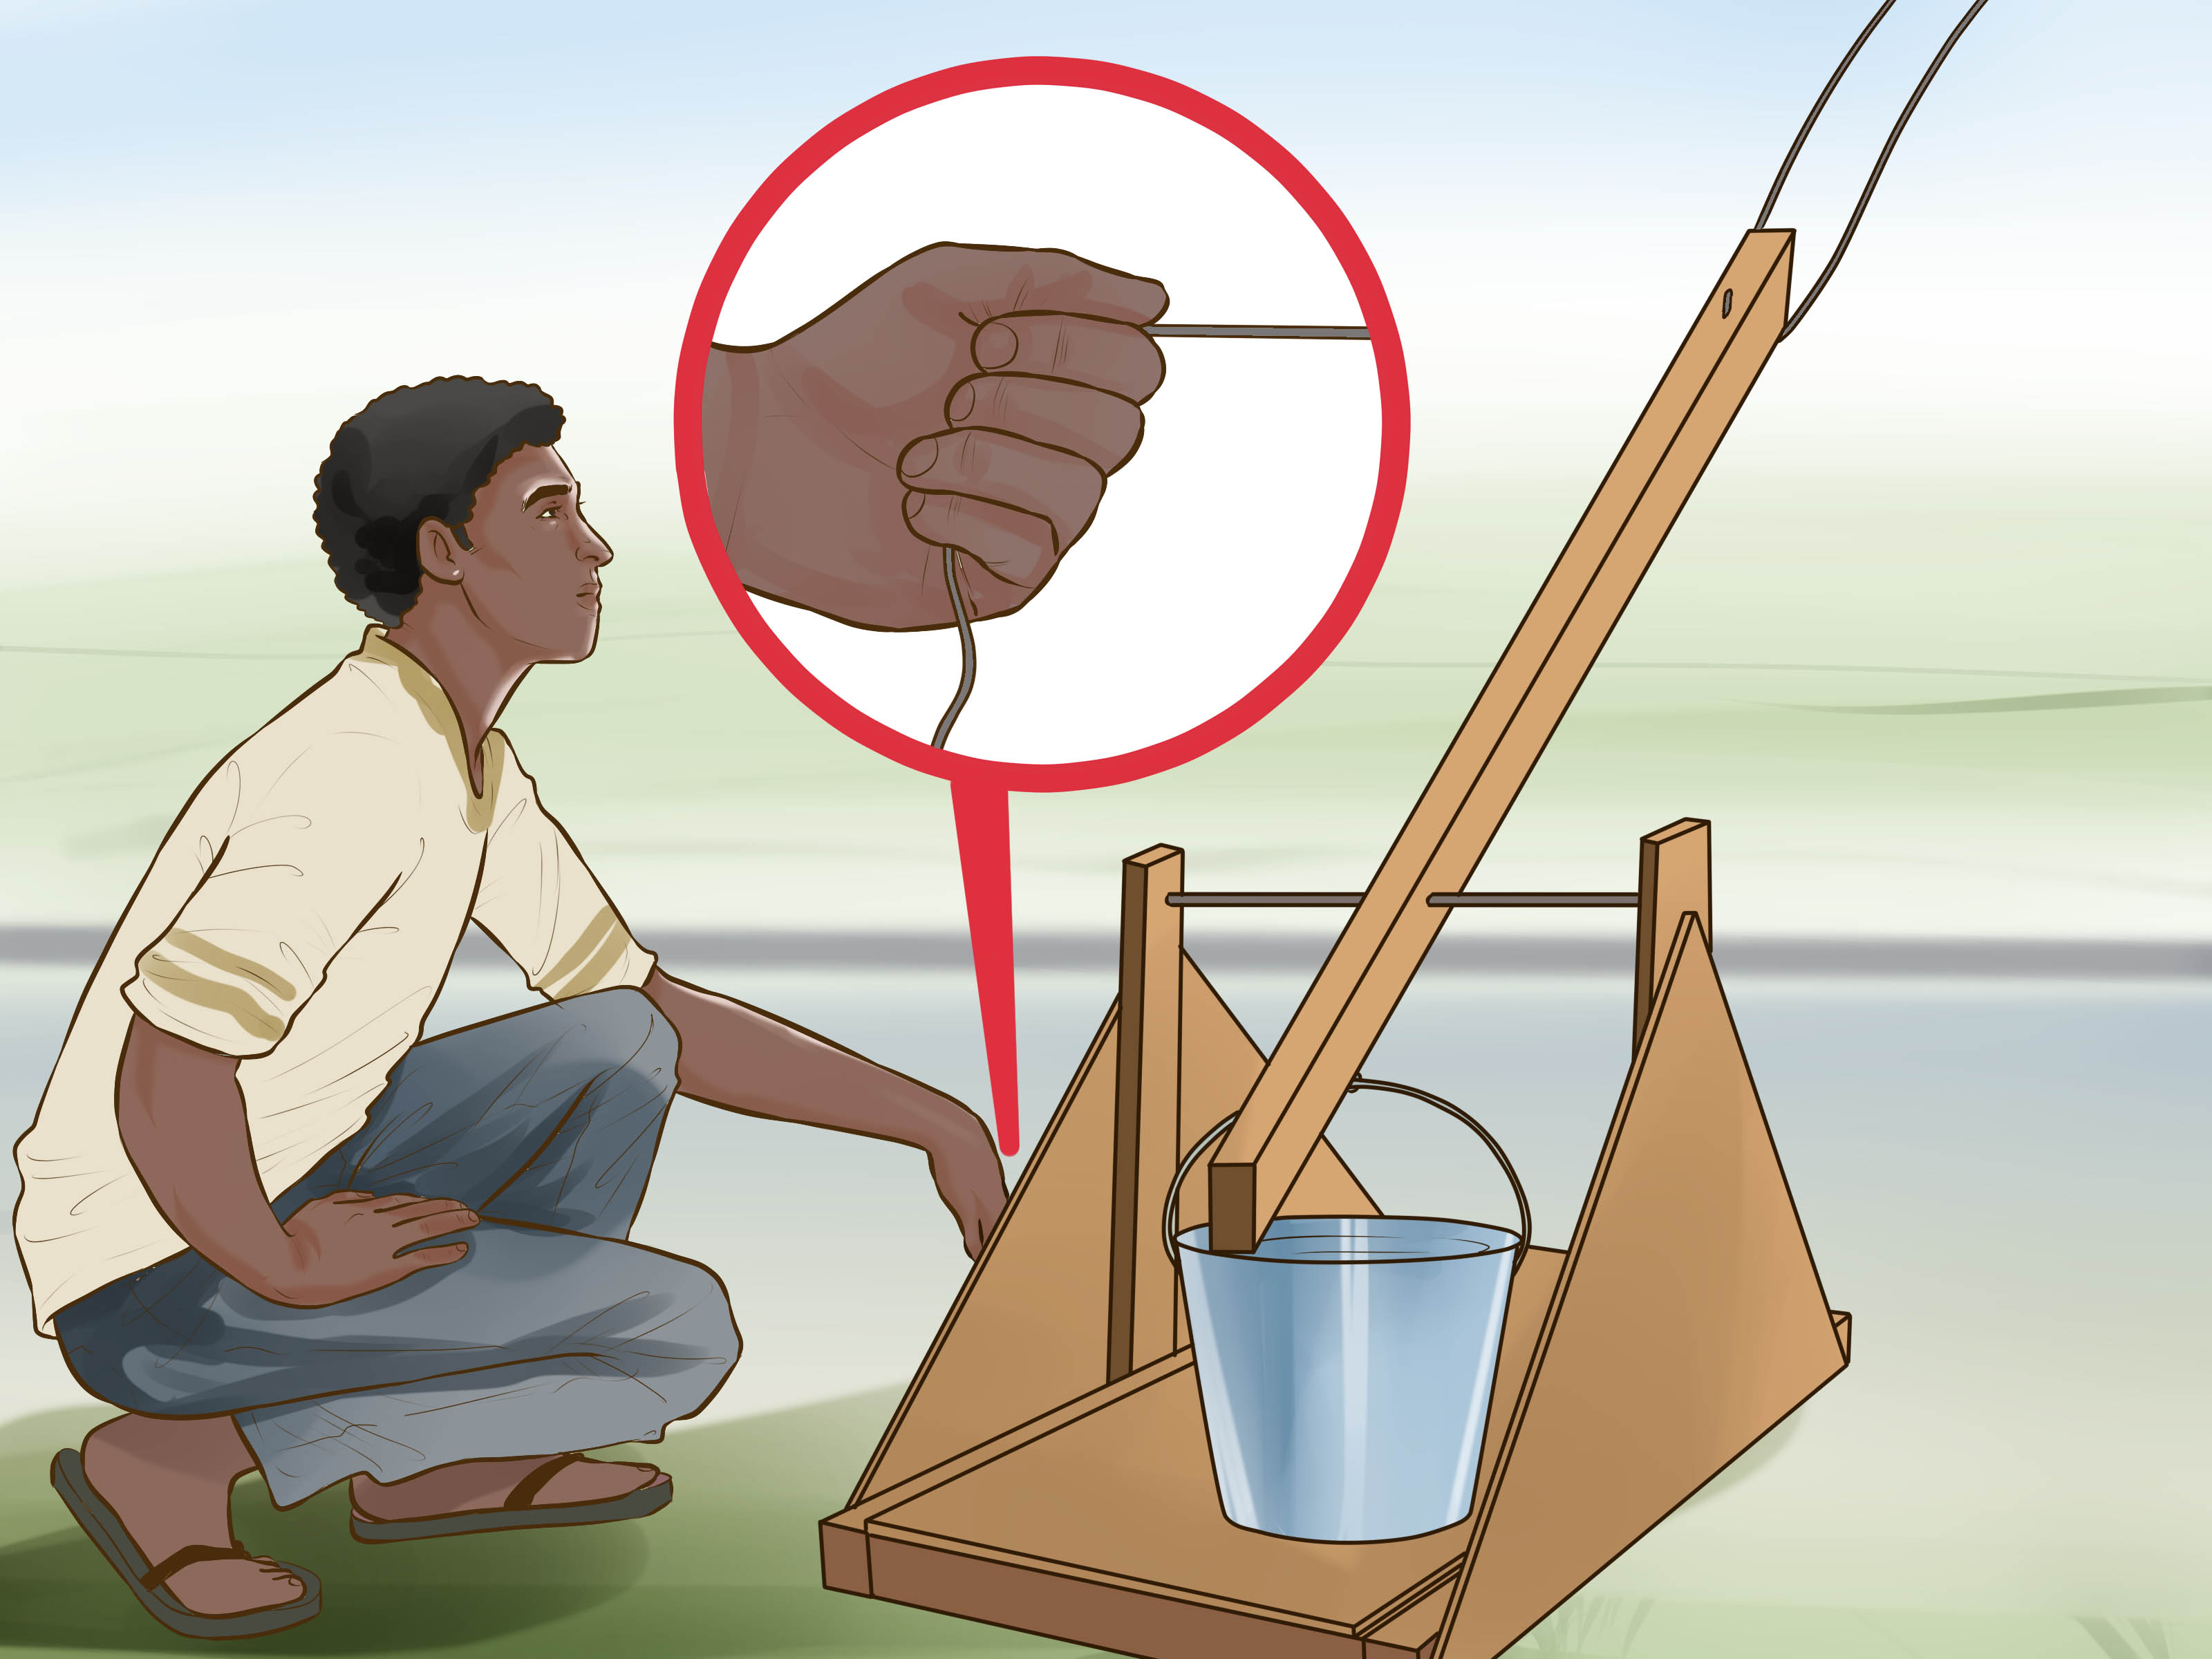
At the short end, install an eye screw or small bracket for the counterweight. At the long end, install a small hook, nail, or bent wire release pin. This release pin is where one loop of the sling will slip off during launch. Start with the pin angled slightly upward, around 30 to 45 degrees from the arm. Later, you can bend or adjust it to tune the release angle.
Step 4: Install the Axle and Arm
Slide the axle through one A-frame support, through the throwing arm, and then through the other support. Add washers if you have them. The arm should swing smoothly with minimal friction. If it scrapes the frame, add spacers or sand the contact points.
Spin the arm slowly by hand. It should move freely without binding. This boring little test matters. A trebuchet with a sticky pivot wastes energy, produces short throws, and makes you wonder why your medieval engineering career is off to such a disappointing start.
Step 5: Add the Counterweight
Attach the counterweight to the short arm using a secure loop of cord or a small hanging bucket. A swinging counterweight is often more efficient than a rigid one because it can move naturally as the arm rotates, but for a beginner model, simple and secure is more important than perfect efficiency.
Start with about 1 kilogram. A sealed bottle filled with water or sand works well. If you use loose washers, rocks, or sand, place them inside a lidded container or fabric bag that cannot spill. The counterweight should hang freely and should not crash into the frame during the swing.
Step 6: Make the Sling
Cut a small fabric rectangle about 10 cm by 15 cm for the pouch. Punch or sew a hole near each end. Tie one cord to each hole. The two cords should be equal length at first, around 60 cm. One cord will be fixed permanently to the end of the throwing arm. The other cord will have a loop that slips over the release pin.
The sling is where the trebuchet becomes more interesting than a plain catapult. A longer sling can increase speed, but if it is too long, it may release late, wrap around the arm, or slap the ground like a dramatic noodle. Begin with 60 cm and adjust in small steps.
Step 7: Create a Simple Trigger
For a safe model, you can use a basic pull-pin trigger. Drill a small hole through the base behind the arm’s lowered position. Tie a cord to the long arm, pull the arm down, and secure it with a removable pin or dowel. When everyone is clear, pull the release cord from the side or behind the trebuchet.
Never hold the throwing arm down by hand during launch. Never lean over the frame while the counterweight is raised. A trebuchet stores energy when the counterweight is lifted, and stored energy has a rude habit of leaving suddenly.
Step 8: Test With Lightweight Projectiles
Place a foam ball or marshmallow in the sling pouch. Pull the arm down until the counterweight rises. Secure the trigger. Step back. Confirm that the launch zone is clear. Pull the trigger cord.
Your first launch may not be heroic. The projectile may fly backward, drop straight down, or roll out early with the confidence of a potato. That is normal. Trebuchets are adjustable machines. The first test is not the final performance; it is a conversation with gravity.
How to Tune the Trebuchet
If the Projectile Flies Too Low
The sling may be releasing too early. Try bending the release pin slightly upward or shortening the sling. You can also reduce the counterweight if the motion is too violent.
If the Projectile Shoots Straight Up
The sling is probably releasing too late. Bend the release pin slightly downward or shorten the sling. Late release wastes distance and may send the projectile into the sky instead of toward the target.
If the Projectile Falls Out Early
Deepen the sling pouch, make the cords equal, and check that the projectile sits centered. A shallow pouch is fine for marshmallows but less reliable for foam balls.
If the Frame Shakes
Add diagonal braces. Tighten screws. Check that the base is flat. A shaky frame steals energy and increases risk. The trebuchet should look like a tiny bridge, not a nervous ladder.
The Physics Behind the Throw
A trebuchet begins with gravitational potential energy in the raised counterweight. When the trigger releases, the counterweight drops. That energy becomes kinetic energy in the swinging arm, rotating axle, sling, and projectile. The long end of the arm moves faster than the short end because it travels a greater distance in the same rotation time.
The sling acts like a second lever. It extends the path of the projectile and increases its release speed. The release angle controls the flight path. For many classroom trebuchets, a launch angle near 40 to 45 degrees gives good range, but real results depend on sling length, projectile weight, counterweight mass, friction, arm ratio, and timing.
This is why trebuchets are excellent STEM projects. You can change one variable at a time and collect data. Try three sling lengths while keeping the counterweight the same. Then try three counterweights while keeping the projectile the same. Measure launch distance, record results, and look for patterns. Congratulations: you are now doing engineering instead of merely flinging marshmallows at a cardboard castle. Though, honestly, both are respectable.
Common Mistakes to Avoid
- Using heavy projectiles: Keep launches soft and safe with foam or paper.
- Skipping braces: A tall frame needs diagonal support.
- Making the pivot hole too loose: Excess wobble reduces power and accuracy.
- Using a weak axle: A thin dowel can bend under counterweight load.
- Changing everything at once: Tune one variable at a time.
- Ignoring the sling: Sling length and release pin angle often matter more than adding more counterweight.
Example Testing Plan
Set a tape measure along the launch lane. Use the same foam ball for every launch. Start with a 1 kg counterweight, a 60 cm sling, and a 35 degree release pin angle. Launch three times and record the distance. Then change only the sling to 65 cm and test three more times. Repeat with 70 cm. Average the results. This method helps you see what actually improved performance instead of relying on the ancient scientific method known as “that looked cooler.”
Experience Notes: What Building a 1 Meter Trebuchet Teaches You
The first real lesson from building a 1 meter trebuchet is that measuring twice is not a cute saying invented by people who own too many pencils. It matters. When the two A-frame sides do not match, the axle sits crooked. When the axle sits crooked, the throwing arm rubs. When the arm rubs, your beautiful launch becomes a sad wooden shrug. The best builders spend extra time making both sides identical before they ever touch the trigger.
The second lesson is that the sling is the personality of the machine. Beginners often obsess over the counterweight because it looks powerful. Add more weight, get more distance, right? Sometimes. But the sling decides whether the projectile releases forward, upward, backward, or directly into the ground like it suddenly remembered an appointment. A small adjustment to sling length or release pin angle can make a bigger difference than doubling the counterweight. That is the magic and mild annoyance of trebuchet tuning.
The third lesson is that lightweight projectiles are more useful than heavy ones. A foam ball gives repeatable launches, does not damage the model, and keeps the project safe. Heavy objects may seem more “authentic,” but authenticity is overrated when it cracks the frame or scares the family dog. If you want meaningful data, choose one safe projectile and use it consistently.
The fourth lesson is that a trebuchet is a team project disguised as a machine. One person measures, one holds the frame, one records distances, and one becomes the official safety announcer who says, “Clear!” with unnecessary seriousness. That teamwork makes troubleshooting easier. When a launch fails, everyone sees a different clue: the sling twisted, the counterweight hit a brace, the arm bounced, or the projectile slipped early.
The fifth lesson is patience. A good trebuchet rarely works perfectly on the first launch. It improves through small changes, careful notes, and the willingness to laugh when a marshmallow travels six inches and lands with the dignity of a dropped sock. That is not failure. That is data wearing a clown hat. By the end, you understand leverage, energy, friction, release timing, and structural stability in a way no worksheet can match.
Conclusion
A 1 meter scale trebuchet is a rewarding project because it combines history, woodworking, physics, and hands-on problem solving. Build a strong rectangular base, brace the A-frame, align the axle carefully, use a balanced throwing arm, and tune the sling patiently. Keep everything safe by using lightweight projectiles, modest counterweights, eye protection, and a clear launch zone.
The real value of this project is not just watching a foam ball fly. It is learning how small design choices change performance. A few centimeters of sling length, a slightly different release pin angle, or a better brace can transform the machine. That is engineering in miniature: test, measure, adjust, repeat, and try not to name the trebuchet something too dramatic. Actually, name it something dramatic. It earned it.
